Welcome to the FortiVoice Fast Track hands-on training.
This training provides practical experience deploying, configuring, and operating FortiVoice in a simulated enterprise environment. Throughout the labs, you will configure a FortiVoice system and progressively add the services required to build a functional voice solution.
The training begins with access to the virtual lab environment and the initial FortiVoice network configuration. You will then configure extensions and softphone clients before connecting the system to a simulated PSTN using SIP trunks.
As you progress through the labs, you will configure call routing and common telephony services, including ring groups, automated attendants, virtual numbers, call blocking, and eFax. You will also use Call Detail Records (CDRs) to review call activity and troubleshoot call flows.
The final section introduces FortiVoice emergency calling capabilities. You will configure an E911 emergency zone, notifications, call monitoring, and recording before validating the configuration using a simulated emergency call.
By the end of this training, you will be able to:
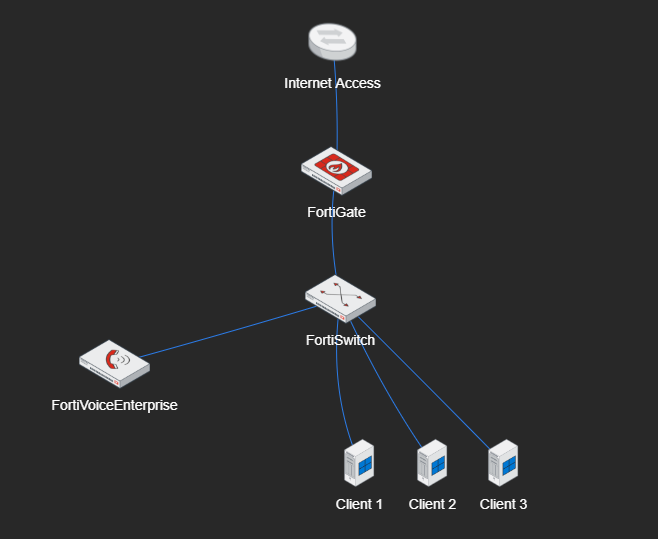
Each student is assigned a dedicated virtual lab environment containing a FortiVoice system and FortiFone clients. Shared infrastructure services provide DNS, NTP, RADIUS authentication, and a simulated PSTN for testing external calls.
The exercises are designed to build on one another. Unless instructed otherwise, complete the modules in order so that configuration performed in earlier exercises is available in subsequent labs.
Lab Performance: The virtual lab environment is designed for functional and feature testing, not for performance, capacity, or scalability testing. Because the environment uses shared and virtualized resources, its performance may differ from that of a production deployment. Performance observed during these exercises should therefore not be used to evaluate or benchmark FortiVoice performance.
Important: All telephone numbers, SIP services, and emergency calling scenarios used in this training are part of the simulated lab environment. The E911 exercises do not place calls to a real emergency service.
Written by
Consulting Systems Engineers: Aymeric Vampouille, Reginald Dewitte, and Veronica Izaguirre
A dedicated virtual training environment is provided for this course. Each student is assigned a unique lab number (N) and a dedicated environment that can be accessed through a web browser.
The environment includes a virtual FortiVoice system and three FortiFone clients, as well as shared infrastructure services such as DNS, RADIUS, NTP, and a SIP-based PSTN simulator.
FortiFone clients are accessed directly from within the virtualized training environment.
The FortiGate and FortiSwitch devices in the training environment are preconfigured and do not require any configuration or direct access during this training.
After completing this section, you will be able to:
Estimated: 10 minutes
You should have received an email containing detailed instructions for accessing the training environment.
The email can be identified by the following information:
This email contains the information required to access your lab environment, including the training environment URL, your assigned lab number, and the credentials required to log in.
Review the email before starting the training and verify the following prerequisites:
Access to the training environment is provided through FortiPAM.
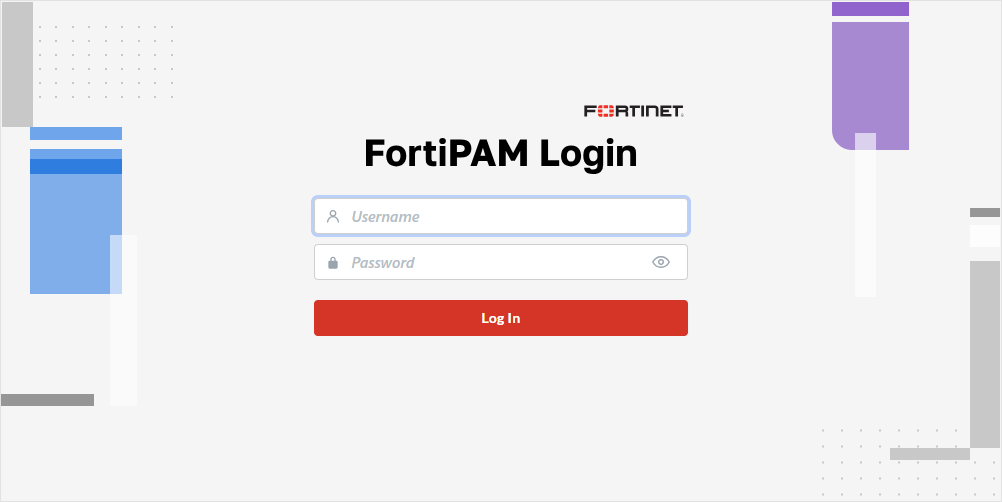
Click the link provided in the email to open the FortiPAM login page, then sign in using the credentials provided.
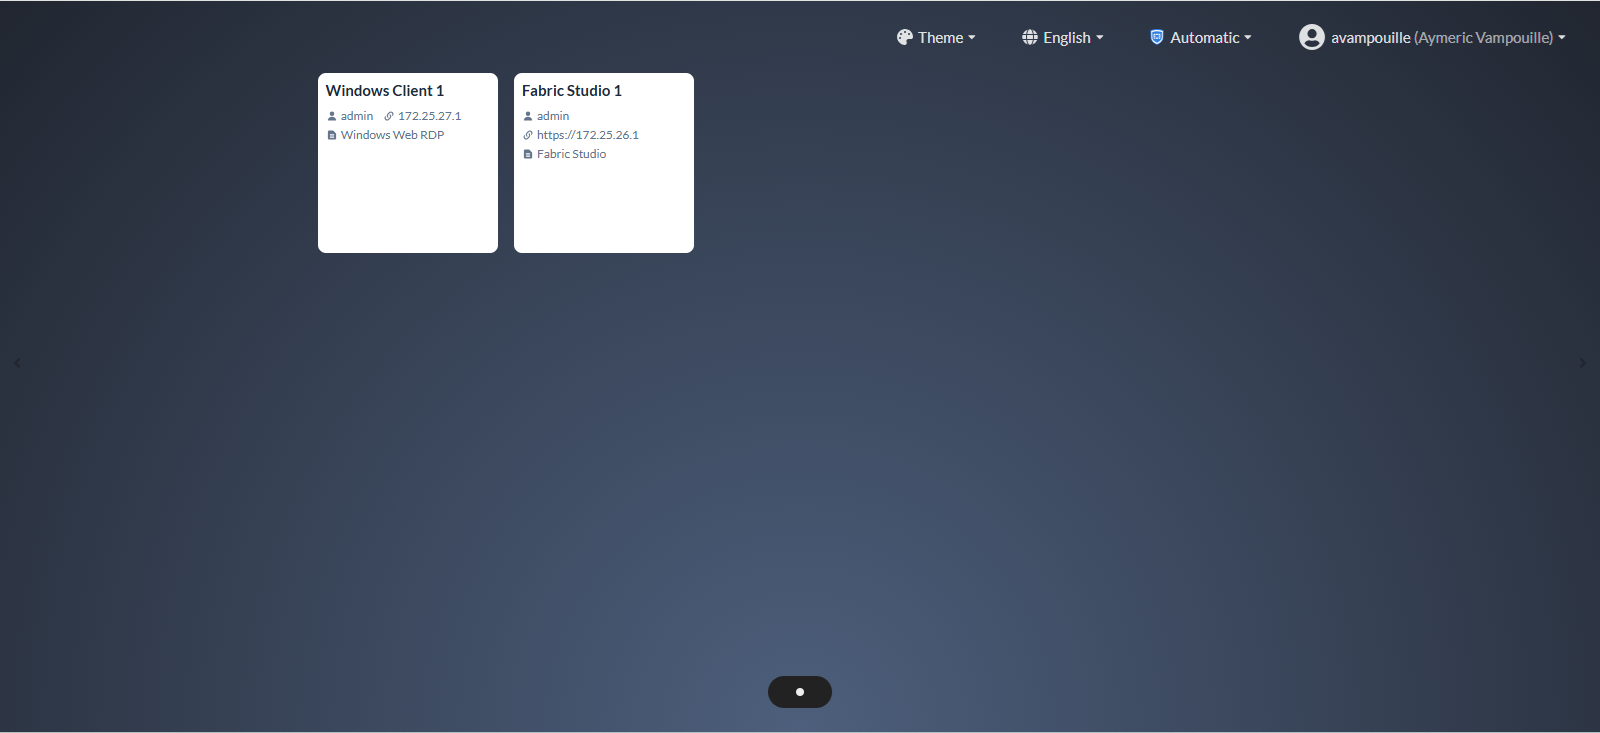
After authentication, the training dashboard is displayed.
Ensure that the FortiPAM mode is set to Automatic or Extension on the dashboard.
To change the mode, use the drop-down menu located in the upper-left corner, next to your username, and select the appropriate mode.
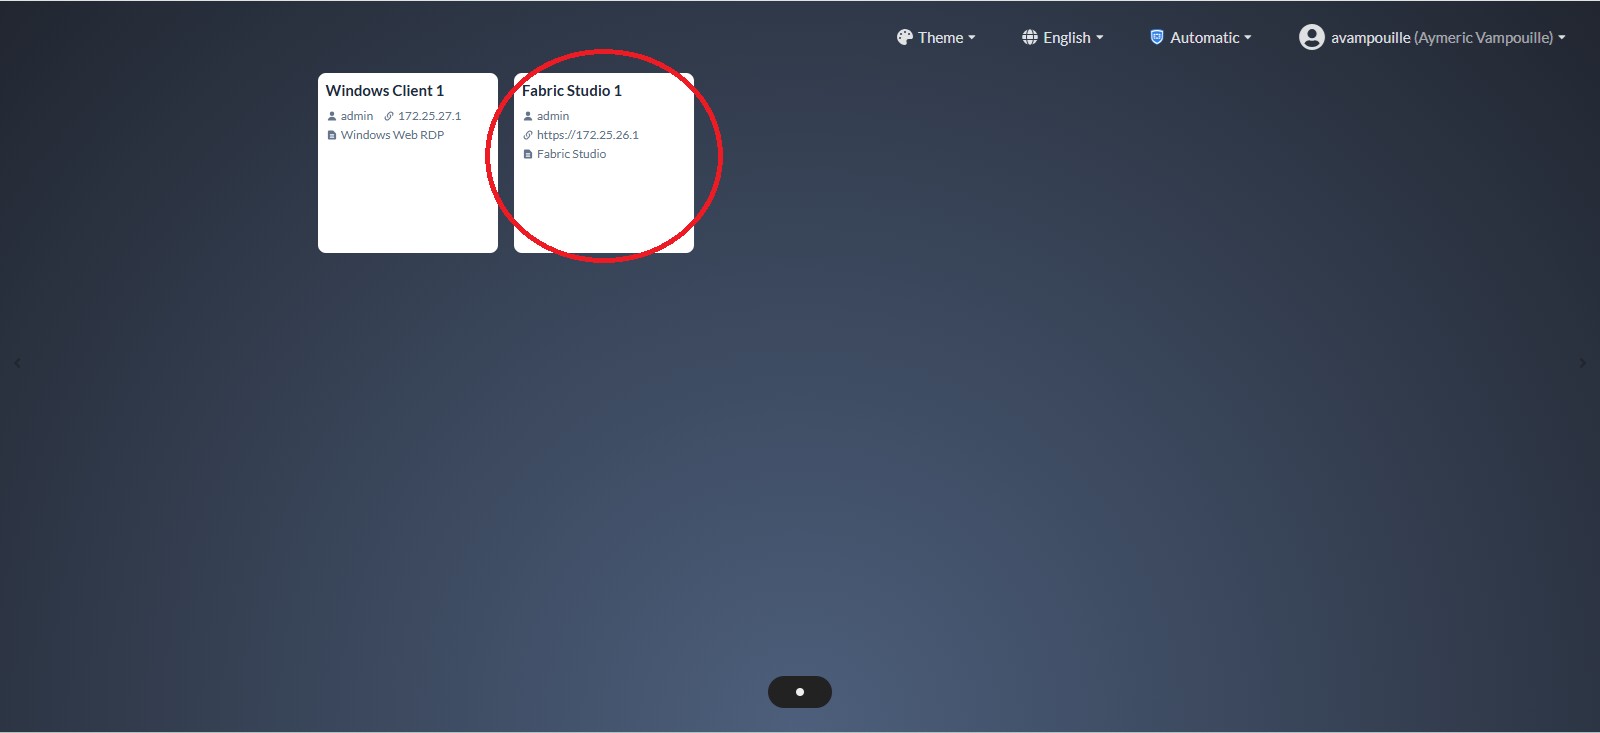
On the training dashboard, click the Fabric Studio tile to open the virtualization environment.
Click the Web Browsing icon.
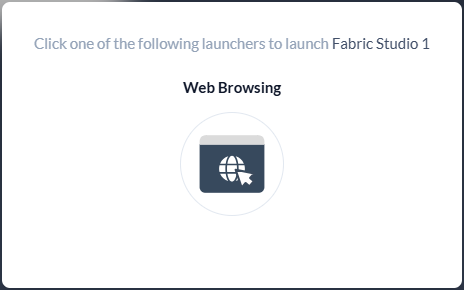
A new browser tab will open automatically. Switch to the newly opened tab to access the virtualization environment.
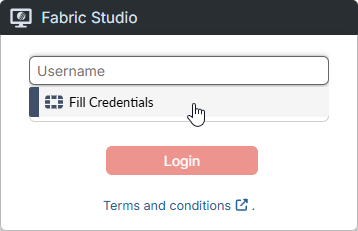
Sign in to the virtualization environment: click the Username field, click Fill Credentials, and then click Login.
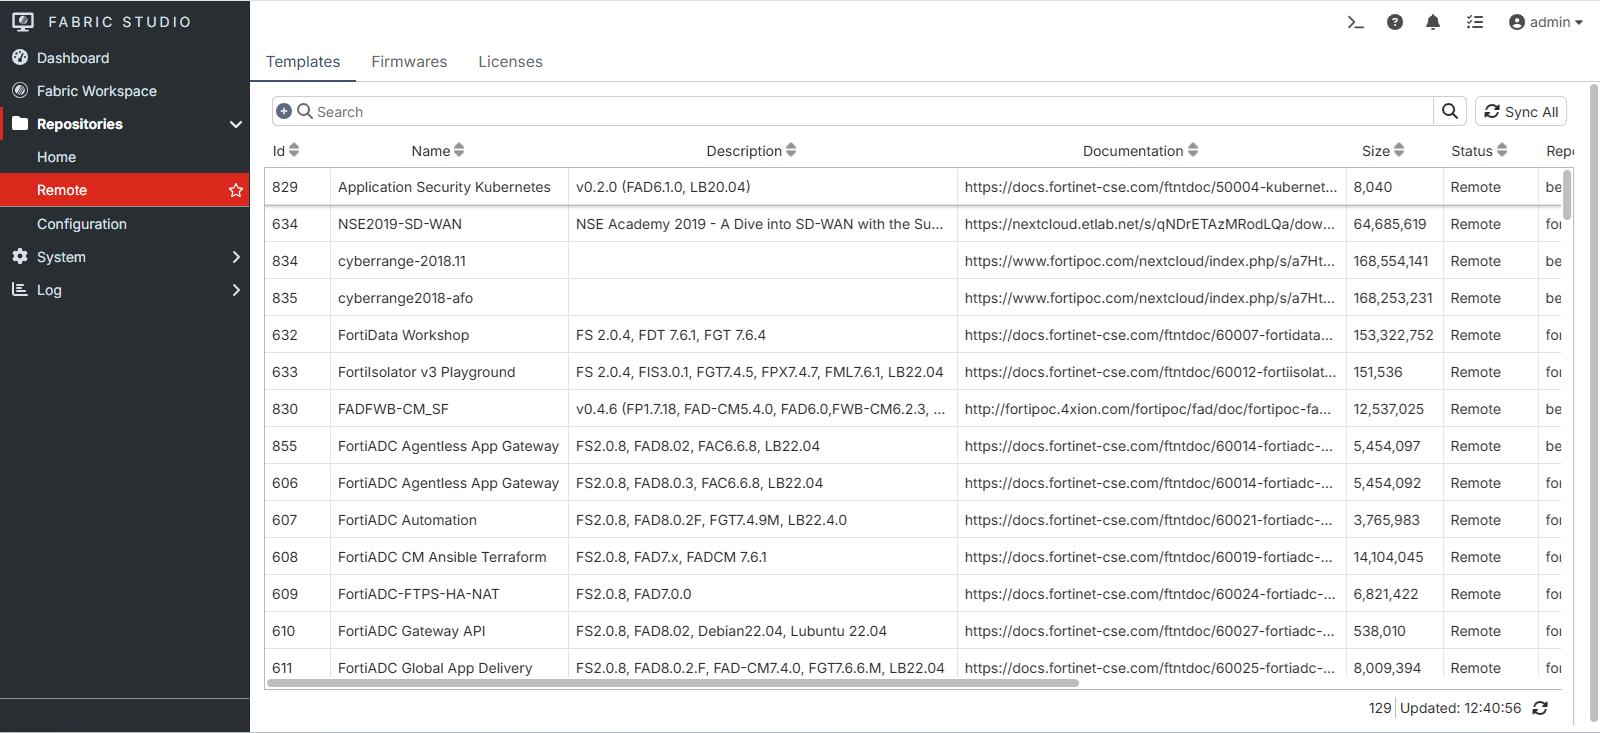
On the left-hand menu, select Repositories, and then select Remote.
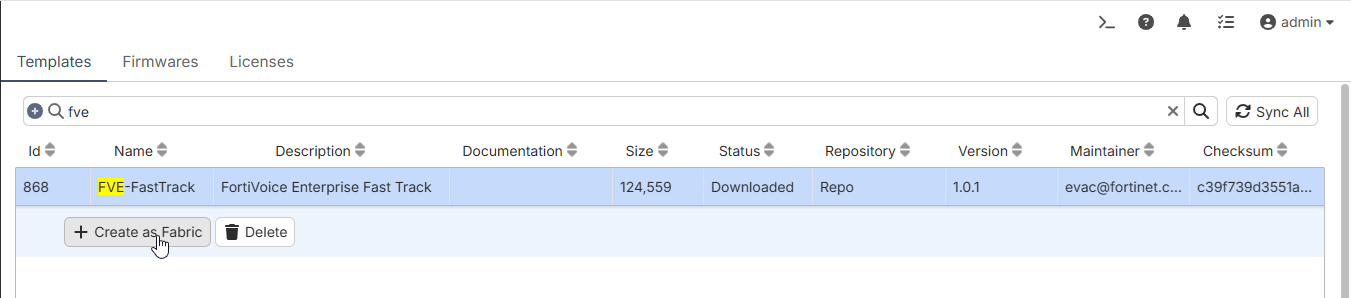
In the search bar, enter FVE to locate the training lab project.

Select the FVE-FastTrack lab project, and then click Create as Fabric to import the training lab into the virtualization environment.
Ensure version 1.0.2 is selected if there is more than one version of the lab project.
Once the training lab has been imported, select Fabric Workspace from the menu on the left.

Select the imported training lab, then click the Edit button to access the training lab environment.

Click the Install button to deploy and start the training lab in the virtualization environment.
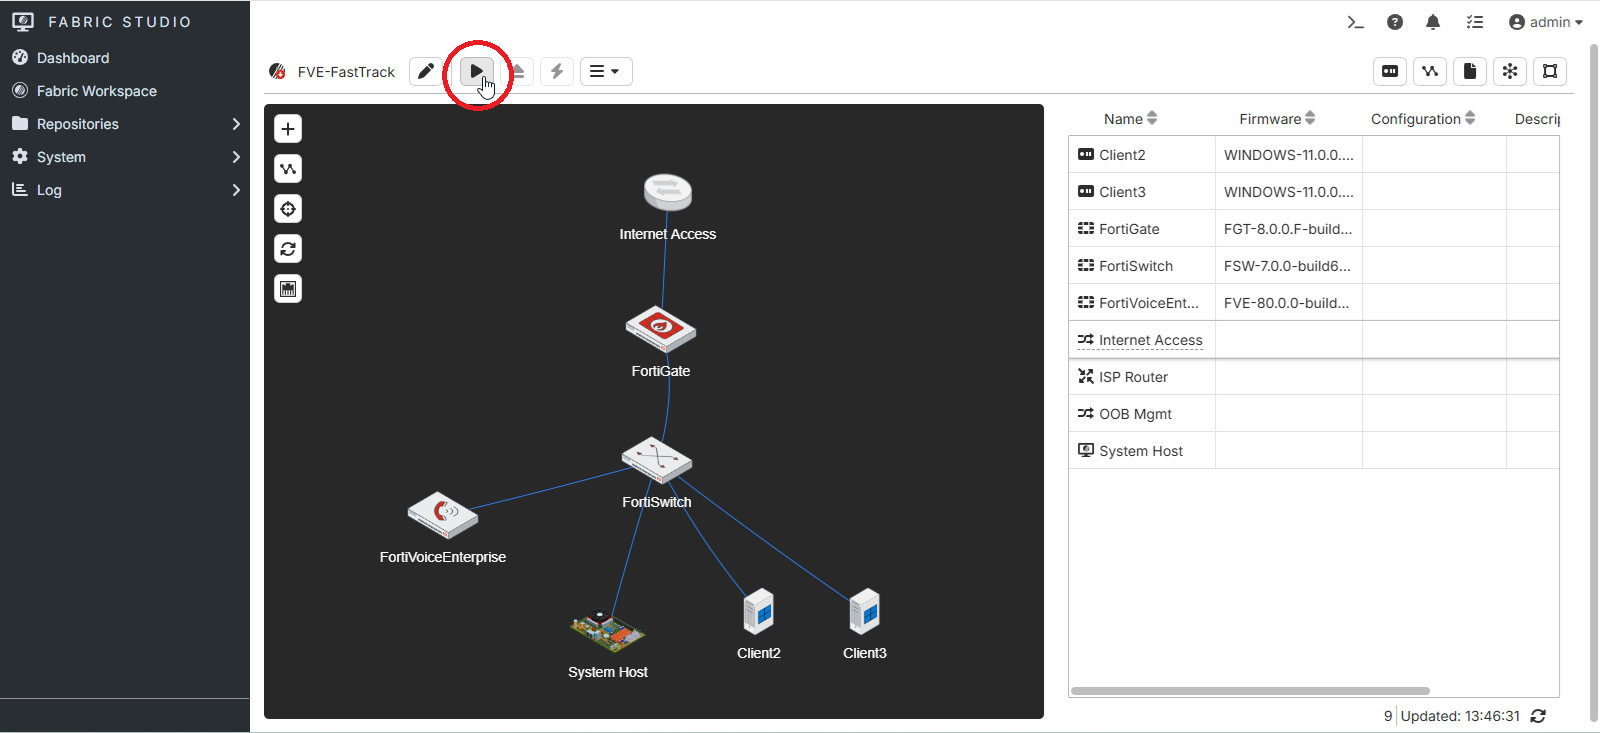
Click the OK button to confirm the installation.
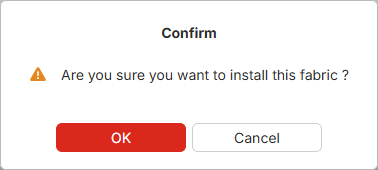
Wait for the training lab deployment to complete. This process may take a few minutes.
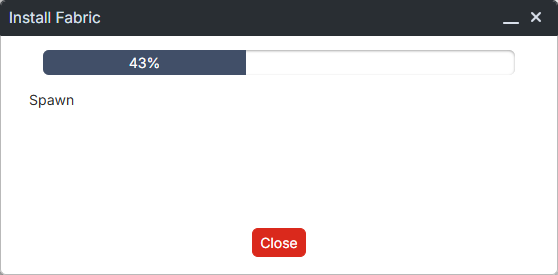
Once the installation is complete, click the Close button.
The training lab is now deployed and ready to use.
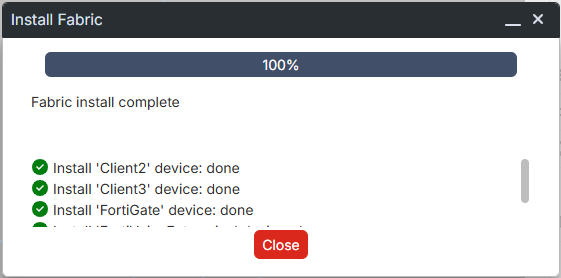
Within the training lab environment, right-click the FortiVoice Enterprise icon, select Access, and then choose HTTPS.

A new browser tab will open automatically. Switch to the newly opened tab to access the FortiVoice web administration page.

Log in to FortiVoice Enterprise using the following credentials:
adminfortinet4A!!
Before configuring extensions and telephony services, FortiVoice must be connected to the IP network and configured with the appropriate network settings.
In this section, you will configure the FortiVoice IP address and default route to provide connectivity to the lab network. You will also configure DNS for name resolution and NTP to synchronize the system time.
Finally, you will configure administrative access. FortiVoice supports local administrator accounts as well as external authentication services such as RADIUS.
The following network settings are used throughout this lab.
After completing this section, you will be able to:
Estimated: 15 minutes
The virtualization environment uses port1 on each virtual device as a dedicated management interface to access services such as HTTPS and SSH. Therefore, use port2 to connect FortiVoice Enterprise to the virtual lab network and carry lab traffic.
Using the FortiVoice web administration page, select System and Network on the left-hand menu and select the Network tab.
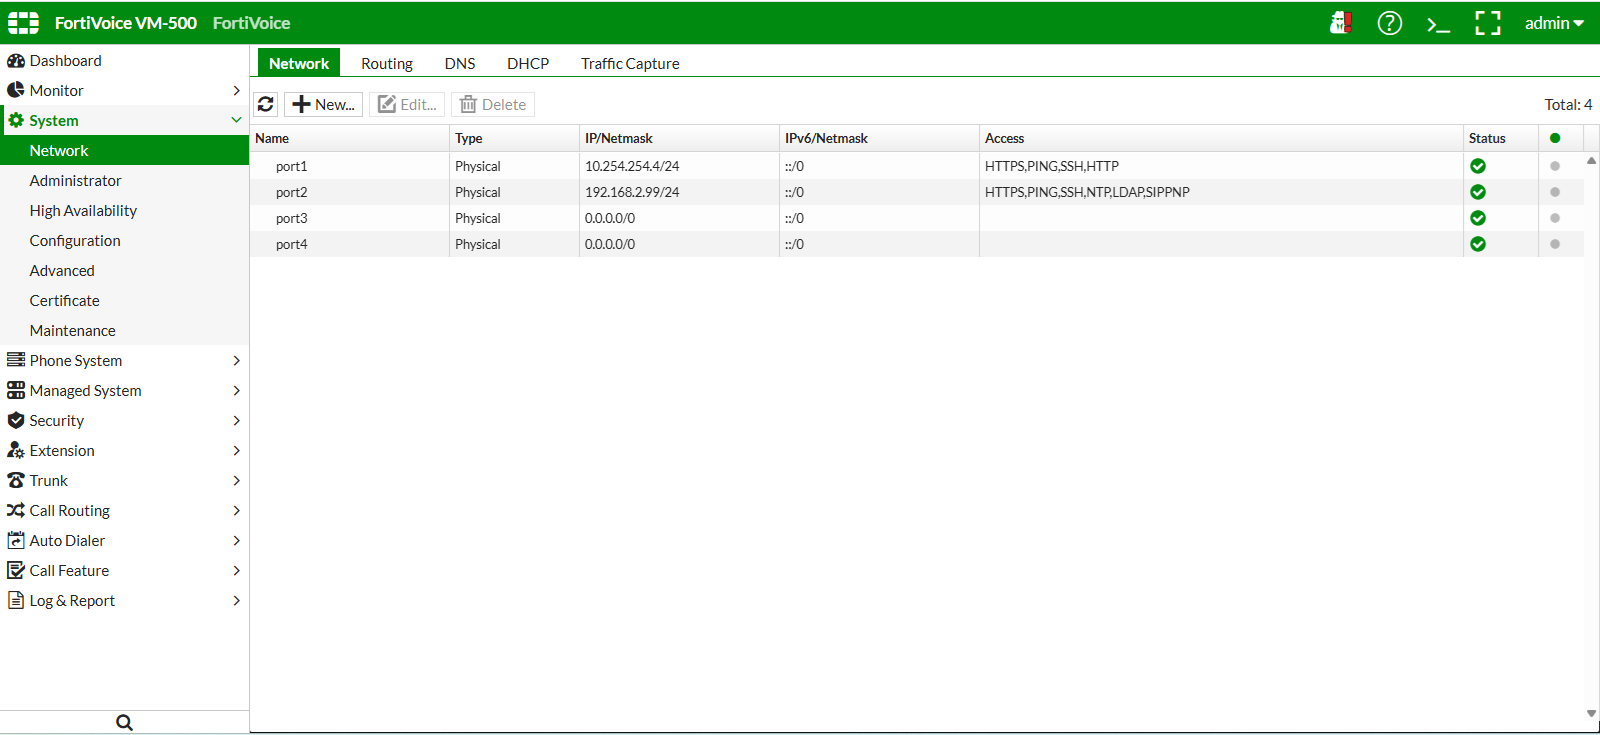
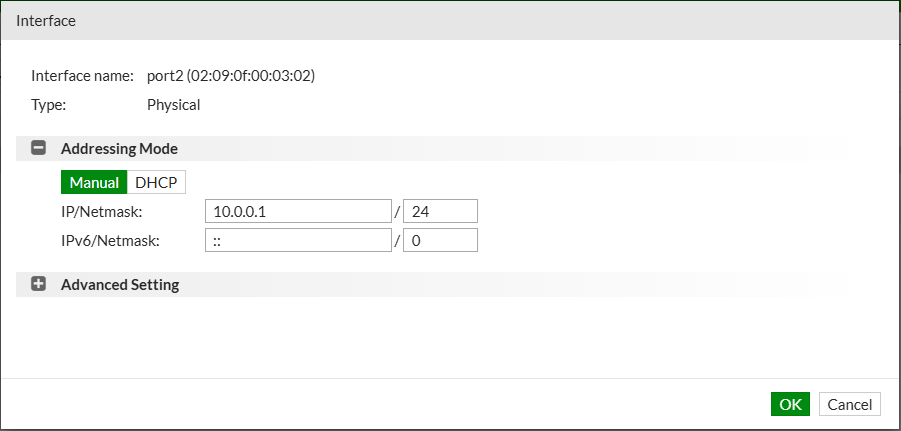
Select port2 and click the Edit button.

Set the FortiVoice IP address to 10.0.0.1 and click the OK button.
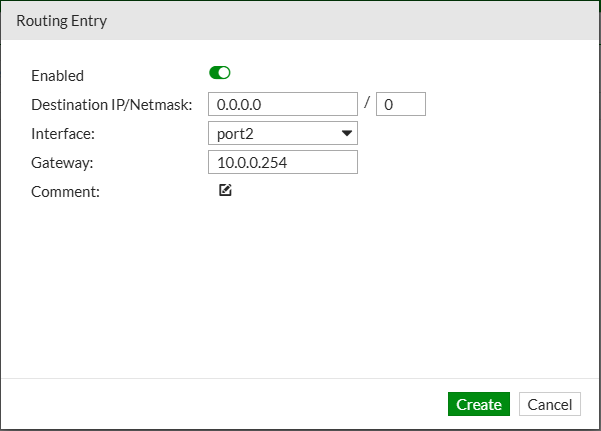
Select the Routing tab to manage the default gateway for the FortiVoice and click the New button.

Set the default gateway to 10.0.0.254 and select port2 for the interface, then click the OK button.
Verify FortiVoice local and external network connectivity by using the FortiVoice console.
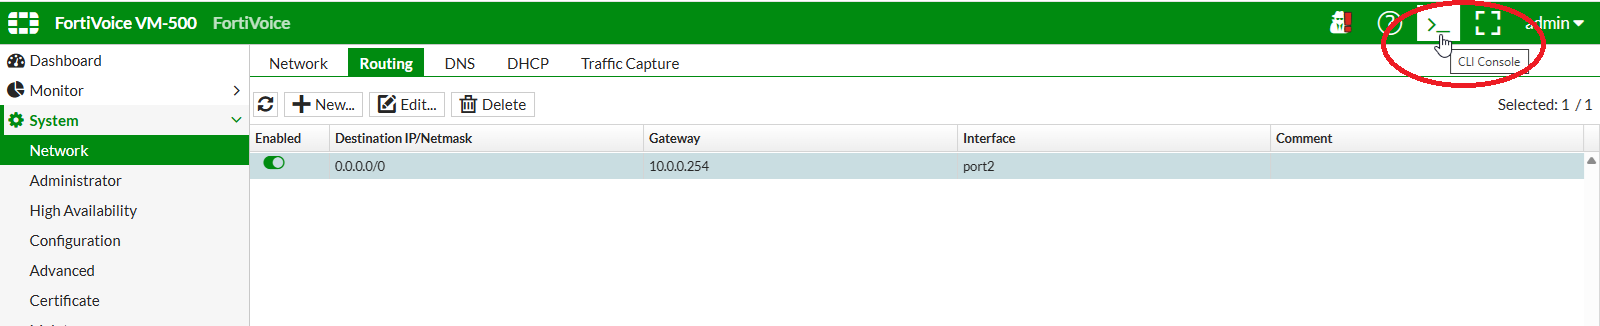
Open the FortiVoice web CLI console by clicking on the >_ button on the upper-right of the web page.
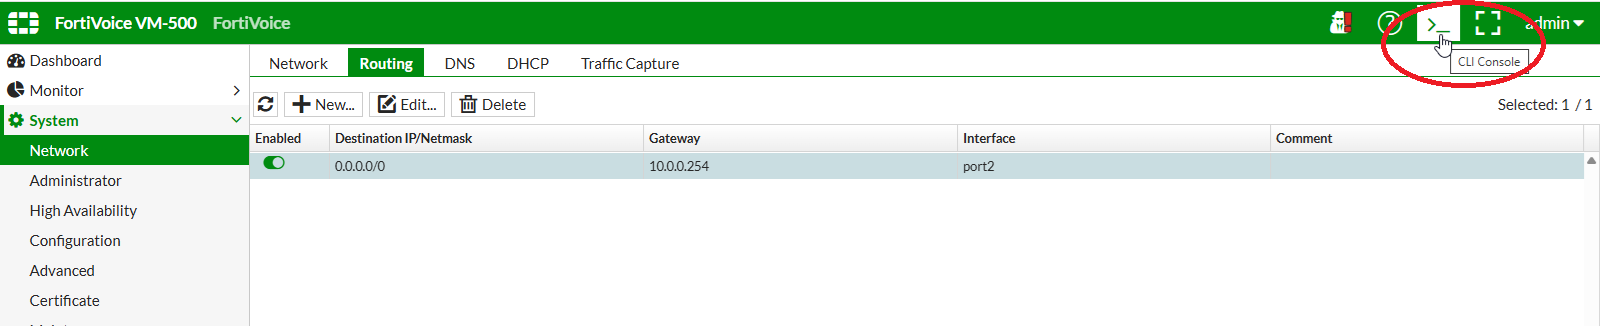
Enter the following commands:
execute ping 172.25.26.254execute ping 8.8.8.8Both commands should complete without packet loss. If either test fails, verify the port2 IP address, default route, and lab connectivity before continuing.
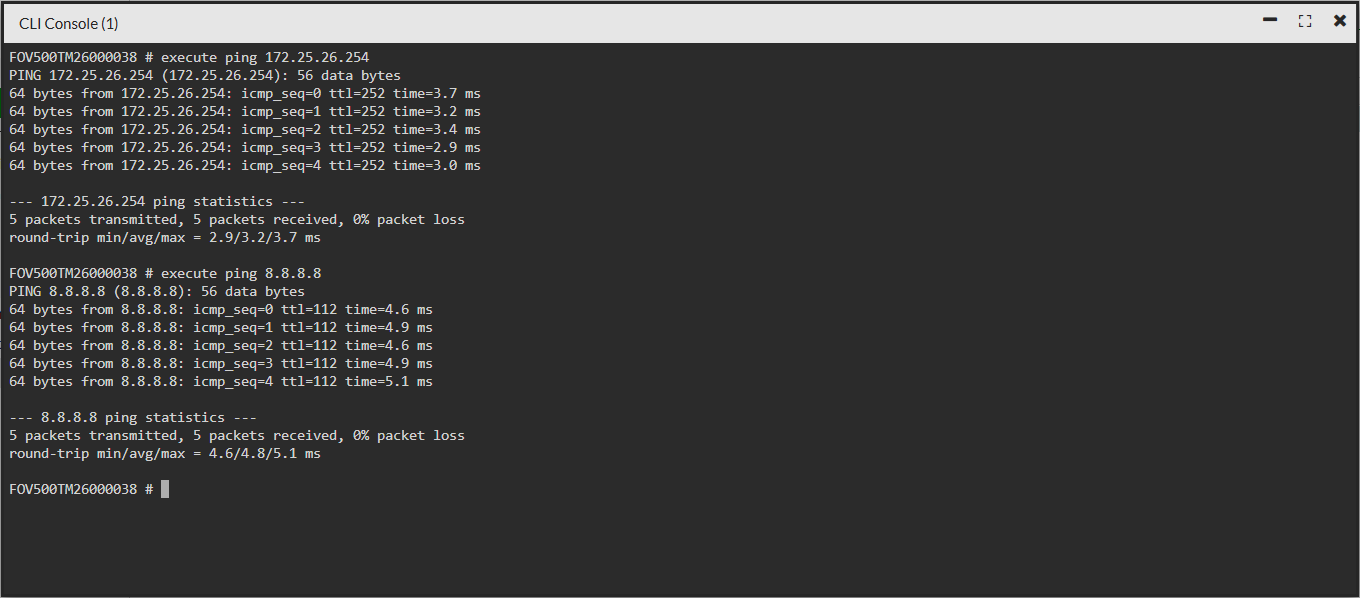
You can close the web CLI console for the next steps.
As port2 is used to connect the FortiVoice to the network, the provisioning interface used to provide configuration to FortiFones and softphone clients must be updated.
Using the FortiVoice web administration page, select System and Advanced on the left-hand menu and select the Auto Provisioning tab.
Select port2 for all entries under Server Setting for Phone Configuration.
Click the Apply button at the bottom of the page to apply the changes.
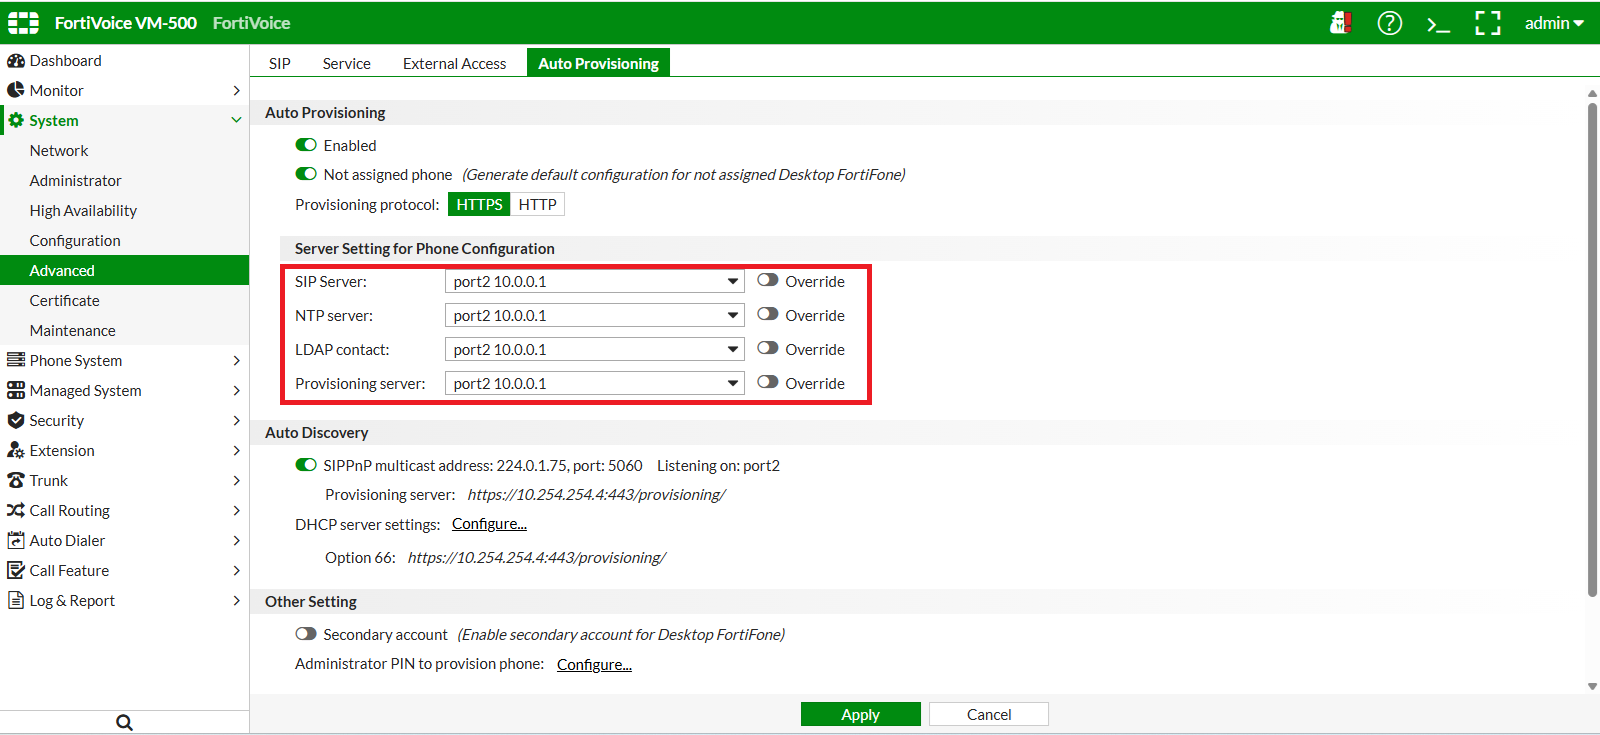
Using the FortiVoice web administration page, select System and Network on the left-hand menu and select the DNS tab.
Configure the following DNS servers:
172.25.25.221172.25.25.222Click the Apply button to save the changes.

Using the FortiVoice web administration page, select System and Configuration on the left-hand menu.
Select the Time tab to manage NTP configuration for the FortiVoice.
Set the appropriate time zone and enable Synchronize with NTP Server.
Use 172.25.26.254 as the NTP server (use the – button to remove unneeded servers).
Click the Apply button to save the changes.
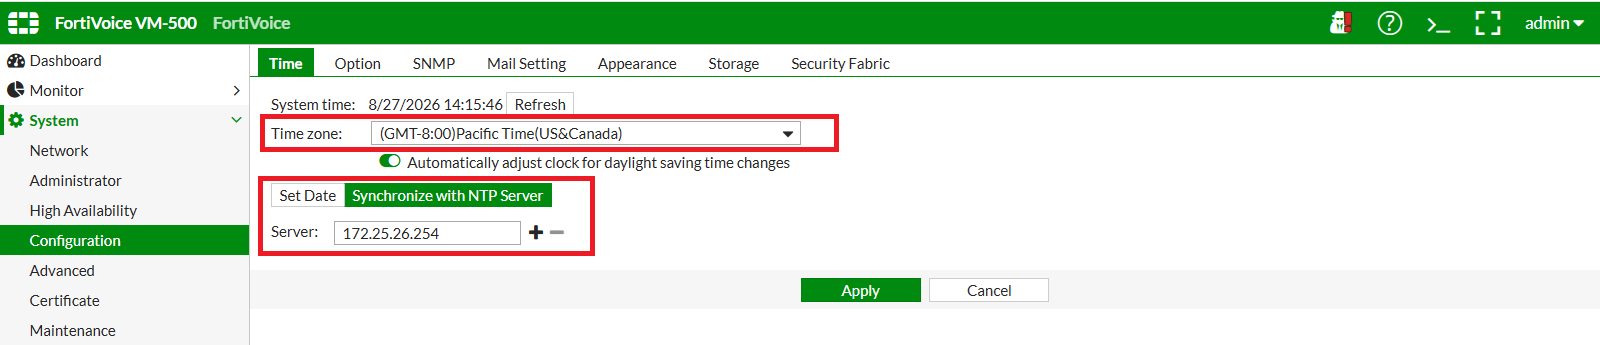
On the FortiVoice web administration page, select Phone System and Setting on the left-hand menu.
Select the Location tab to manage the default country and time zone for extensions.
Click the Apply button at the bottom of the page to apply the changes.
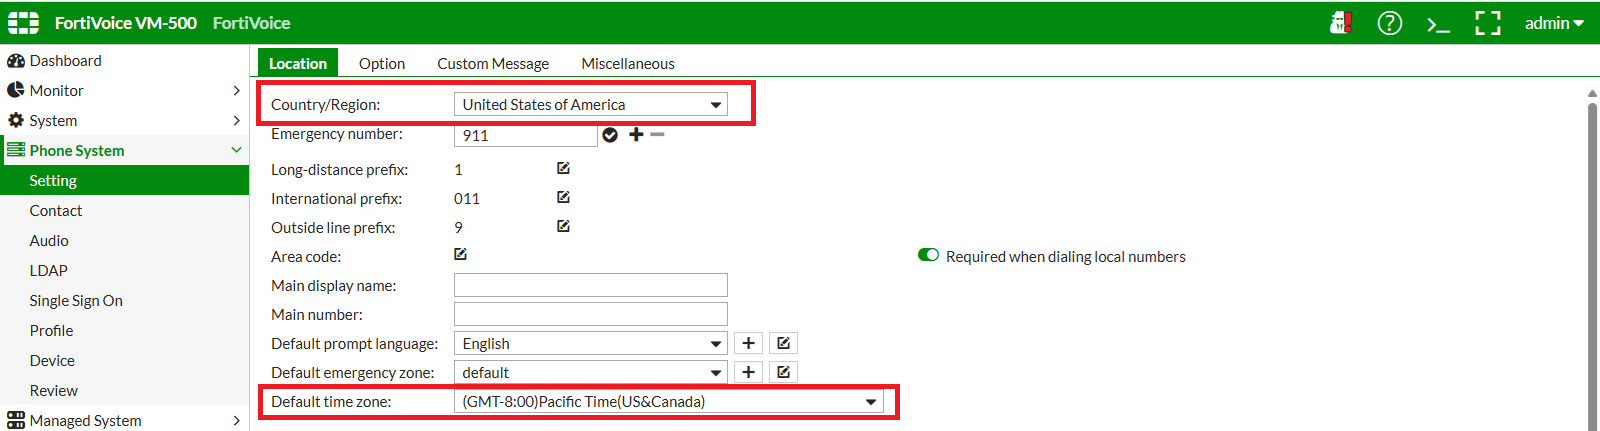
Open the FortiVoice web CLI console by clicking on the >_ button on the upper-right of the web page.
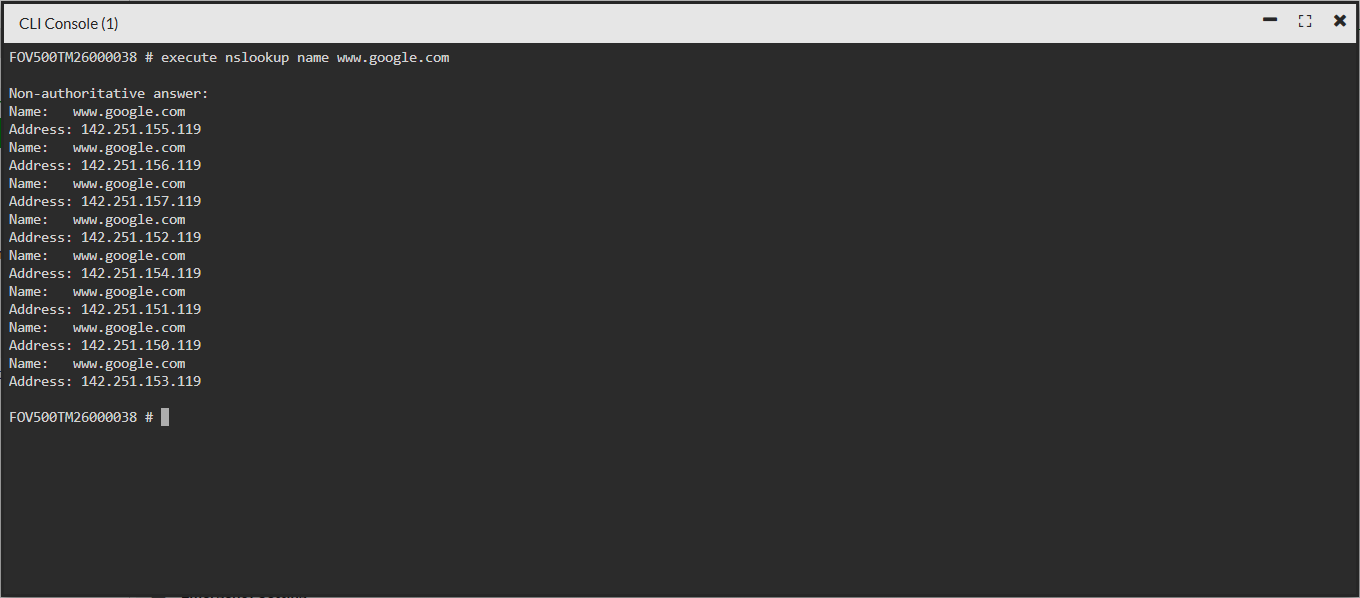
Verify that FortiVoice can resolve DNS names by running the following command:
execute nslookup name www.google.com
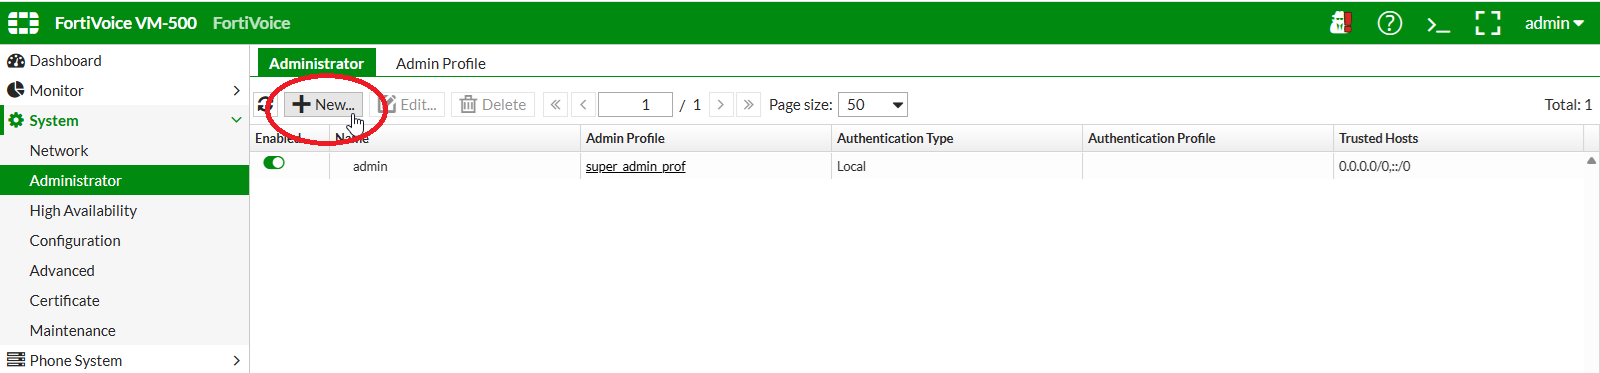
On the FortiVoice web administration page, select System and Administrator on the left-hand menu.
Select the Administrator tab to manage administrators.
Click the New button to create a new administrator.
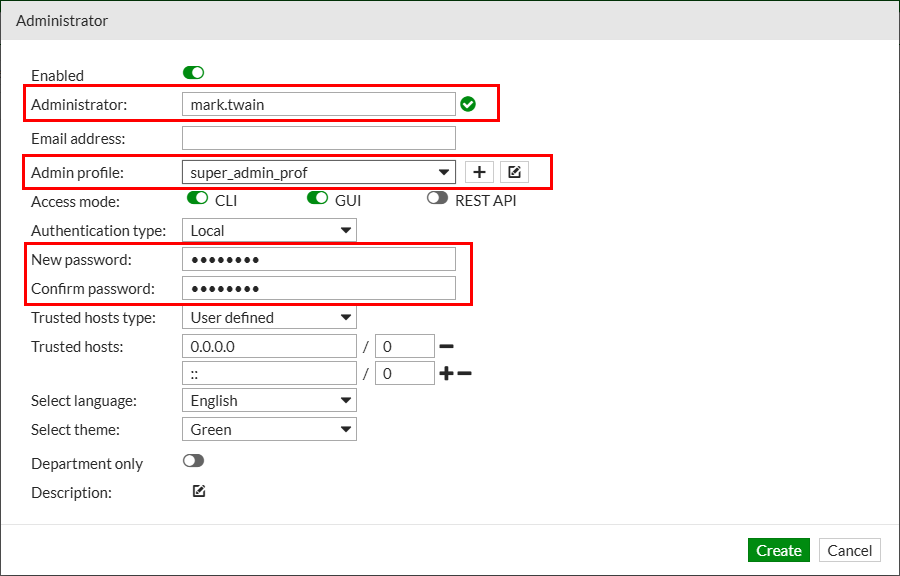
Complete the following fields to create a new administrator account:
mark.twain (username of the new administrator)super_admin_profLocalfortinetfortinetClick the Create button at the bottom of the page to create the new administrator.
Log out of the FortiVoice web administration page by clicking on the upper-right menu and selecting Log Out.

Sign in to the FortiVoice web administration page using the newly created administrator:
mark.twainfortinet
A RADIUS server is available in the training environment. It provides authentication for user jane.doe with password fortinet.
Log back in to the FortiVoice web administration page using the admin account (password fortinet4A!!).
Select Phone System and Profile on the left-hand menu.
Select the RADIUS tab to manage RADIUS server profiles.
Click the New button to create a new RADIUS server profile.
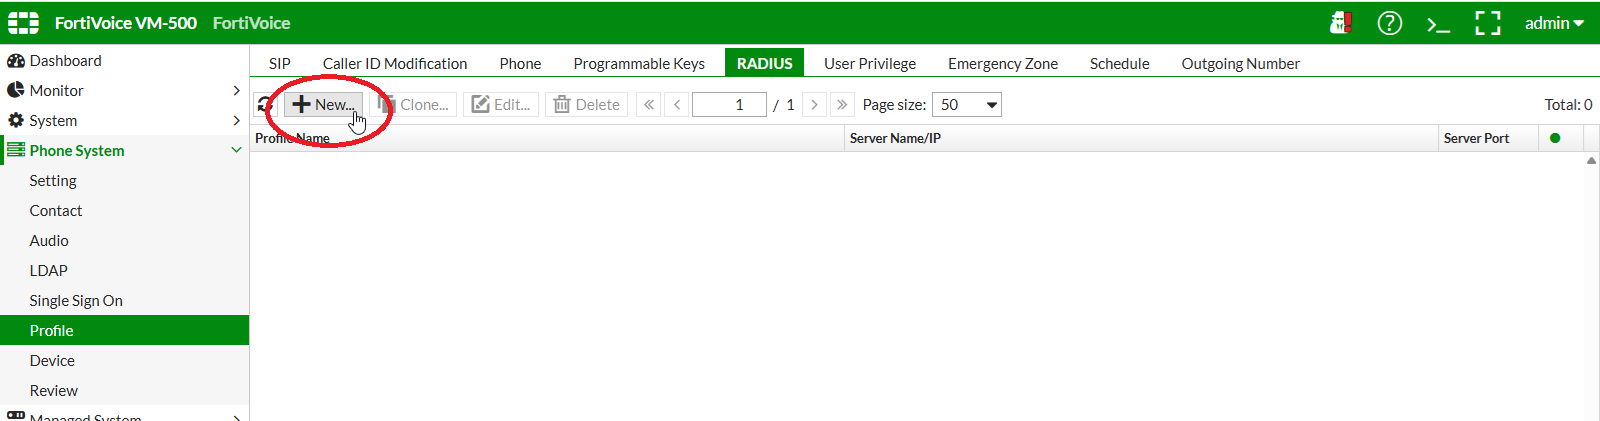
Complete the following fields to create a new RADIUS server profile:
Radius-Server172.16.10.250fortinetClick the Create button at the bottom of the page to create the new RADIUS server profile
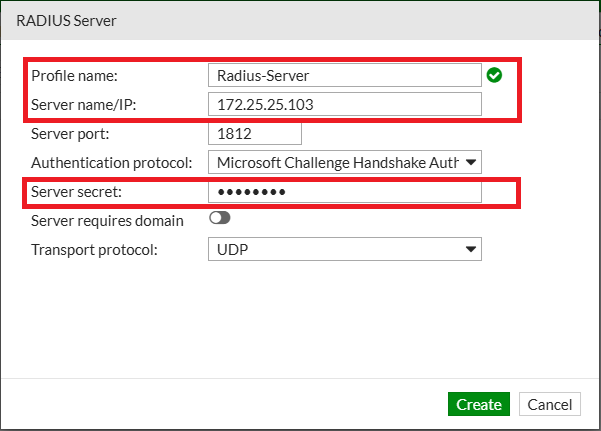
On the FortiVoice web administration page, select System and Administrator on the left-hand menu.
Select the Administrator tab to manage administrators.
Click the New button to create a new administrator.
Complete the following fields to create a new administrator account:
jane.doesuper_admin_profRADIUSRadius-ServerClick the Create button at the bottom of the page to create the new administrator.
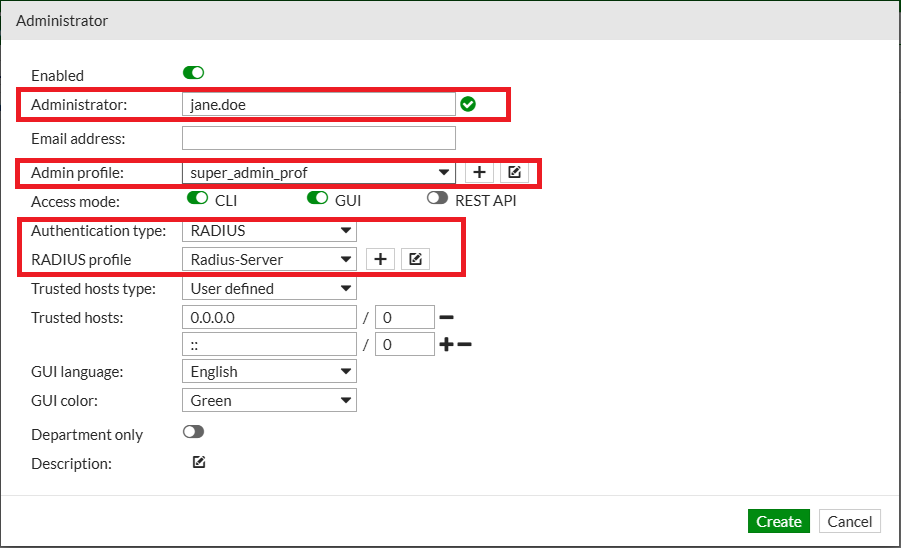
Log out of the FortiVoice web administration page and sign in to the FortiVoice web administration page using the newly created administrator:
jane.doefortinet
Log back in to the FortiVoice web administration page using the admin account.
Select System and Administrator on the left-hand menu.
Select the Admin Profile tab to manage administrator profiles.
Click the New button to create a new administrator profile.

Provide a name for the new administrator profile (use Extension_Only) and select Read-Write privileges for Extension.
Click the Create button at the bottom of the page to create the new administrator profile.
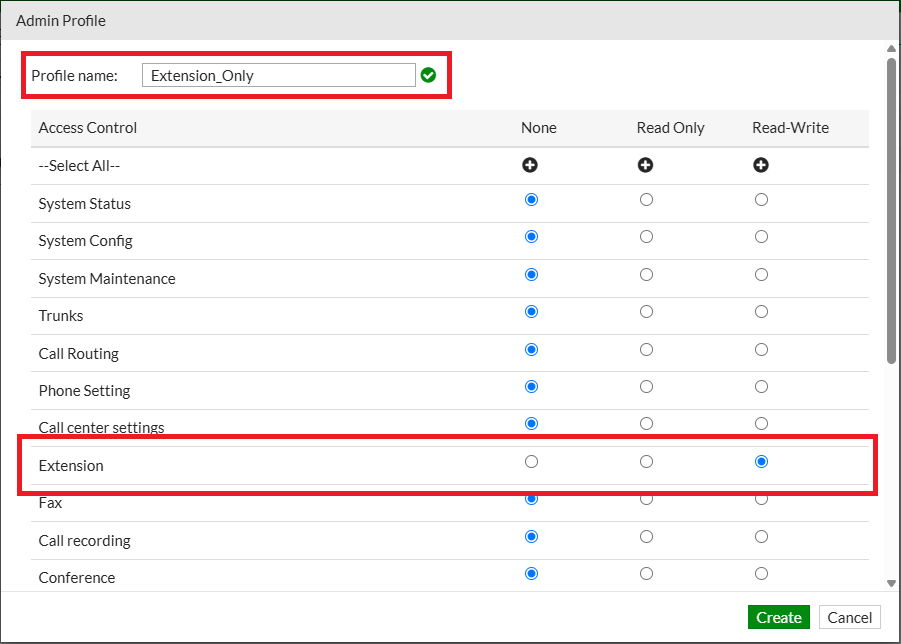
Select System and Administrator on the left-hand menu.
Select the Administrator tab to manage administrators.
Select mark.twain user and click the Edit button.
Assign the previously created Extension_Only admin profile to the user and click the OK button to update the user.
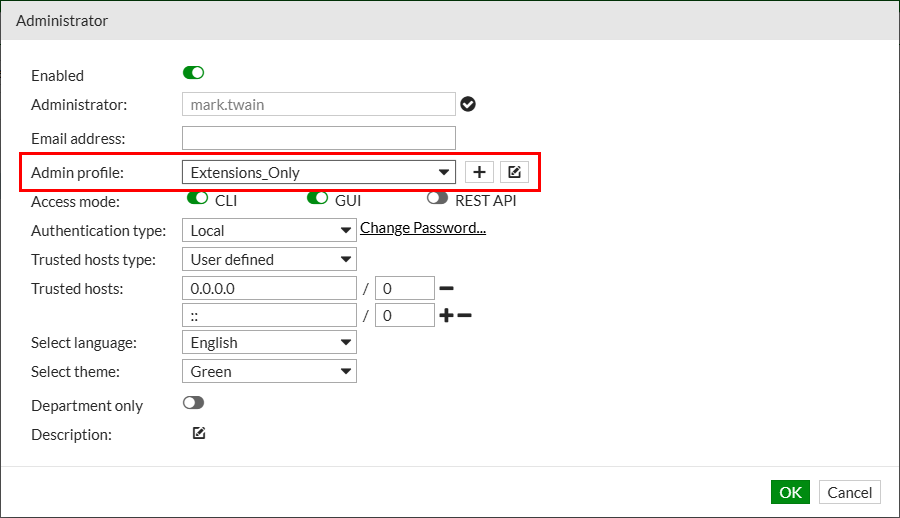
Log out of the FortiVoice web administration page and sign in to the FortiVoice web administration page using the mark.twain account.
Verify that the user can only access extensions management.
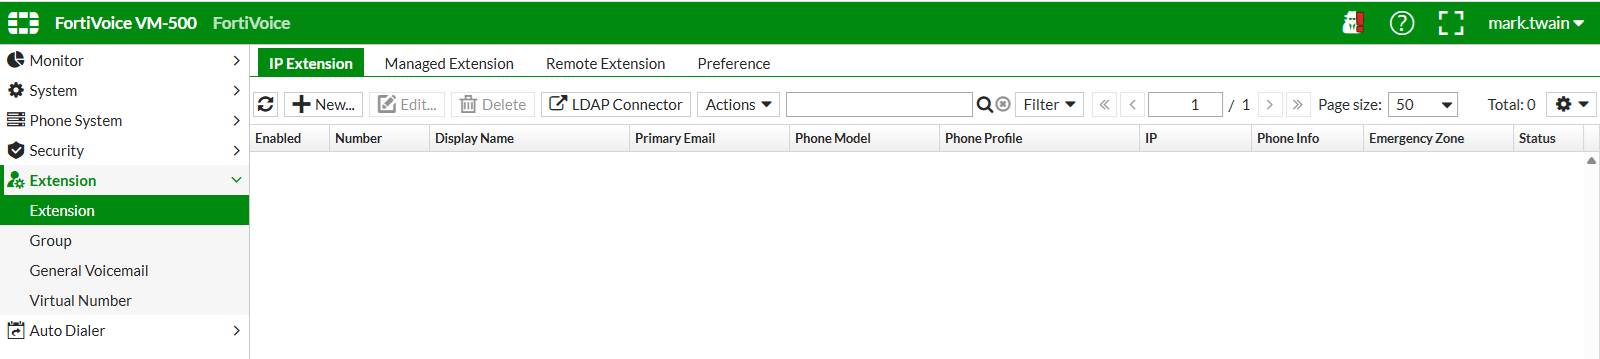
Log back in to the FortiVoice web administration page using the admin account for the next labs.
Extensions are internal numbers assigned to users or devices in FortiVoice. They allow users to make and receive calls and provide access to features such as voicemail, call forwarding, and the FortiVoice user portal.
Each extension is associated with a user privilege profile. The profile determines which FortiVoice features and calling permissions are available to the user.
Extensions can be associated with physical FortiFone devices or softphone clients running on desktop or mobile devices.
In this section, you will create extensions, configure their user privilege profiles, configure softphone clients, and place test calls.
After completing this section, you will be able to:
Estimated: 20 minutes
Create the following three extensions for this lab:
On the FortiVoice web administration page, select Extension and Extension on the left-hand menu.
Select the IP Extension tab to manage IP extensions.
Click the New button to create a new IP extension.

Complete the following fields to create a new extension:
1000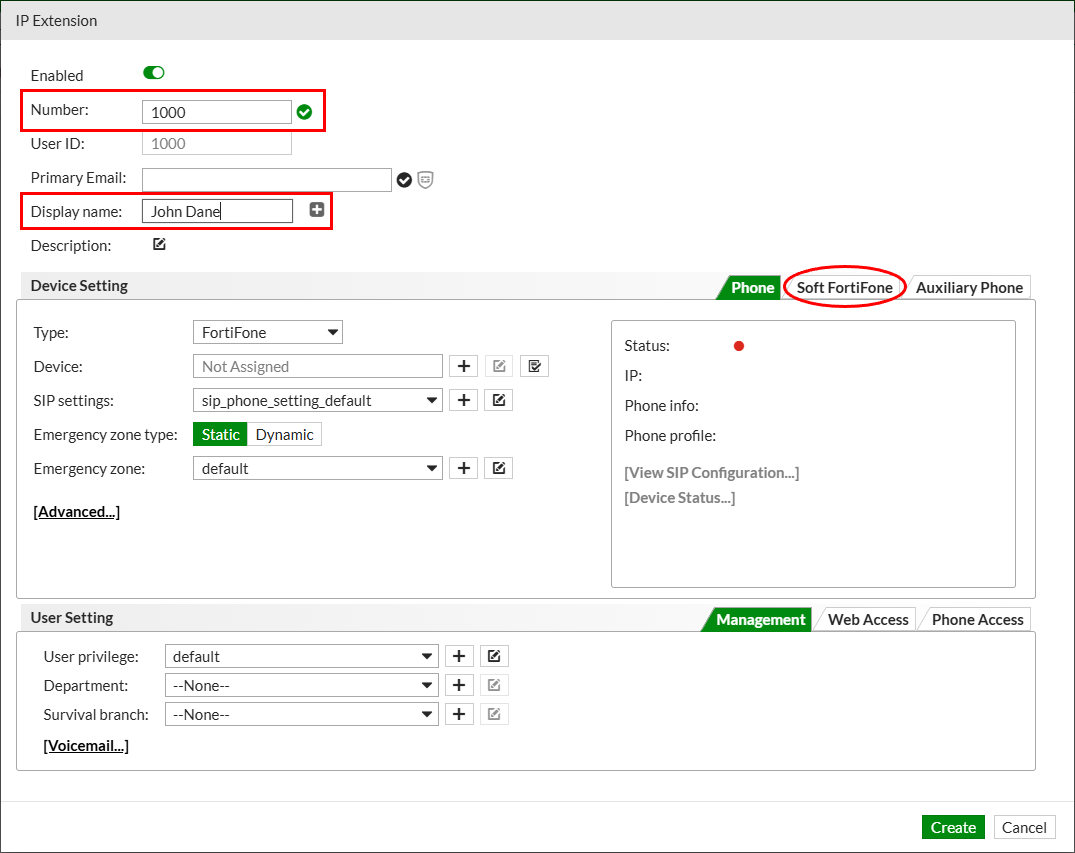
Select the Soft FortiFone tab and assign 1 softphone license to the extension.
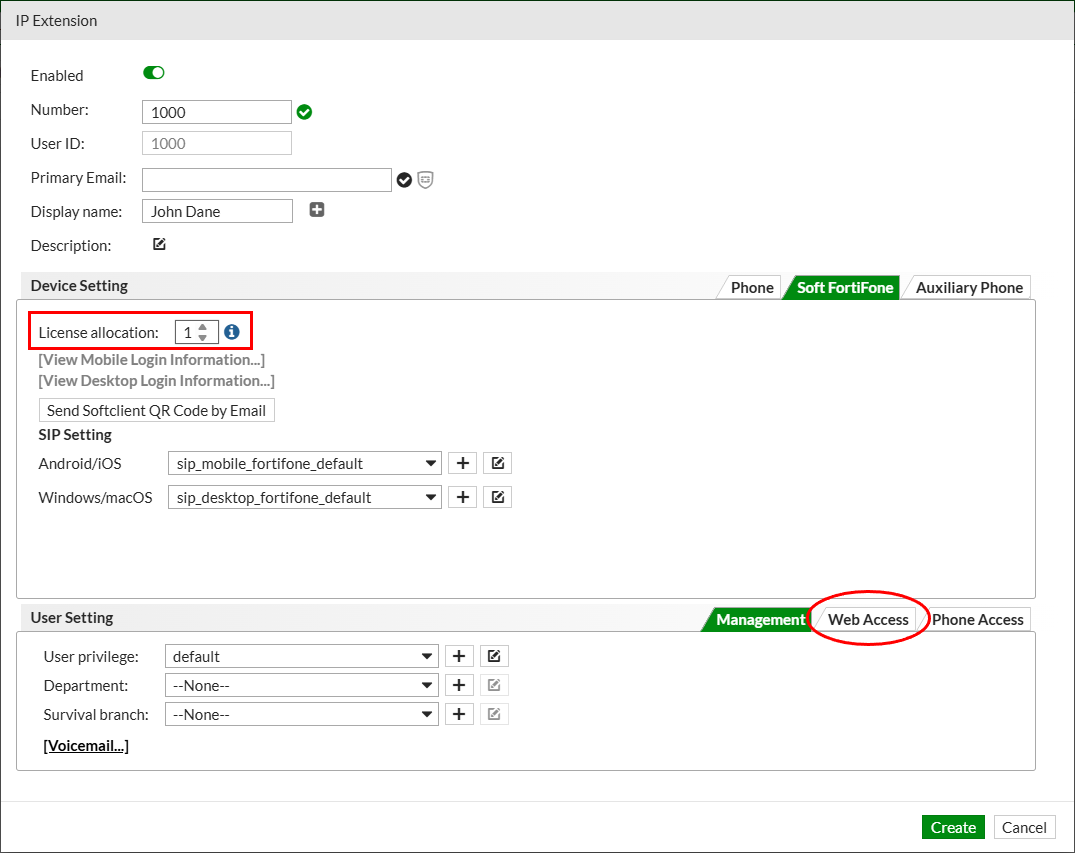
The extension password to register the softphone is randomly generated by FortiVoice to provide higher security.
For consistency during the lab, you will manually set the password to a known value.
Scroll down and select the Web Access tab. Modify the User password field and use fortinet as the new value.
Click the Create button at the bottom of the page to create the new extension.
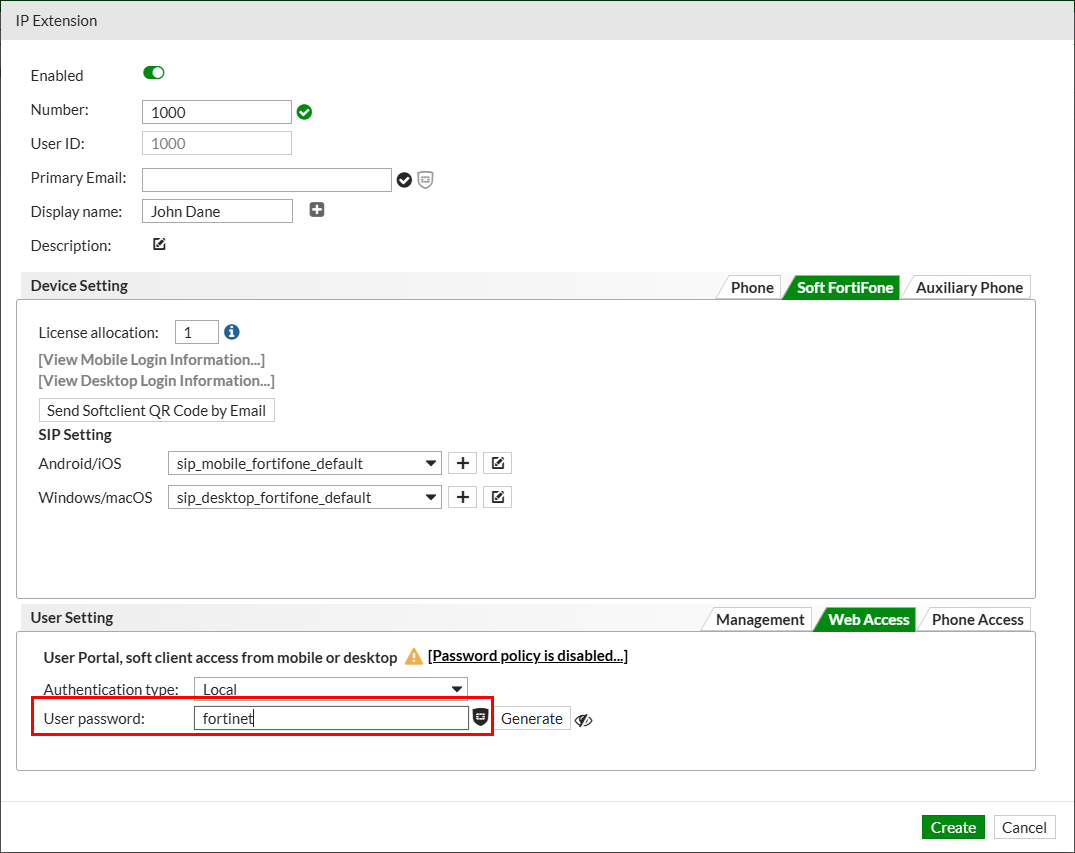
Edit the newly created extension and go to the Soft FortiFone tab again.

Click the View Desktop Login Information link.
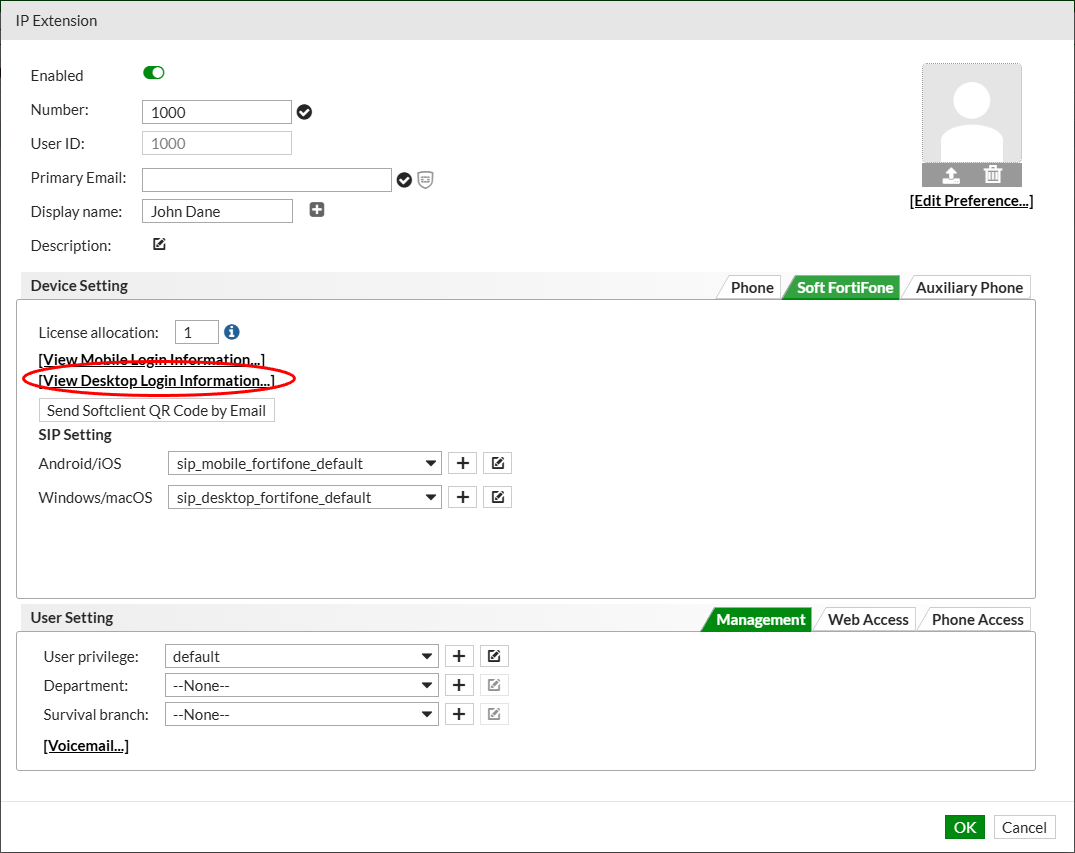
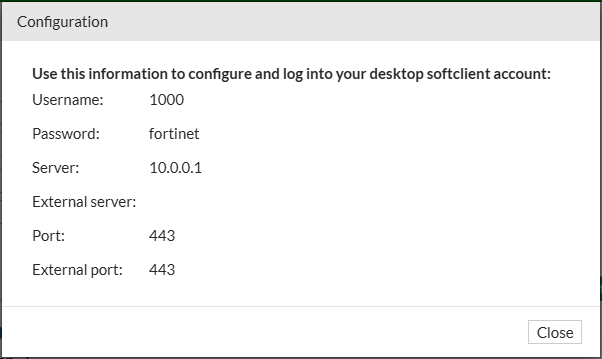
Record this information. You will use it to configure the softphone client.
Repeat these steps to create extensions 1001 and 1002.
The FortiFone clients must be powered on before you can access them.
Within the training lab environment, right-click the Client 1 icon, select Power, and then choose Power On.
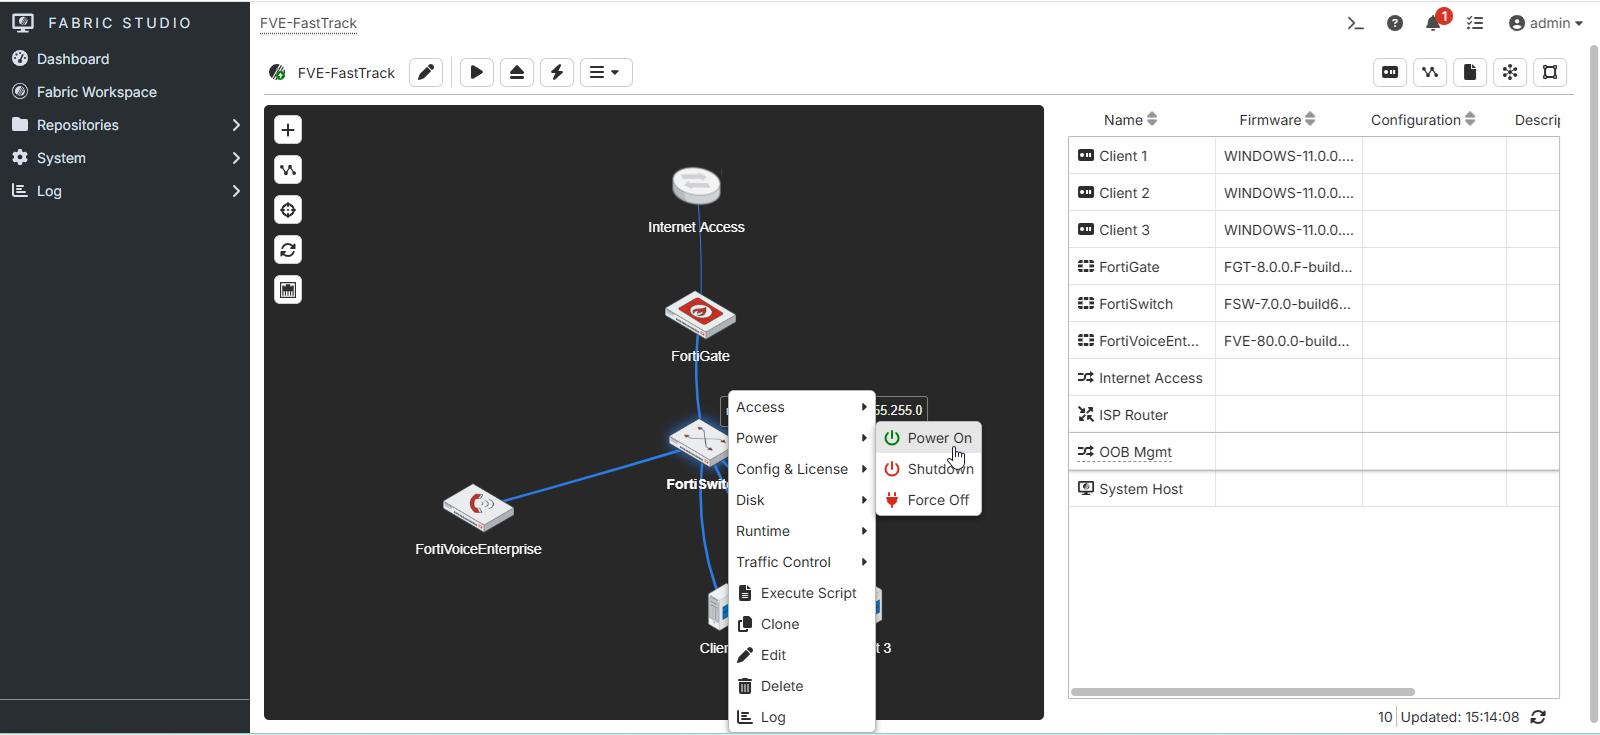
Wait approximately one minute for the FortiFone client to finish starting before continuing.
Within the training lab environment, right-click the Client 1 icon, select Access, and then choose Display (VNC).
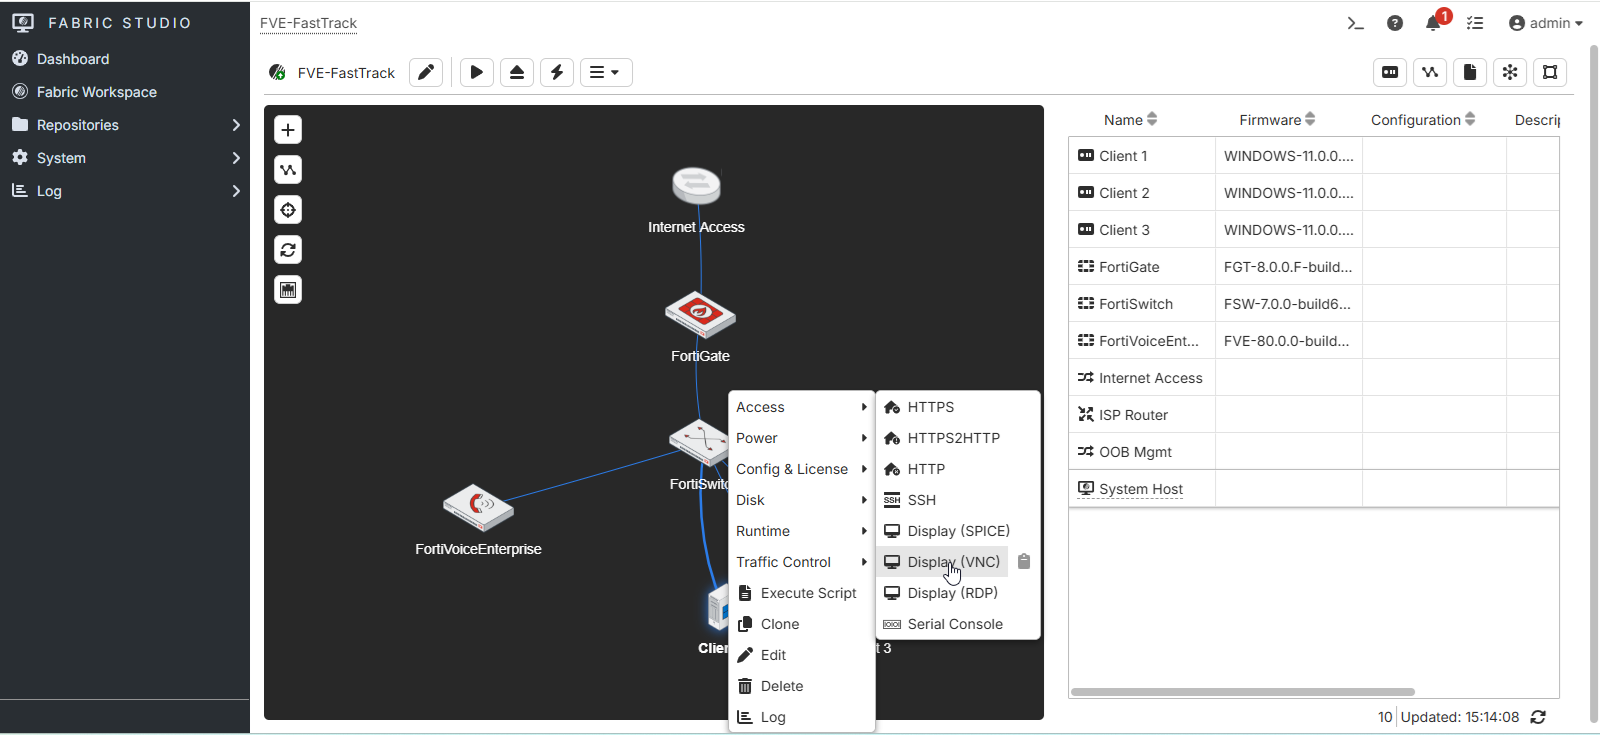
A new browser tab will open automatically. Switch to the newly opened tab to access the FortiFone client.
Double-click the FortiFone icon.
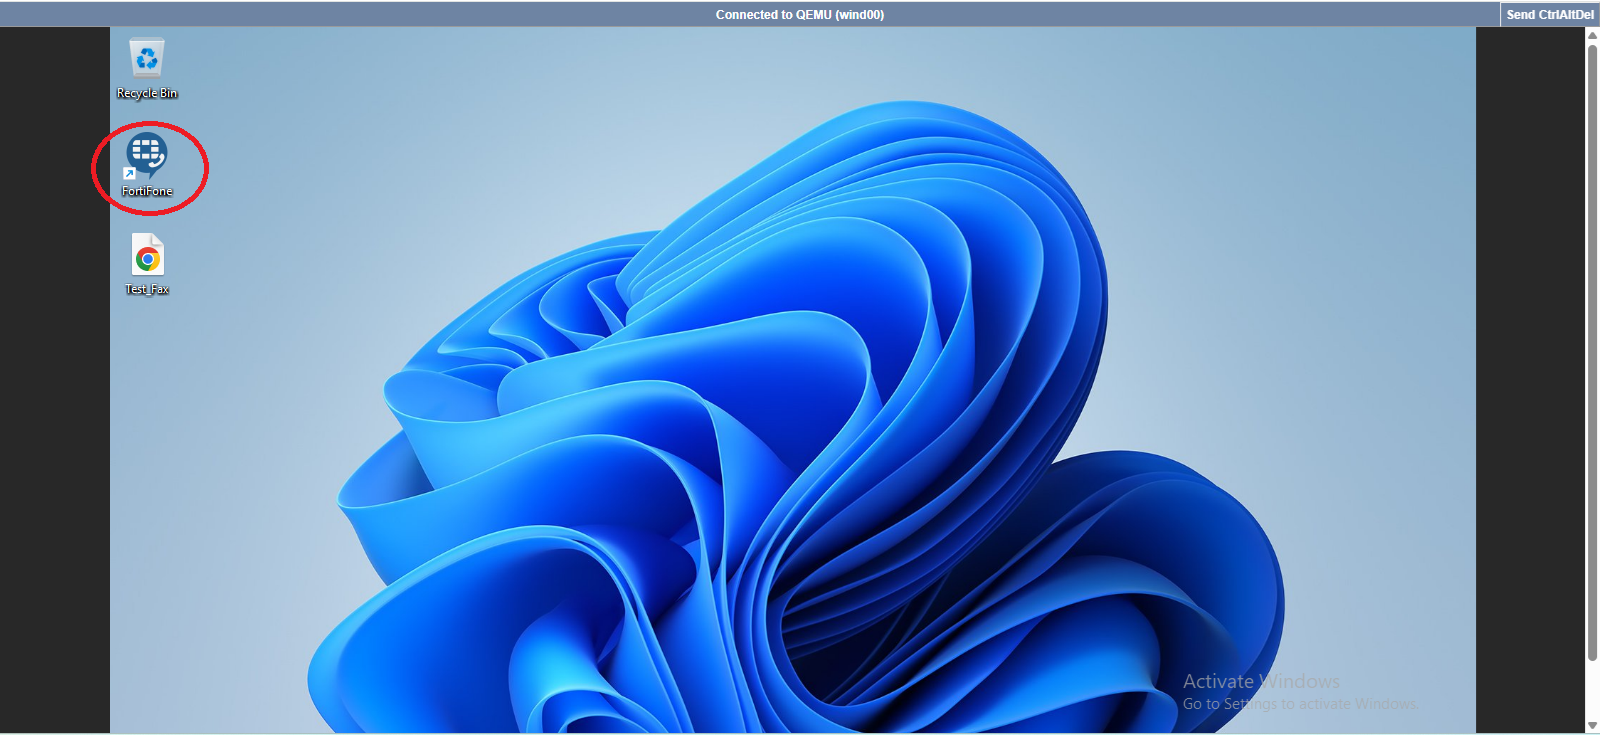
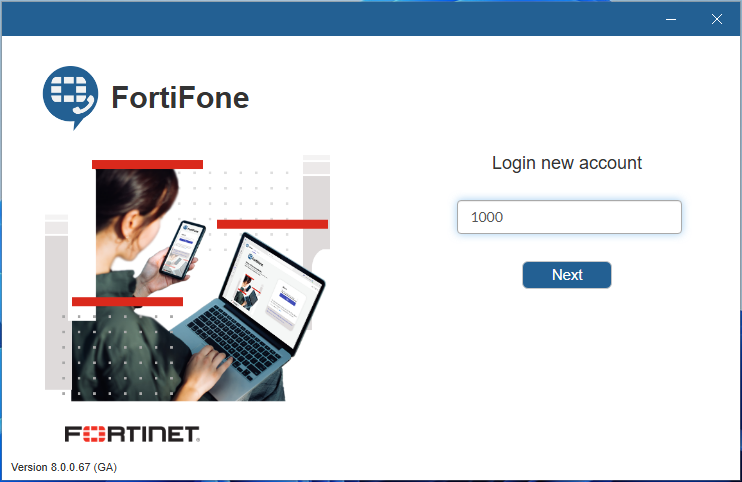
Enter the first extension number you created: 1000.
Click the Next button.
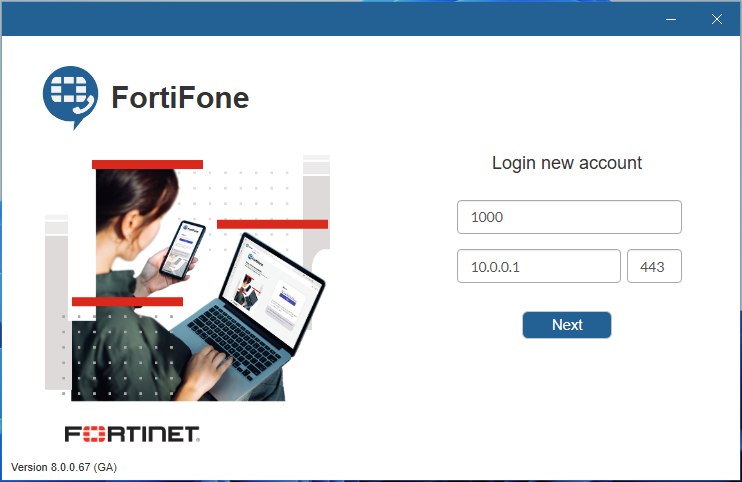
Enter 10.0.0.1 as the server IP address and 443 as the port number.
Click the Next button.
Enter fortinet as the password (as defined previously) and click the Login button.
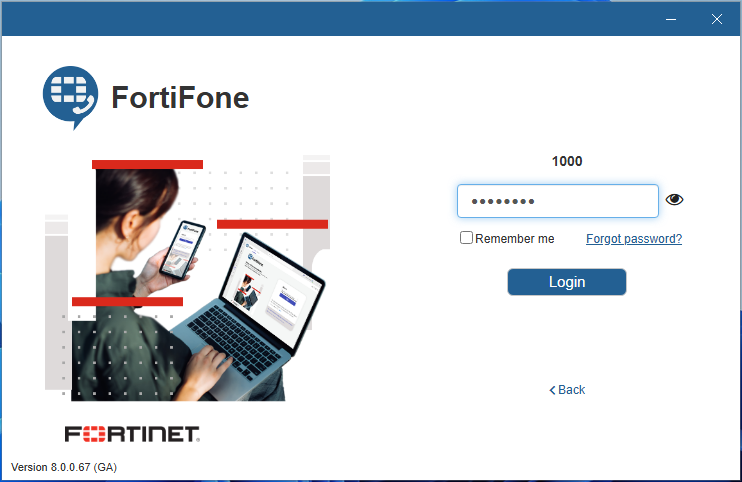
The softphone client is now registered for the first extension.
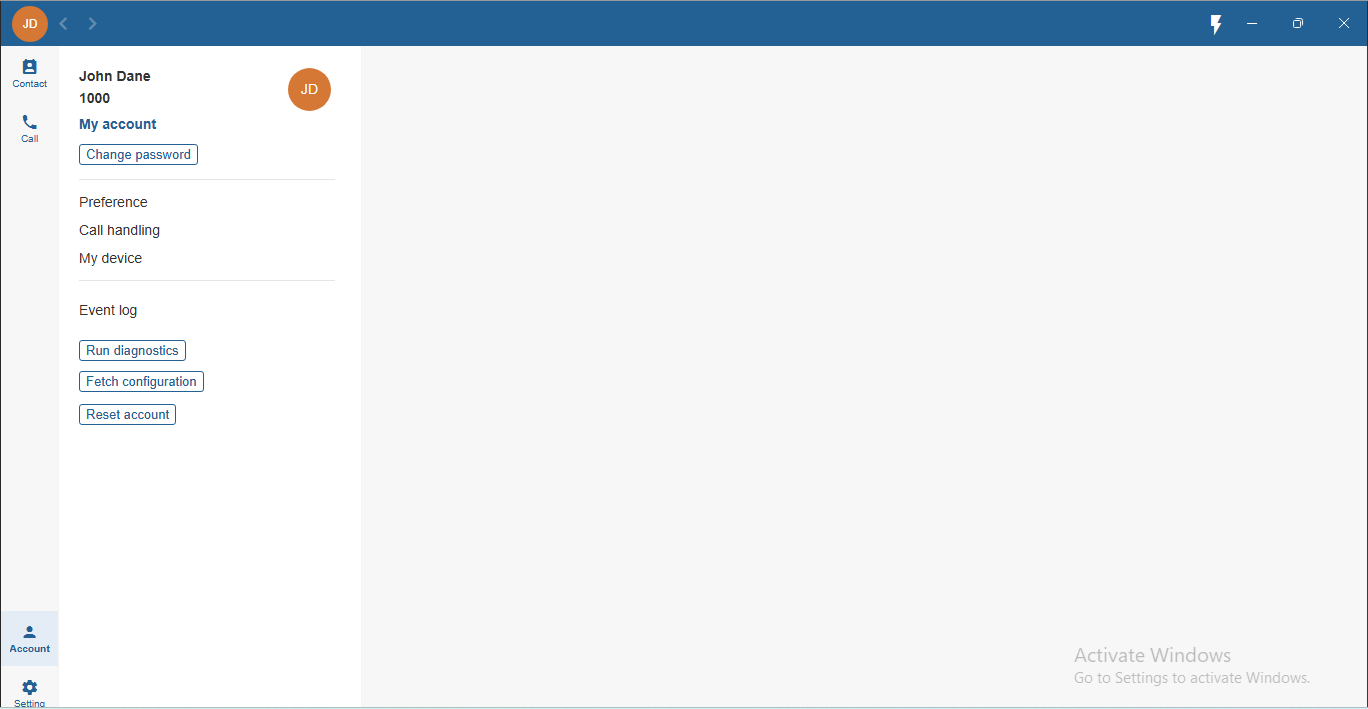
From the FortiVoice web administration page, select Extension and Extension on the left-hand menu.
The IP address of the softphone should be present, and the status should be green.

Repeat these steps to sign in with the other two extensions on Client 2 and Client 3.
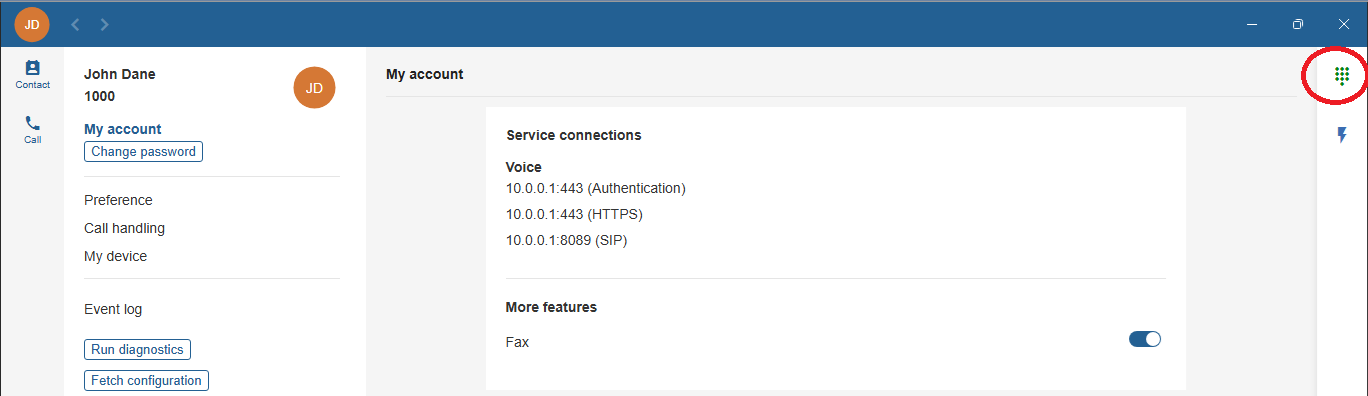
Place test calls between extensions. To display the dial pad, click the dial pad icon in the upper-right corner:
On the FortiVoice web administration page, select Phone System and Profile on the left-hand menu.
Select the User Privilege tab to manage user privilege profiles.
Click the New button to create a new user privilege profile.
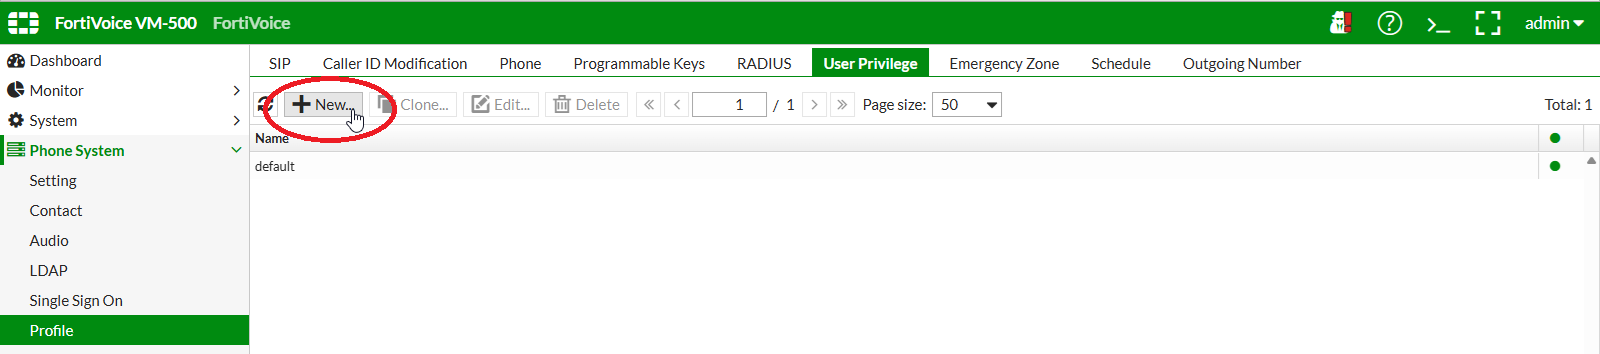
Complete the following fields to create the new user privilege profile:
Fast_TrackClick the Create button at the bottom of the page to create the new user privilege profile
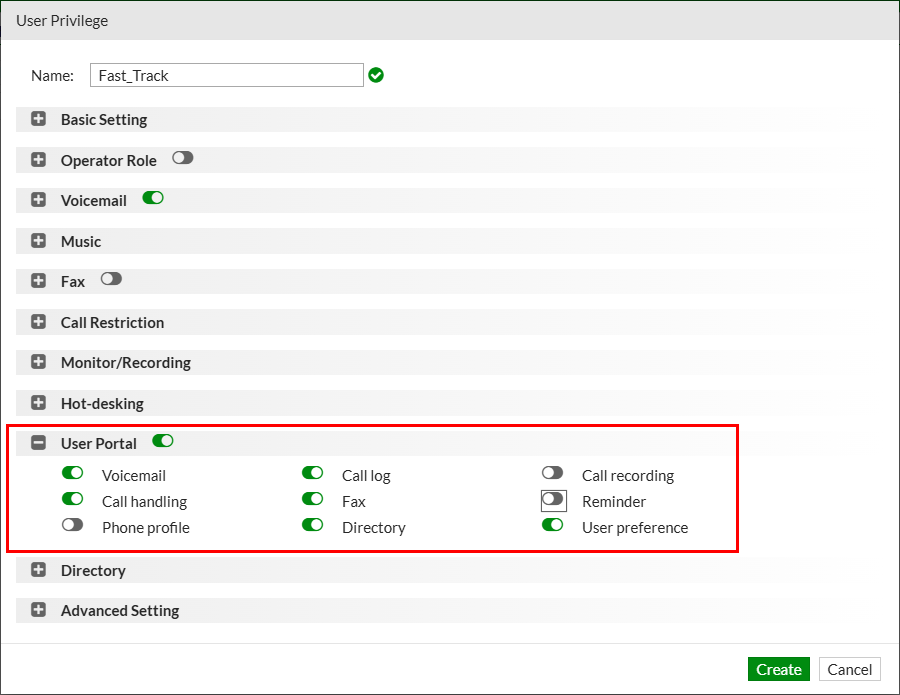
Select Extension and Extension on the left-hand menu.
Select the IP Extension tab to manage extensions.
Select extension 1000 and click the Edit button.
Assign the previously created Fast_Track user privilege profile to the user and click the OK button to update the user.
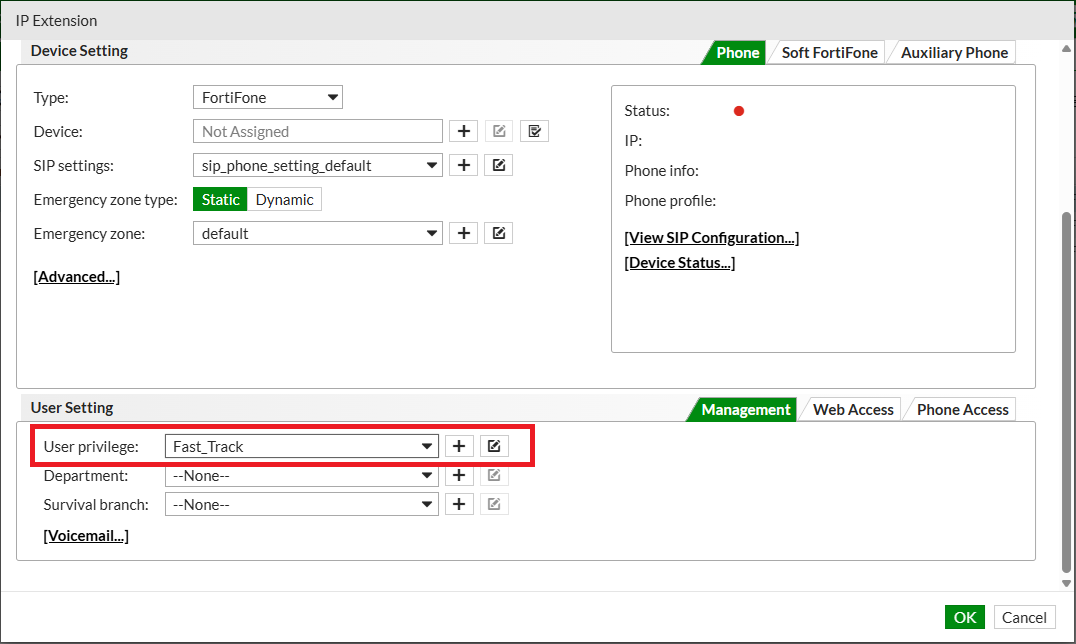
Using Client 1, open the URL https://10.0.0.1/voice from a web browser and authenticate on the FortiVoice user portal using the following credentials:
1000fortinet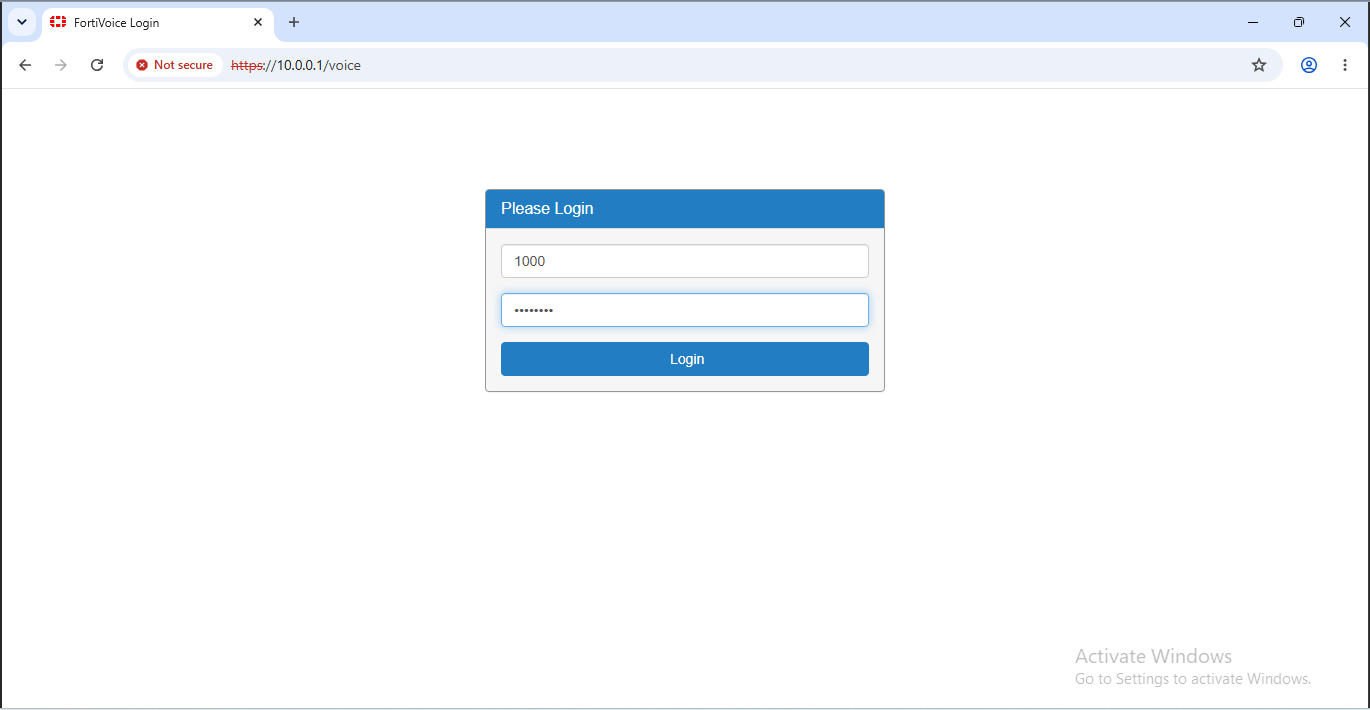
Notice that extension 1000 has access only to the user portal features enabled in the Fast_Track user privilege profile.
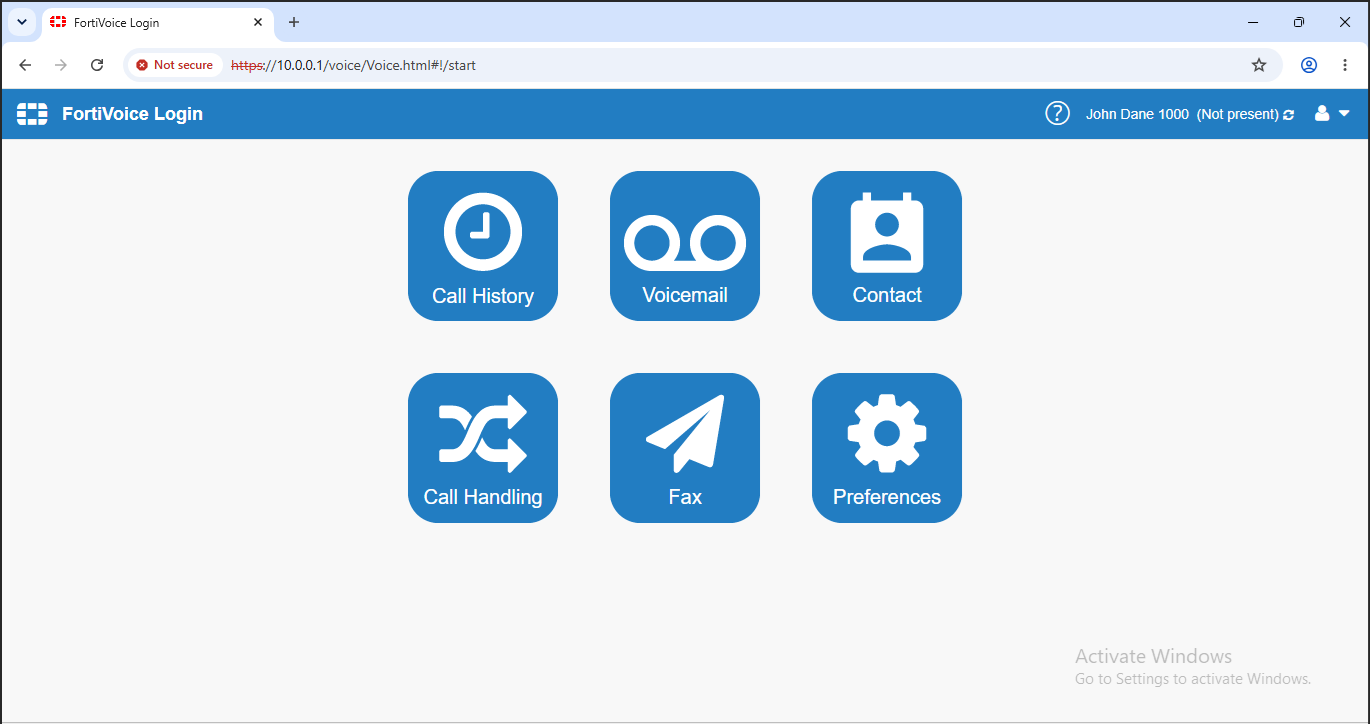
Log out from the FortiVoice user portal and log in using extension 1001 credentials:
1001fortinet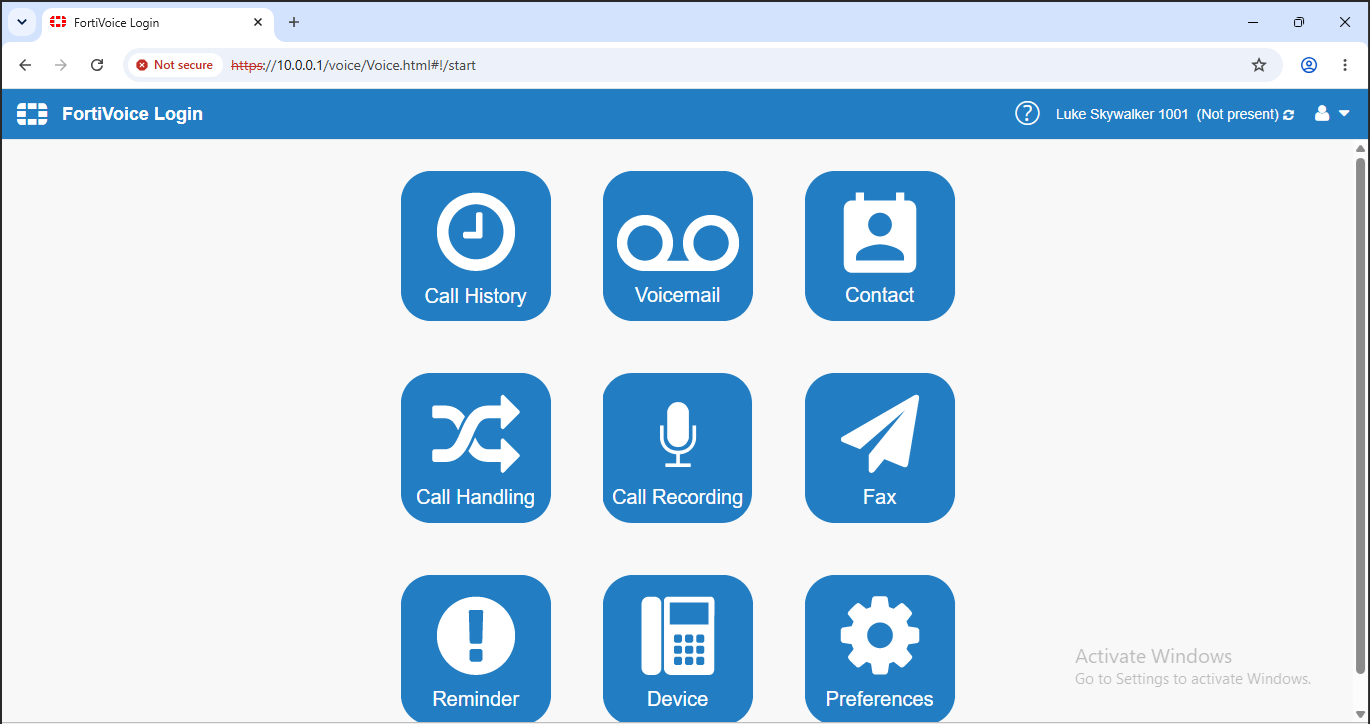
Compare the available user portal features with those available to extension 1000.
A SIP trunk connects FortiVoice to an external SIP service, allowing users to make and receive calls outside the FortiVoice system.
Inbound and outbound call routing rules determine how calls are routed between internal extensions and the SIP trunk. Direct Inward Dialing (DID) numbers can also be mapped to extensions or other FortiVoice destinations, allowing external callers to reach them directly.
FortiVoice systems can also be interconnected using Office Peer trunks. Office Peers provide additional capabilities for communication between FortiVoice systems, including the exchange of extension information.
In this section, you will configure a SIP trunk to the PSTN simulator, create outbound and inbound call routing rules, configure DID mappings, and place test calls.
The external numbering scheme used in the lab is described below. Replace NN with your assigned two-digit lab number.
NN represents the lab number using two digits.
Lab 1 (NN = 01):
Lab 12 (NN = 12):
After completing this section, you will be able to:
Estimated: 15 minutes
On the FortiVoice web administration page, select Trunk and VoIP on the left-hand menu.
Select the SIP tab to manage SIP trunks.
Click the New button to create a new SIP trunk.
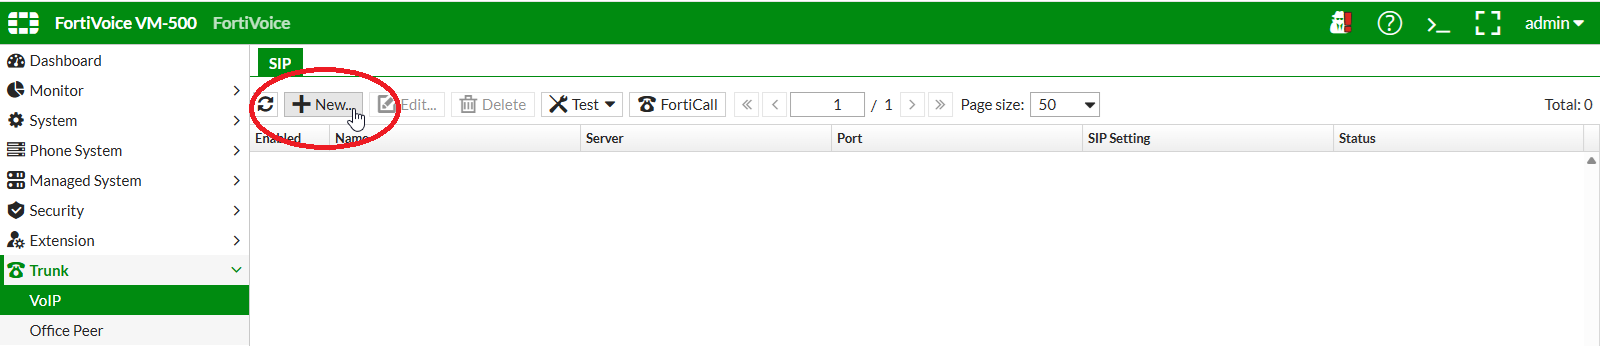
Complete the following fields to create the new SIP trunk (replace NN with your assigned two-digit lab number).
LAB_NNLAB_NN19990NN0000 (for example, Lab 1: 19990010000; Lab 12: 19990120000)sip.swatlab.net4Caller ID priority ruleDisableClick the Create button at the bottom of the page to create the new SIP trunk.
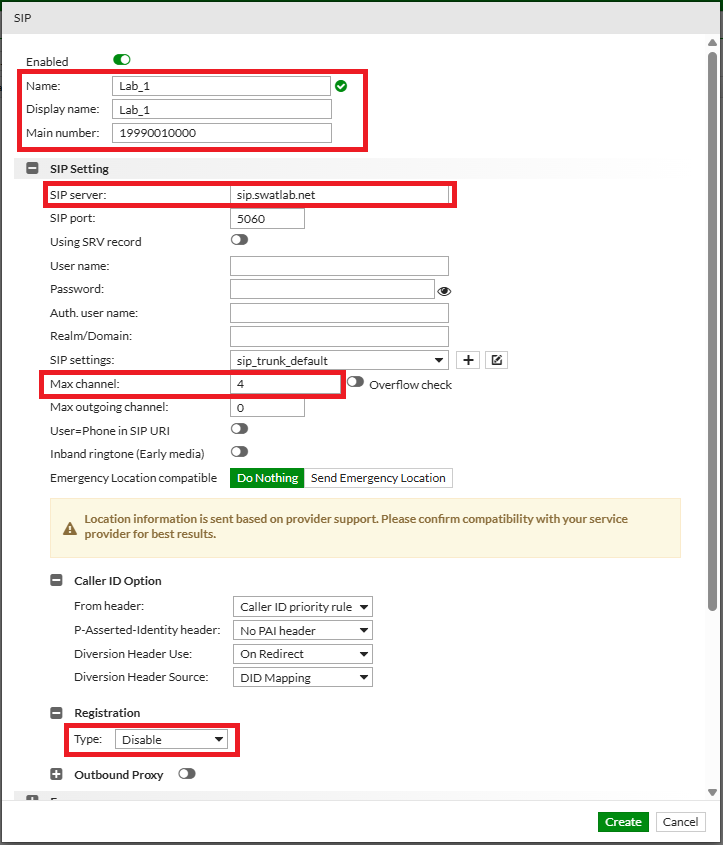
Verify the newly created SIP trunk. The Status column should indicate In service.
The trunk status may take a short time to update. Refresh the SIP trunk page as needed.
To refresh the page, you can use the refresh button located on the upper-left of the table.

Outbound call routing rules govern the way external calls are handled, based on caller ID or called number match rules.
On the FortiVoice web administration page, select Call routing and Outbound on the left-hand menu.
Select the Outbound tab to manage outbound call routing rules.
Select the outgoing_default rule and click the Edit button to edit the outbound call routing rule.
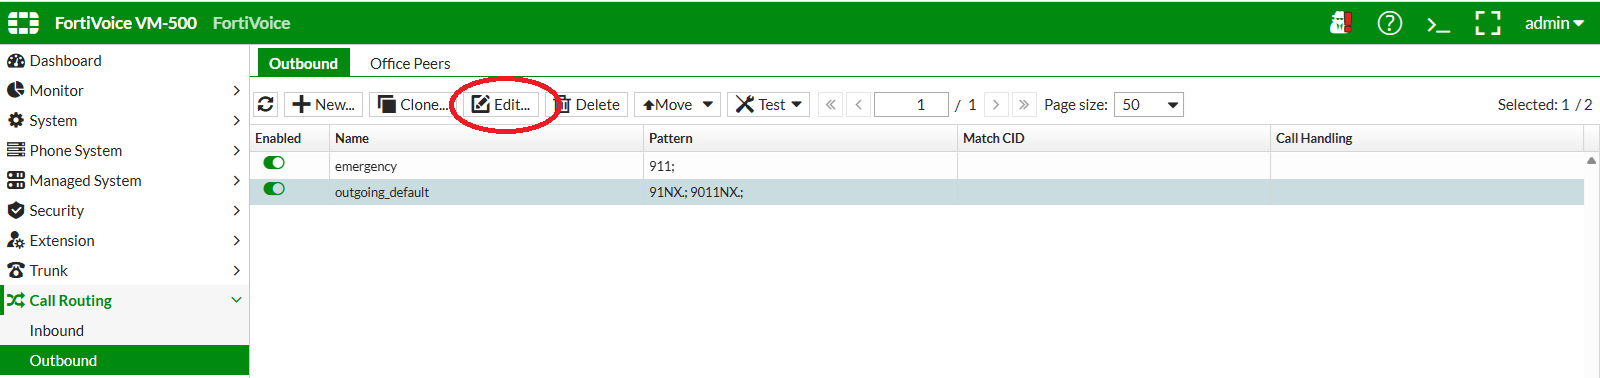
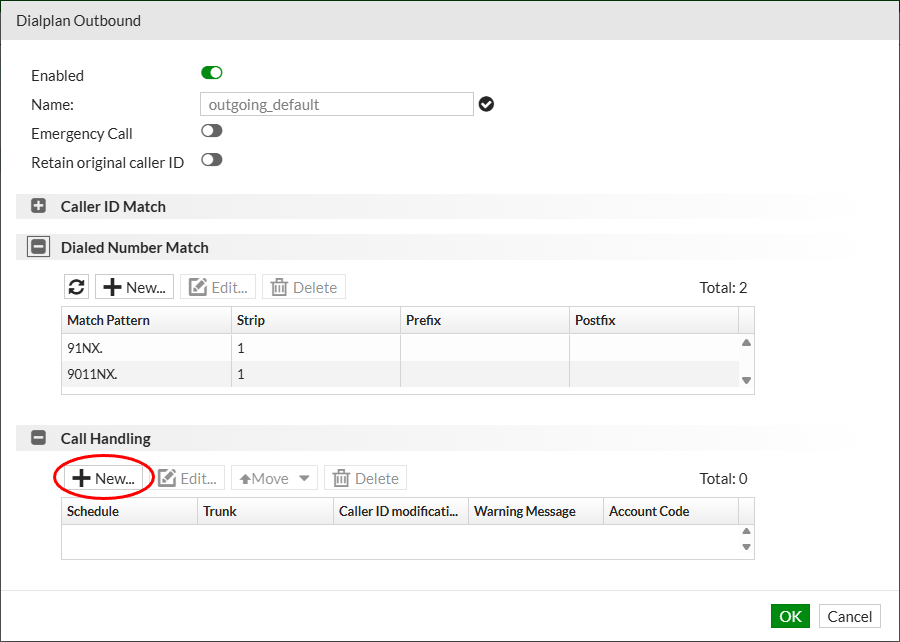
Several Dialed Number Match rules already exist.
They define when the outbound call routing rule is triggered.
For instance, when a user dials 91 followed by any digits, this rule is matched.
These matching rules are written using matching patterns.
Matching patterns:
| Pattern | Description |
|---|---|
| X | Matches any single digit from 0 to 9 |
| Z | Matches any single digit from 1 to 9 |
| N | Matches any single digit from 2 to 9 |
| [ ] | Matches any digit in the brackets. For a range of numbers, use a dash. |
| . (period) | Acts as a wildcard that matches any digit and allows for any number of digits to be dialed. |
| ! (exclamation mark) | Acts as a wildcard that matches any digit (including no digits) and allows for any number of digits to be dialed. |
Some examples:
| Pattern | Description |
|---|---|
| X. | Matches any dialed number. |
| NXXXXXX | Matches any seven-digit number, if the first digit is 2 or higher. |
| 9[135-7] | Matches 91, 93, 95, 96, 97 (note the – allowing a range of digits). |
| 1NXXNXXXXXX | Matches any dialed number that matches this pattern: 1 + area code (between 200 and 999) + seven-digit number (first digit is 2 or higher) |
| 011. | Matches any number that starts with 011 and has at least one more digit. |
| XX! | Matches any two or more digits. |
Several actions can be associated with matching rules:
The following default match patterns are used in this lab:
For both match patterns, the first digit (9) is stripped before the number is sent to the SIP provider.
Using these patterns, a user dials 9 1 XXX XXX XXXX to call a US number.
Once a dialed number is matched, FortiVoice needs to know which trunk to use to place the call. This is managed in the Call Handling section.
Click the New button in the Call Handling section to add an outbound trunk for this outbound call routing rule.
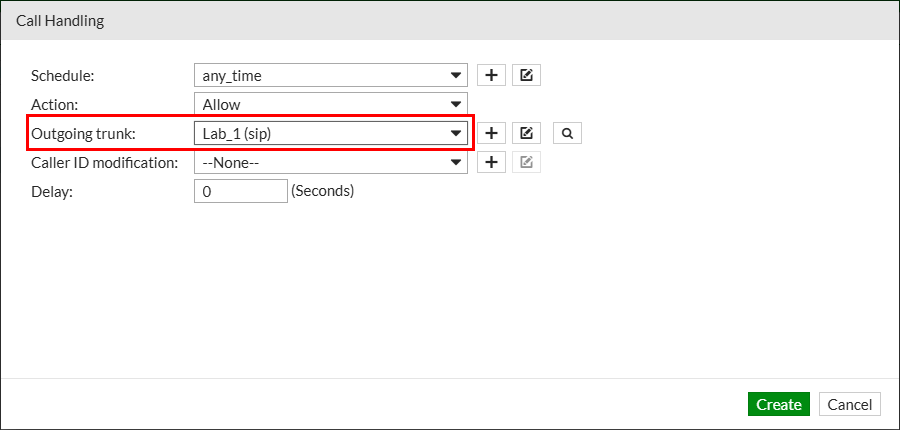
Complete the following fields to add a new call handling for the outbound call routing rule (replace NN with your assigned two-digit lab number):
any_timeAllowLAB_NN (sip)Click the OK button at the bottom of the page to add the new call handling.
Click the OK button to update the outbound call routing rule.
Repeat the same steps for the emergency outbound call routing rule, using the same LAB_NN SIP trunk for the outbound call routing rule call handling.
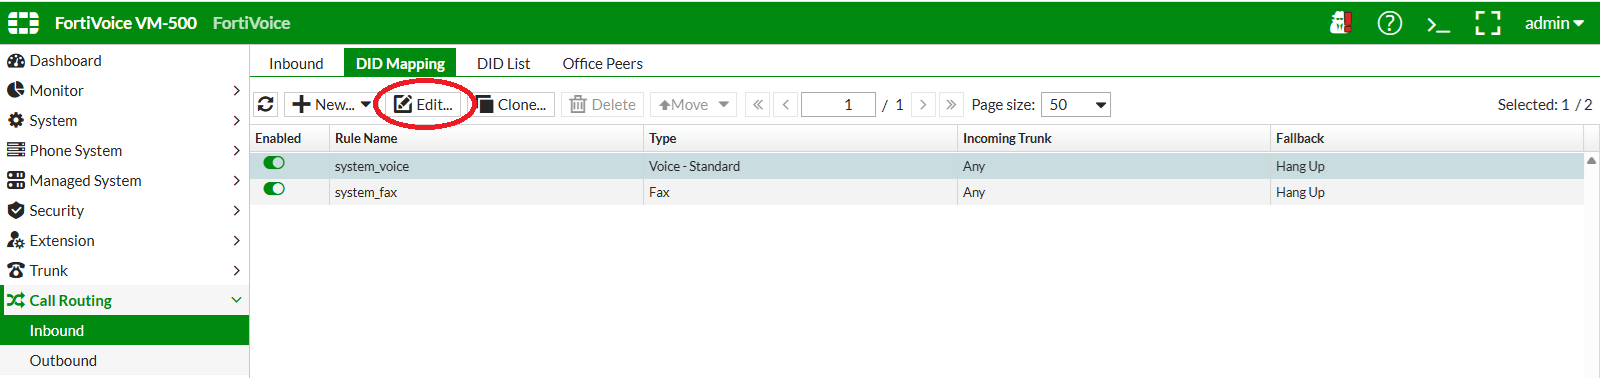
On the FortiVoice web administration page, select Call Routing and Inbound on the left-hand menu.
Select the DID Mapping tab to manage DID mapping rules.
Select the system_voice rule and click the Edit button to edit the DID mapping rule.
In the Number Mapping section, click the New button to add a new DID mapping
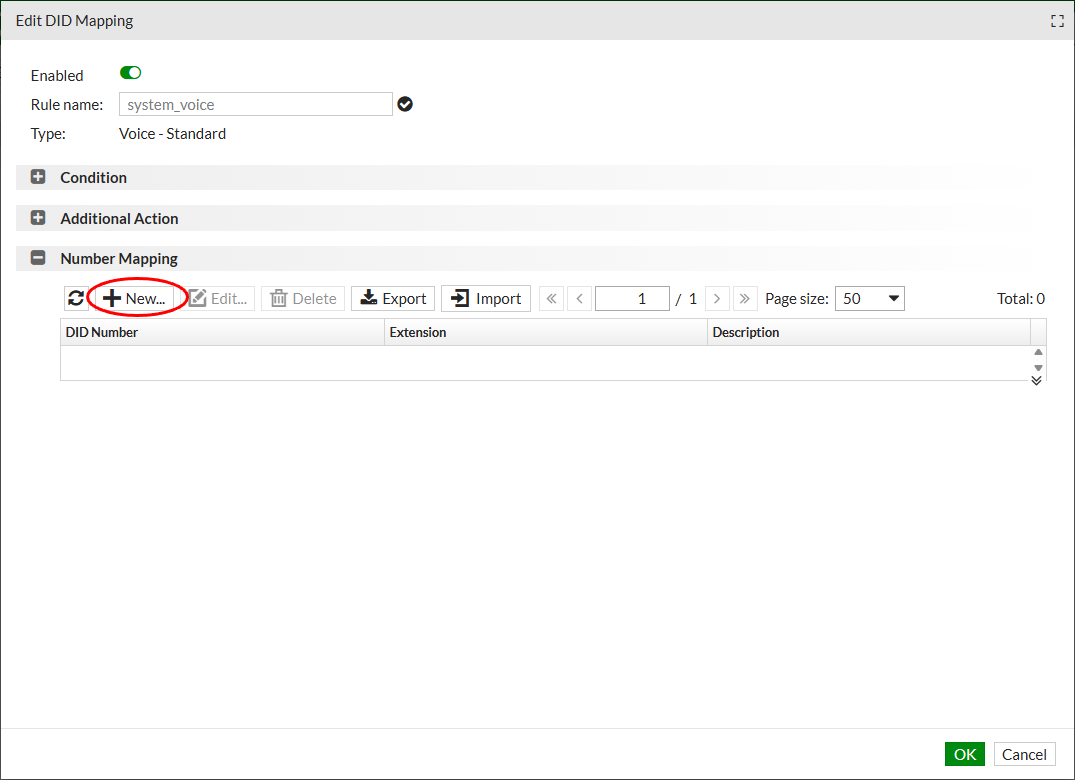
Complete the following fields to map extension 1000 to DID 19990NN1000 (replace NN with your assigned two-digit lab number):
19990NN10001000Click the Create button at the bottom of the page to create the new DID mapping.
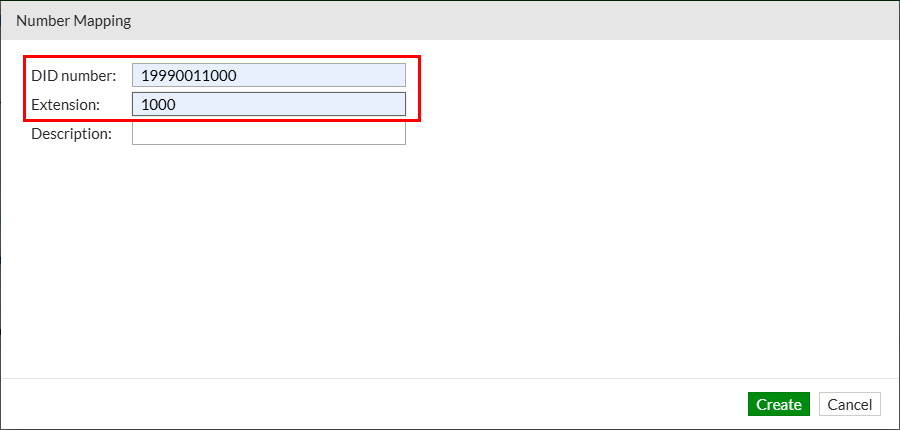
Repeat previous steps to:
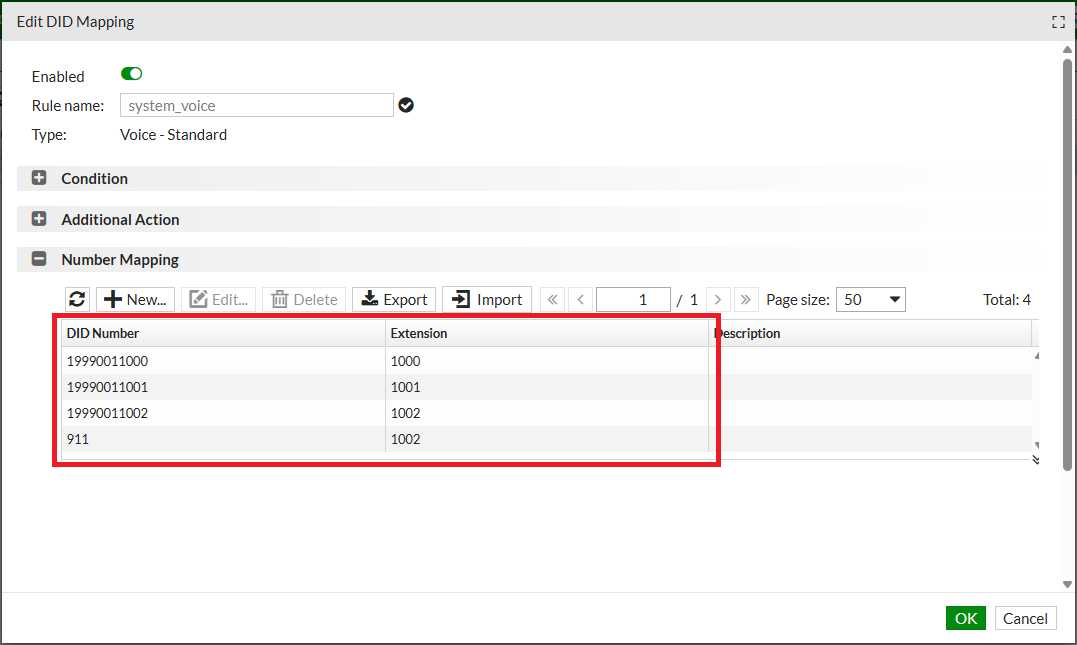
Inbound call routing rules determine how FortiVoice handles external incoming calls that are not routed by a DID mapping. Rules can match the caller ID or called number and apply one or more call-handling actions.
On the FortiVoice web administration page, select Call Routing and Inbound on the left-hand menu.
Select the Inbound tab to manage inbound call routing rules.
Select the incoming_default rule and click the Edit button to edit the inbound call routing rule.
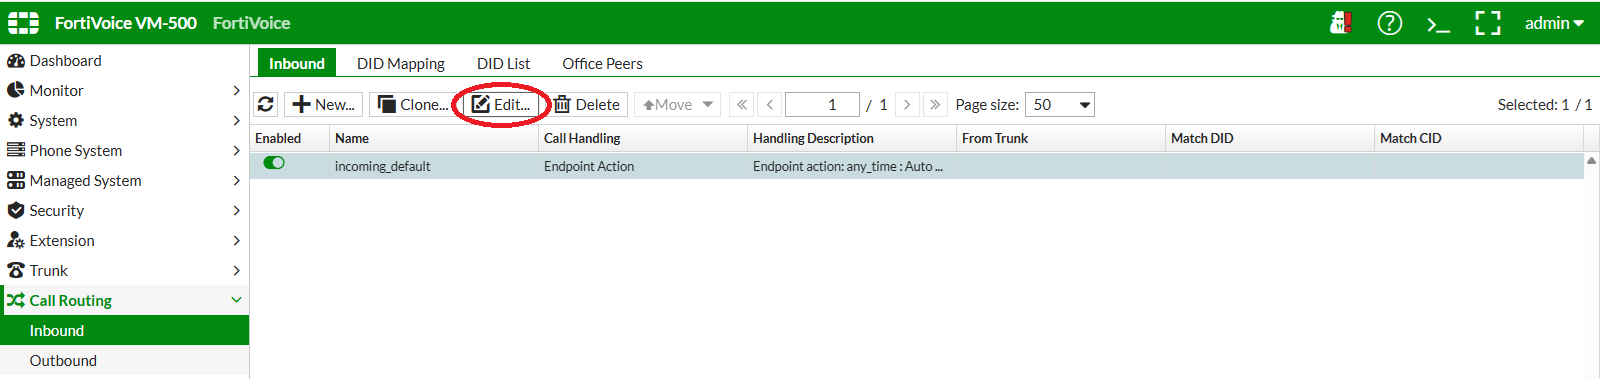
Complete the following fields to assign Lab_N SIP trunk to this inbound call routing rule (replace NN with your assigned two-digit lab number):
LAB_NNNotice in the Call Handling section that the default action for this inbound call routing rule is to route the calls to the predefined auto_attendant_default automated attendant.
Click the OK button at the bottom of the page to update the inbound call routing rule.
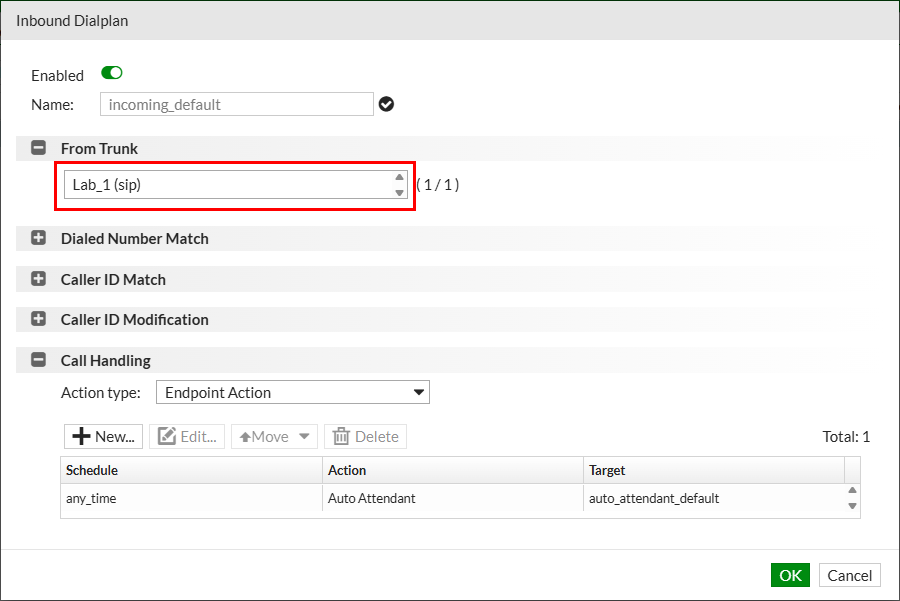
Within the training lab environment, open Client 1 and Client 2 consoles if they are not already opened.
From Client 1, dial 919990NN1001 to call Client 2 using its DID number (replace NN with your assigned two-digit lab number).
The leading 9 is required to make an external call as defined by the dialed number match rules of the outgoing_default outbound call routing rule.
Click the call button to start the call.
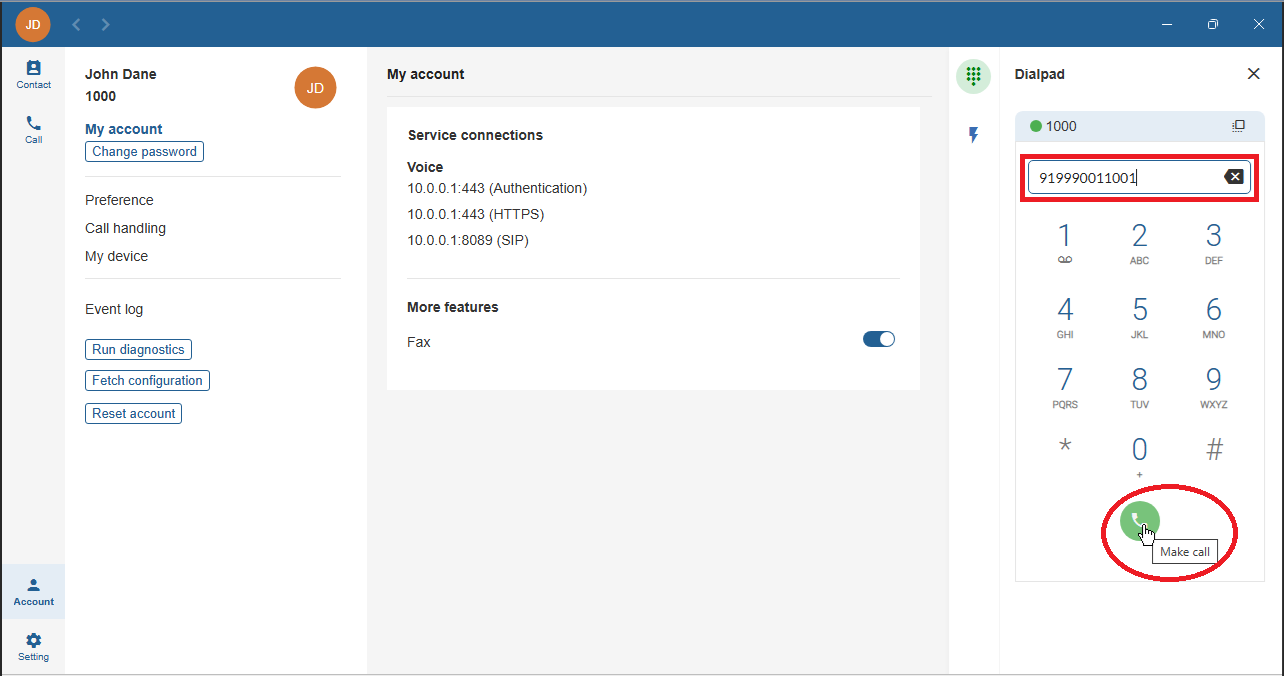
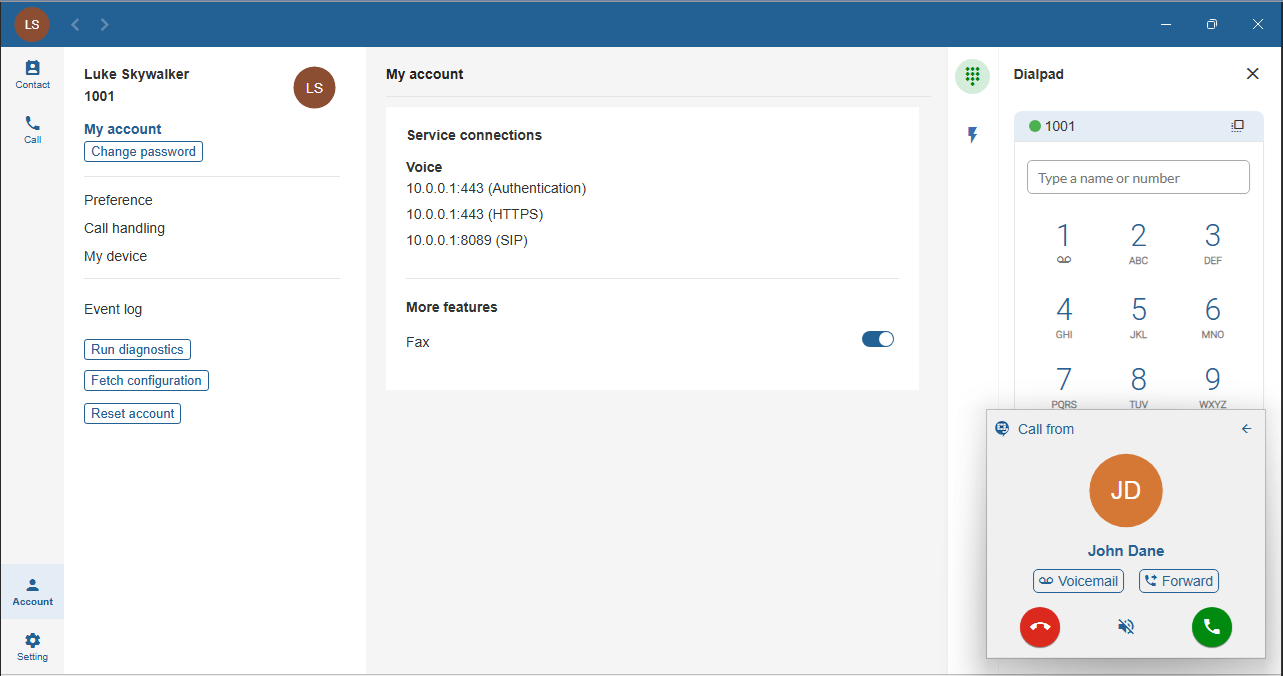
Verify that the call is received on Client 2 and answer the incoming call.
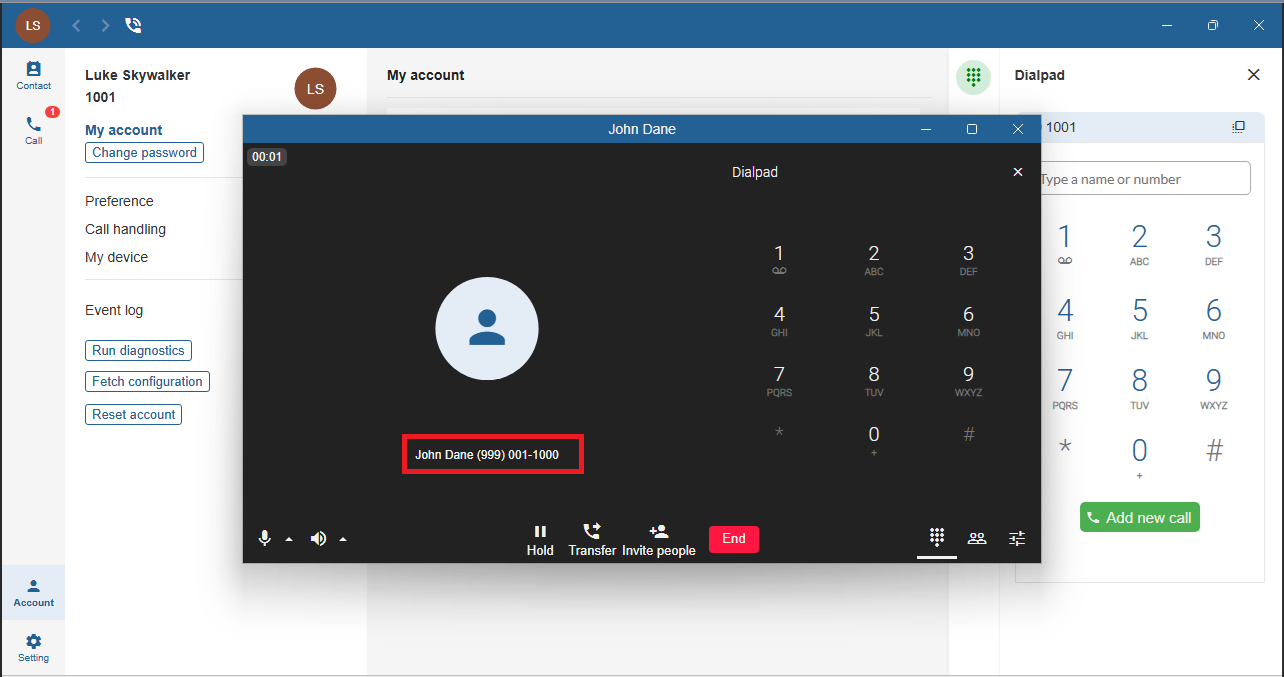
Verify that the caller ID corresponds to the DID assigned to extension 1000 (19990NN1000).
Repeat external call testing by calling other extensions using their DID numbers.
FortiVoice provides several features for controlling how incoming calls are routed to users and services.
A ring group distributes incoming calls among a group of extensions. Depending on the configured strategy, the extensions can ring simultaneously or in a defined sequence.
An automated attendant answers incoming calls and presents callers with a menu of options that can route calls to extensions, ring groups, or other destinations.
A virtual number provides an internal dialable number that can route calls to another FortiVoice destination without requiring a dedicated extension or physical device.
In this section, you will configure these features and use them to build basic call flows.
After completing this section, you will be able to:
Estimated: 20 minutes
On the FortiVoice web administration page, select Extension and Group on the left-hand menu.
Select the Ring Group tab to manage ring groups.
Click the New button to create a new ring group.

Complete the following fields to create the new ring group:
RingGroup11010Ring Group 1AllExtension 1001 and Extension 1002Click the Create button at the bottom of the page to create the new ring group.
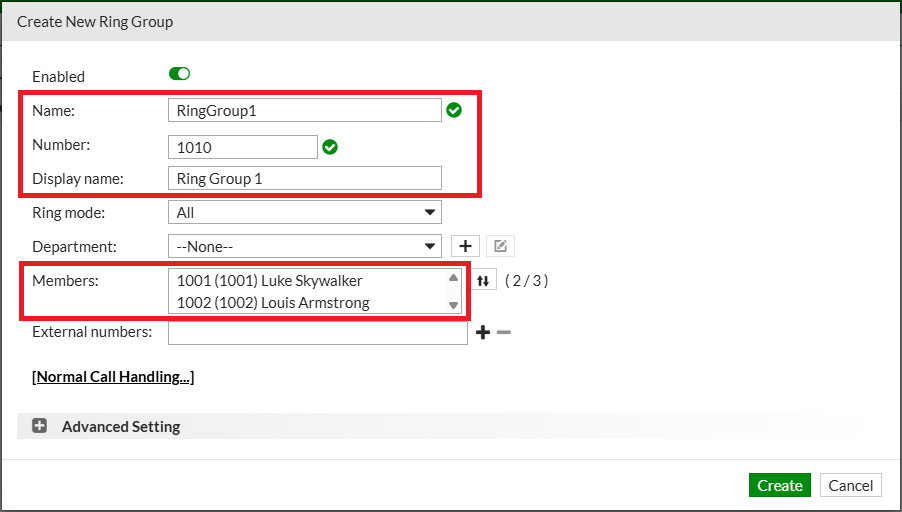
Using Client 1, call the directory number 1010.
Verify that the call is presented on both Client 2 and Client 3.
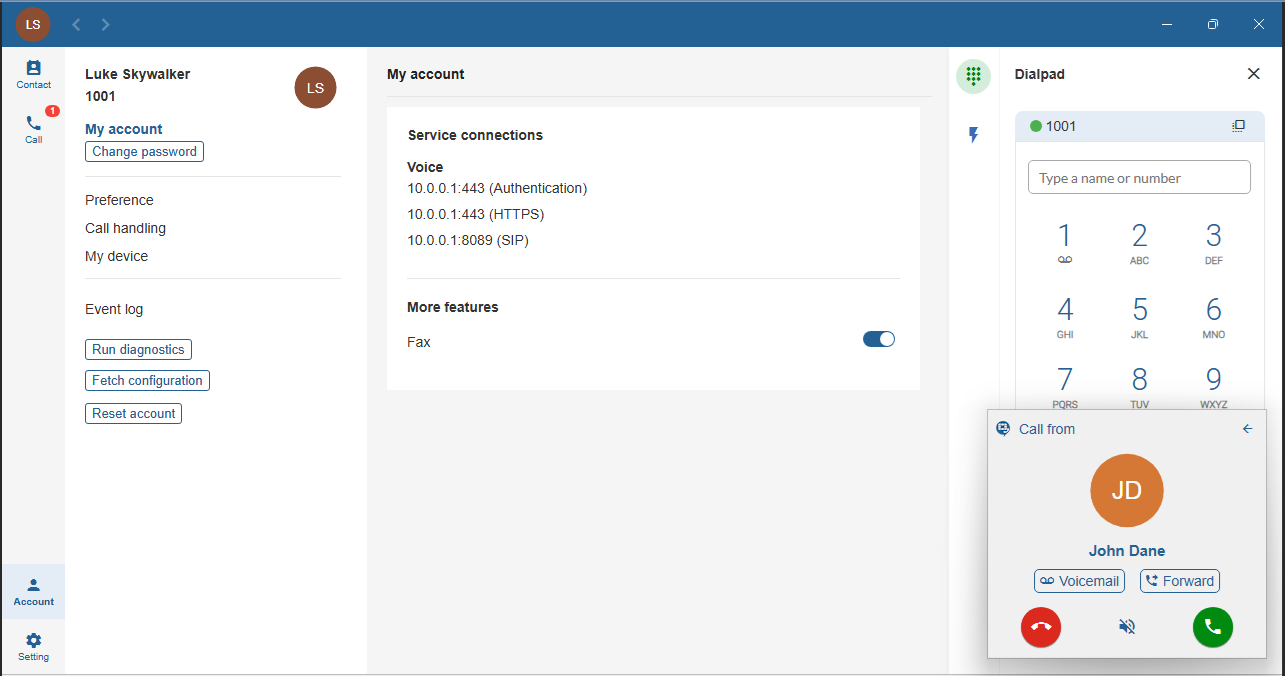
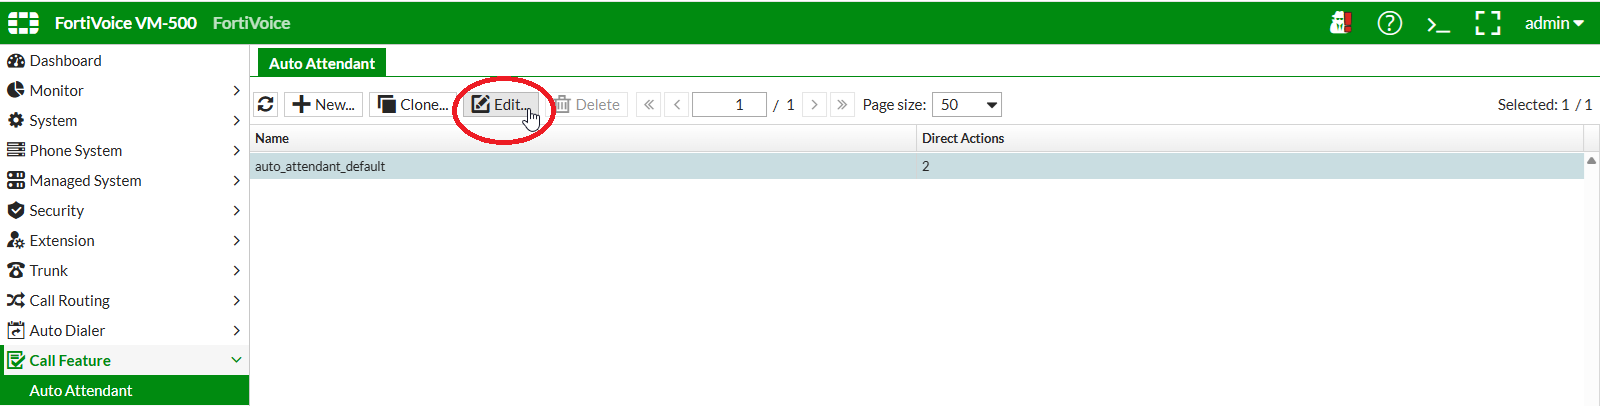
On the FortiVoice web administration page, select Call Feature and Auto Attendant on the left-hand menu.
Select the Auto Attendant tab to manage automated attendants.
Select the auto_attendant_default automated attendant and click the Edit button to edit the automated attendant.
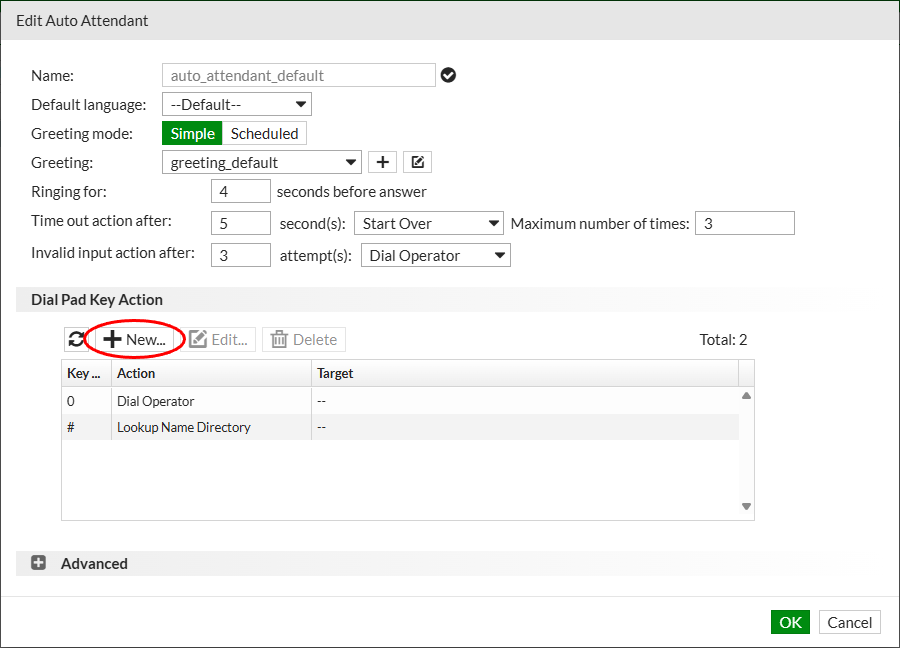
Click the New button in the Dial Pad Key Action section to add a new action item for this automated attendant.
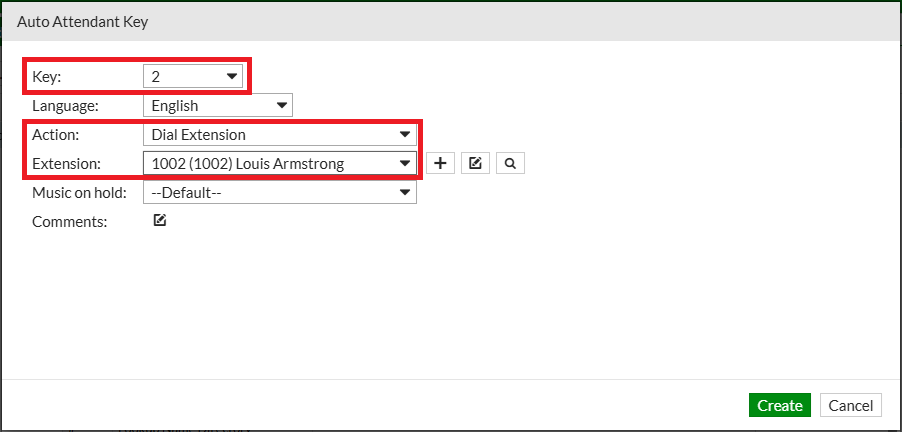
Complete the following fields to create the new action item:
2Dial Extension1002Click the Create button at the bottom of the page to create the new action item for the automated attendant.
The new action item will be added to the Dial Pad Key Action list.
Click the OK button to update the automated attendant.
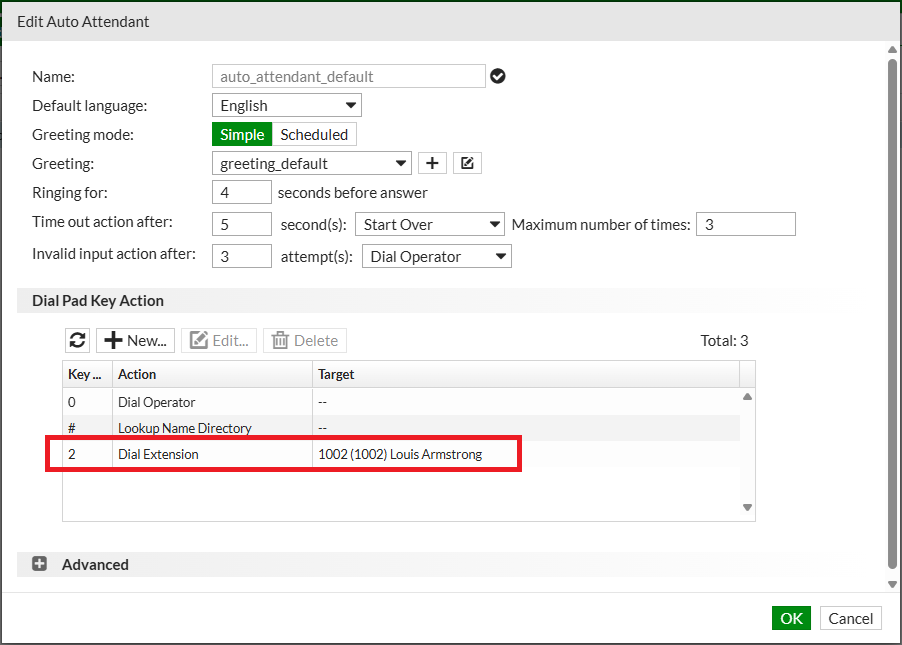
This automated attendant will be used with the virtual number configured in the next exercise.
An automated attendant does not have its own extension number. To allow internal extensions to dial it directly, create a virtual number and route that number to the automated attendant.
On the FortiVoice web administration page, select Extension and Virtual Number on the left-hand menu.
Select the Virtual Number tab to manage virtual numbers.
Click the New button to create a new virtual number.
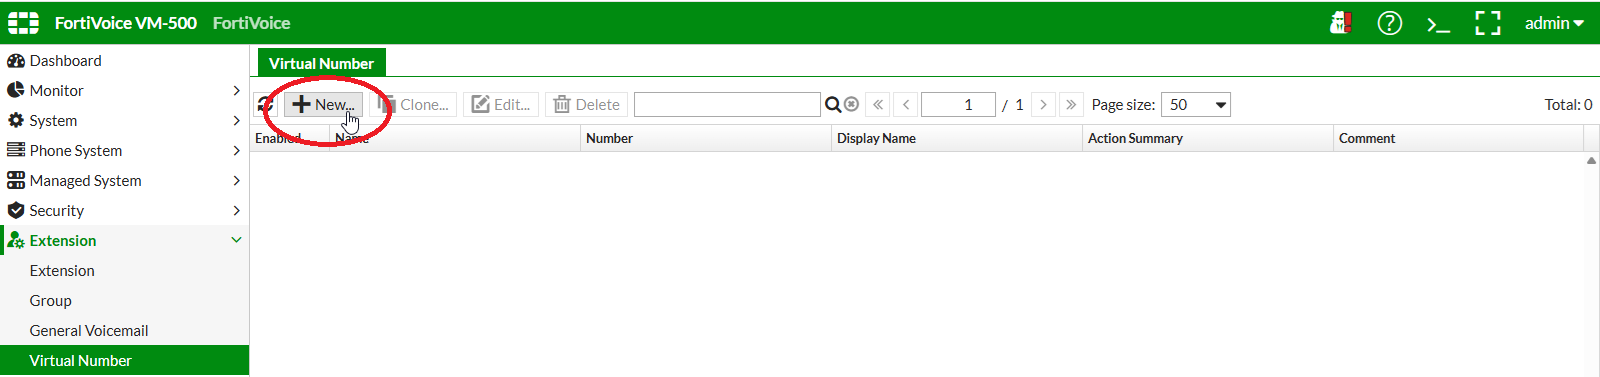
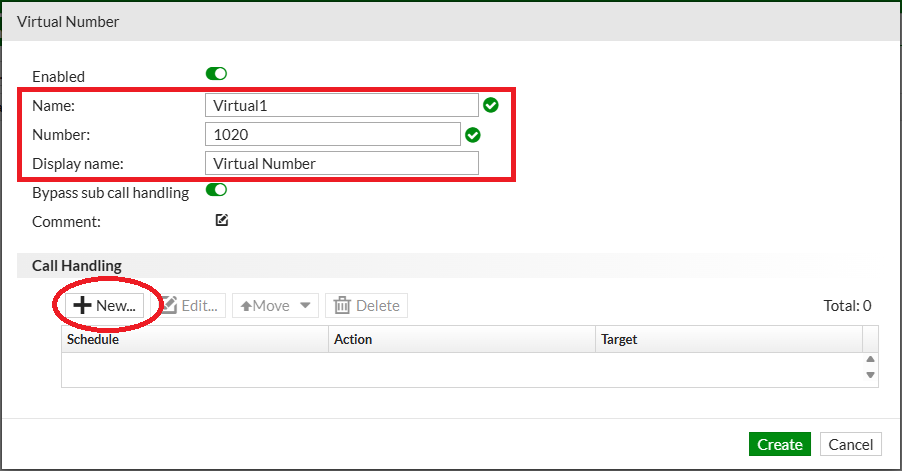
Complete the following fields to create the new virtual number:
Virtual11020Virtual NumberClick the New button in the Call Handling section to add a new call handling item for this virtual number.
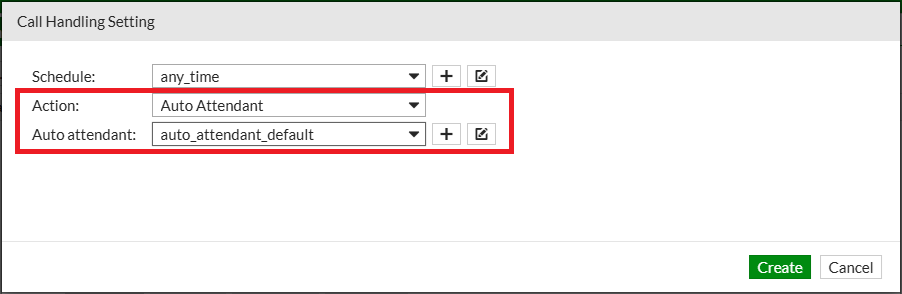
Complete the following fields to manage the virtual number call handling item:
Auto Attendantauto_attendant_defaultClick the Create button at the bottom of the page to create the new virtual number call handling item.
Click the Create button to create the virtual number.
Using extension 1000 from Client 1, call the directory number 1020.
When the call is established, press 2 and verify that the call is transferred to extension 1002.
Call Detail Records (CDRs) provide information about calls processed by FortiVoice.
CDRs include information such as the calling and called numbers, call direction, start time, duration, and call status. Administrators can use CDRs to review call activity and troubleshoot call-related issues.
After completing this section, you will be able to:
Estimated: 5 minutes
On the FortiVoice web administration page, select Monitor and Call History on the left-hand menu.
Select the Call Detail Record tab to access call detail records.

Select one of the call detail records by double-clicking it.

Review the call flow to see the events that occurred during the call.
The call detail record can also be exported for further analysis if needed.
FortiVoice provides several mechanisms for blocking unwanted calls.
Administrators can configure system-wide blocked numbers and block calls based on geographic area codes or number patterns. Individual users can also maintain personal blocked-number lists for their extensions.
In this section, you will configure and test the different call-blocking options available in FortiVoice.
After completing this section, you will be able to:
Estimated: 5 minutes
On the FortiVoice web administration page, select Security and Blocked Number on the left-hand menu.
Select the Blocked Number tab to manage system blocked numbers.
Click the New button to create a new blocked number.
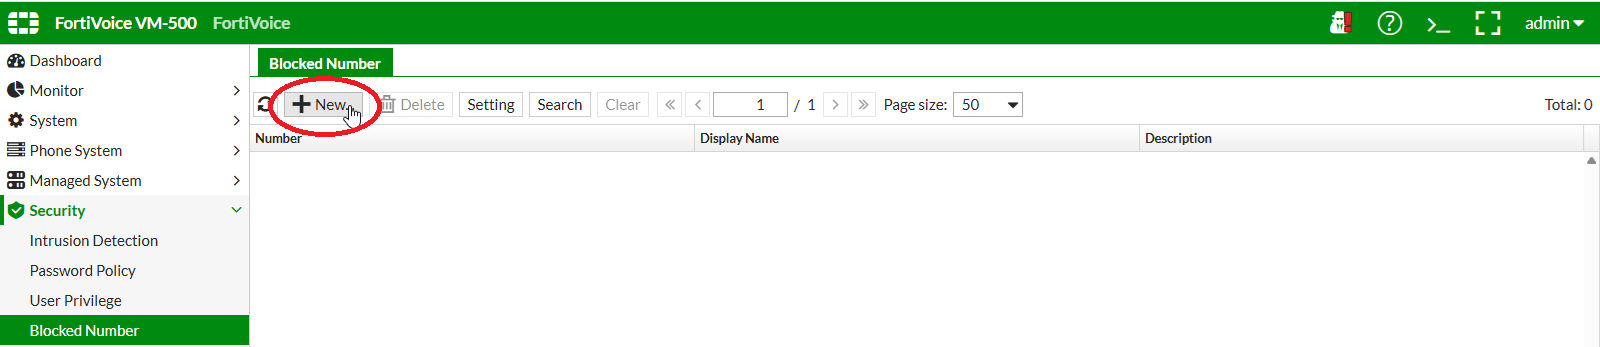
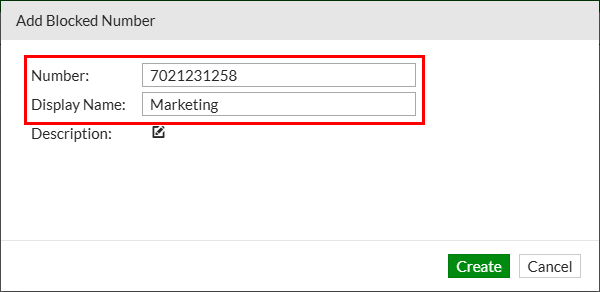
Complete the following fields to create the new blocked number:
7021231258MarketingClick the Create button to create the new blocked number.
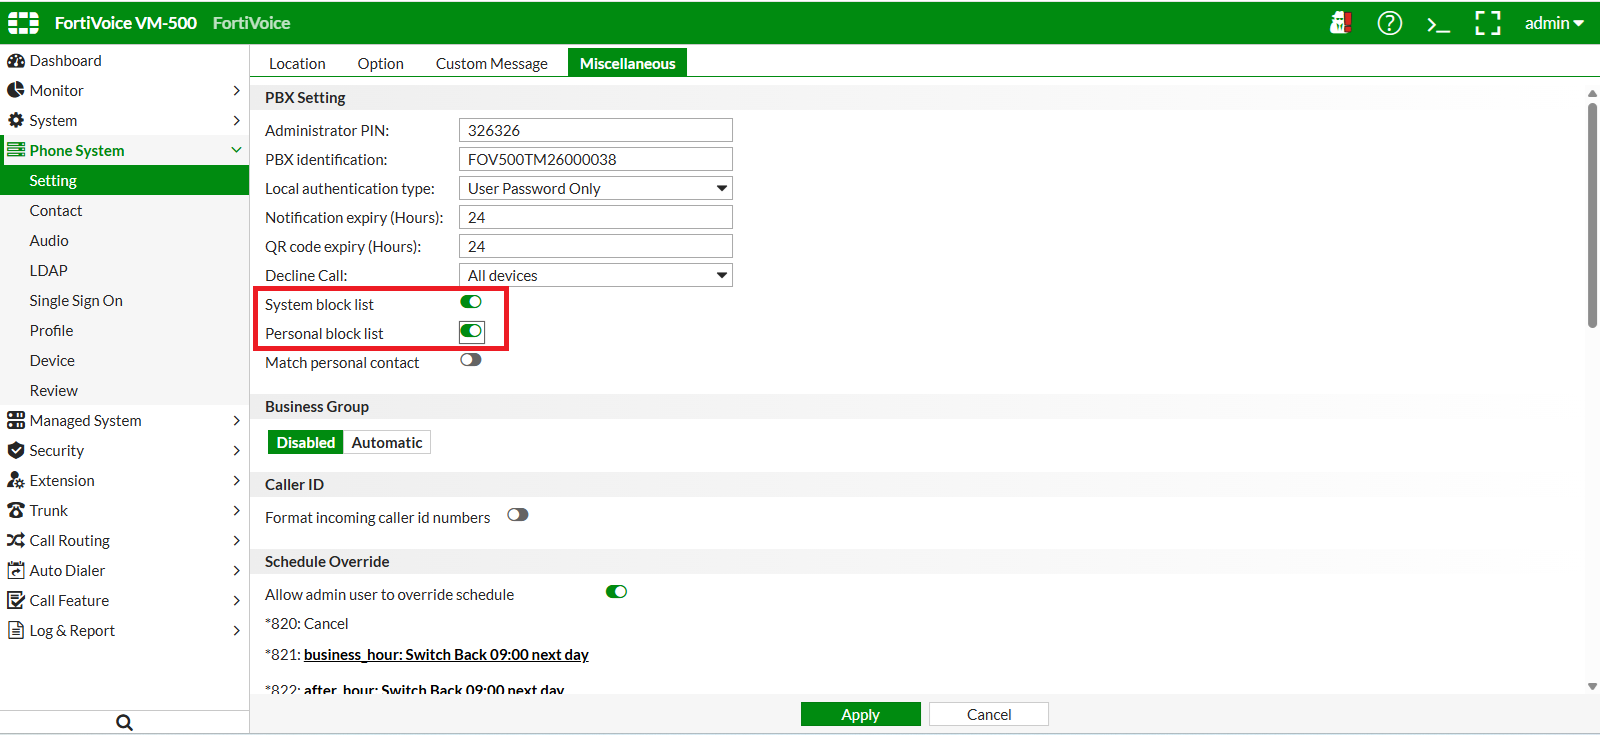
To be active, blocked number and Personal blocked list need to be enabled in the phone system settings.
On the FortiVoice web administration page, select Phone System and Setting on the left-hand menu.
Select the Miscellaneous tab to manage phone system settings.
Enable System block list and Personal block list features.
Click the Apply button at the bottom of the page to apply the new settings.
On the FortiVoice web administration page, select Call Routing and Inbound on the left-hand menu.
Select the Inbound tab to manage inbound call routing rules.
Click the New button to create a new inbound call routing rule.
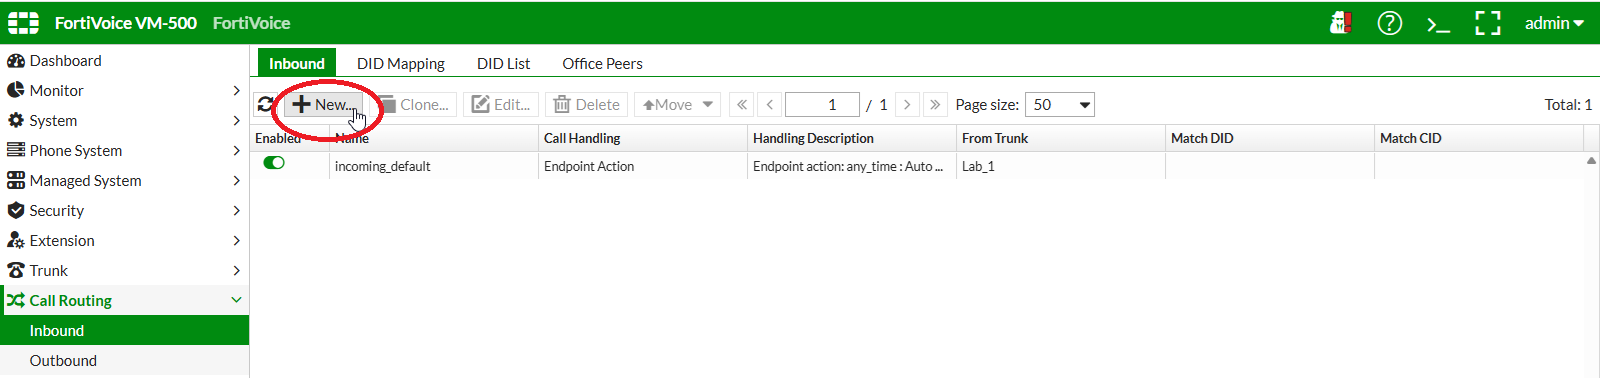
Complete the following fields to create the new inbound call routing rule:
Area_51Lab_N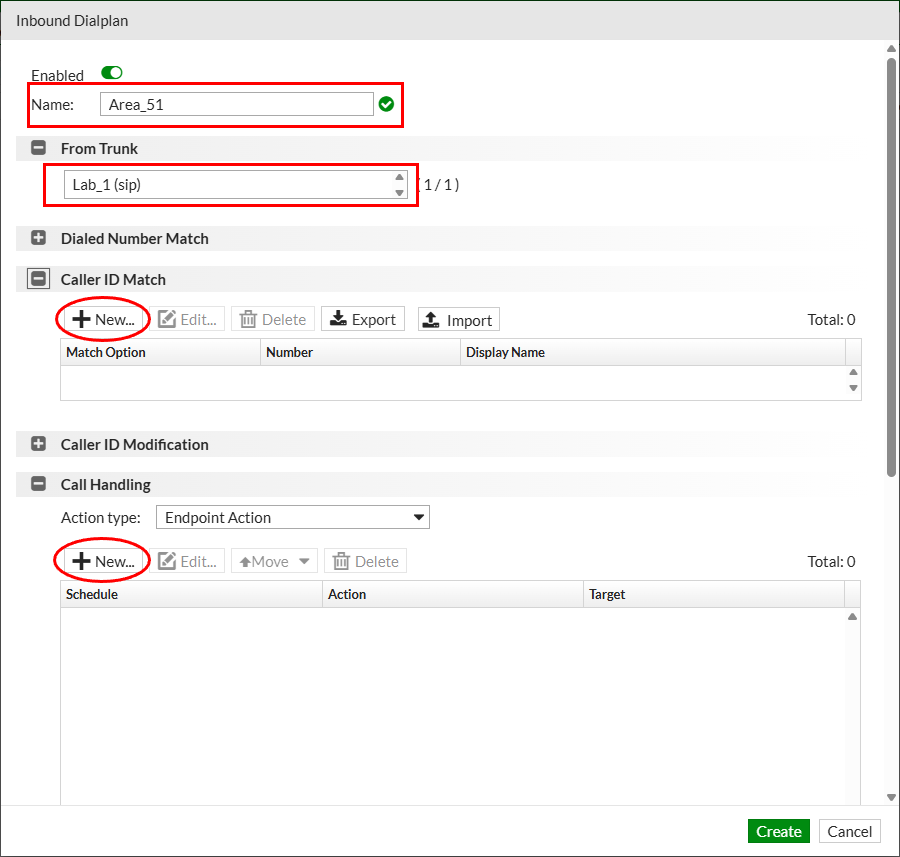
Click the New button in the Caller ID Match section to create a new caller ID match rule.
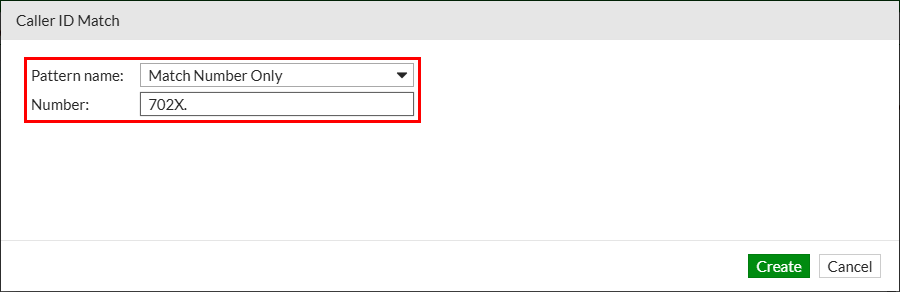
Complete the following fields to create the new caller ID match rule rule:
Match Number Only702X.Click the Create button to create the Caller ID match rule
Click the New button in the Call Handling section to create a new call handling rule.
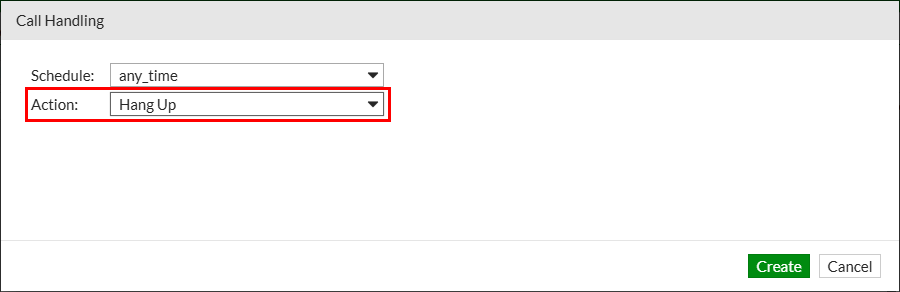
Complete the following fields to create the new call handling rule:
Hang UpClick the Create button to create the Caller ID match rule
Click the Create button to create the inbound calling rule.
702X. as number. This will block any incoming call with a calling ID starting with 702Click the Create button to create the new inbound call routing rule.
Click the Call button, then select Call history.
Select an external incoming call and click Block contact to block the caller.
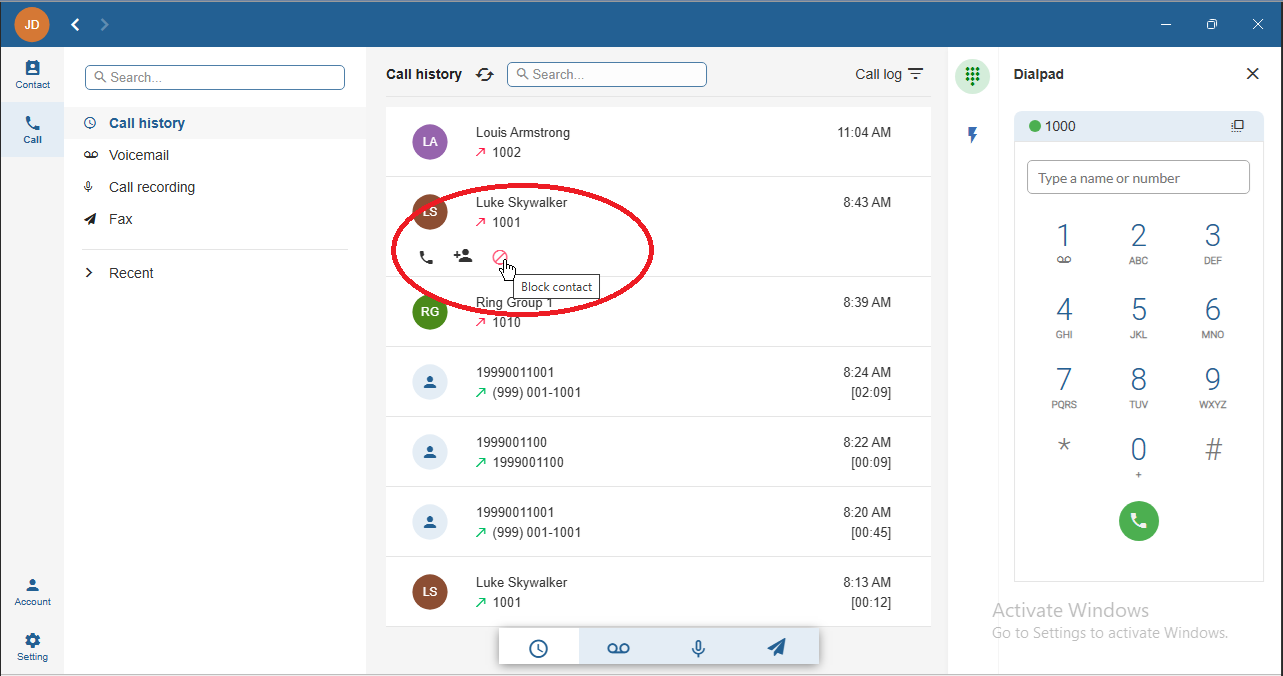
This can also be accomplished through the user web portal.
eFax in FortiVoice allows users to send and receive faxes electronically without requiring a dedicated physical fax machine.
Incoming faxes can be delivered to designated users or email addresses and can be archived for later access. FortiVoice can also integrate with analog fax devices through supported analog gateways when required.
In this section, you will create an eFax account and send a test fax.
After completing this section, you will be able to:
Estimated: 15 minutes
On the FortiVoice web administration page, select Call Feature and Fax on the left-hand menu.
Select the eFax Account tab to manage eFax accounts.
Click the New button to create a new eFax account.
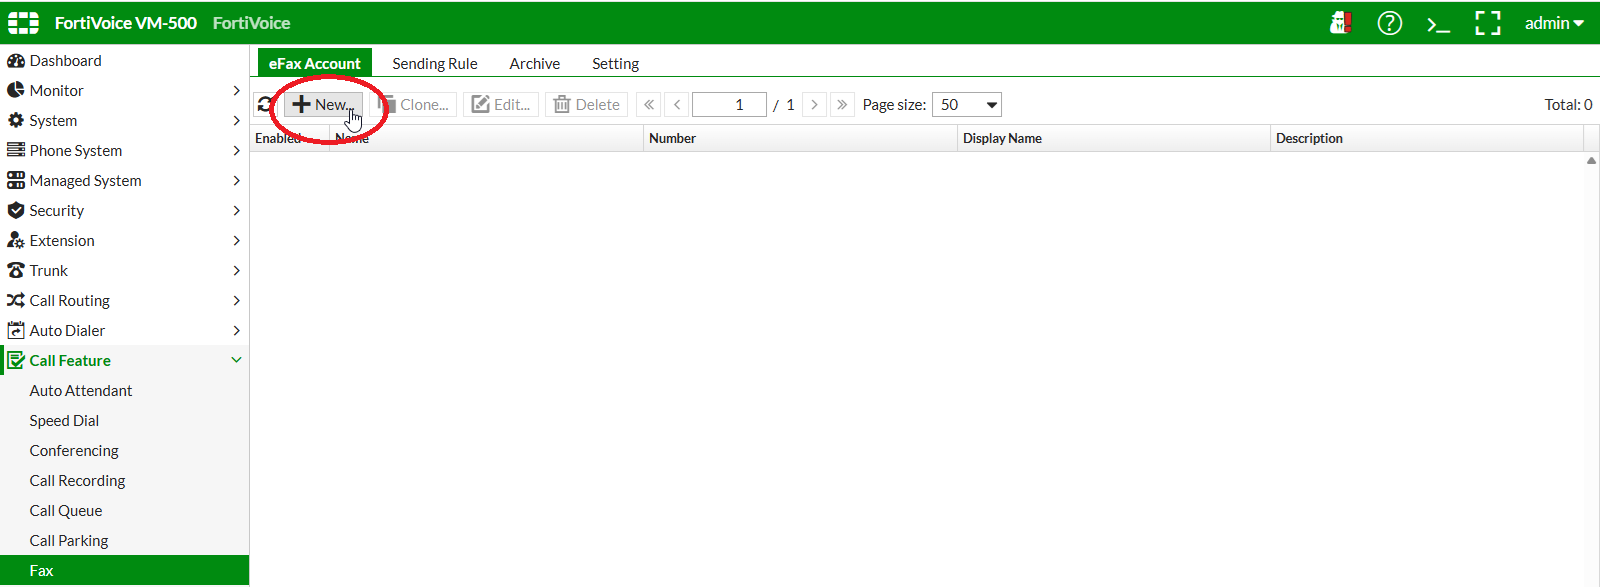
Complete the following fields to create the new eFax account:
eFax12001Fax 1Extension 1001In the External Numbers section, click the New button.
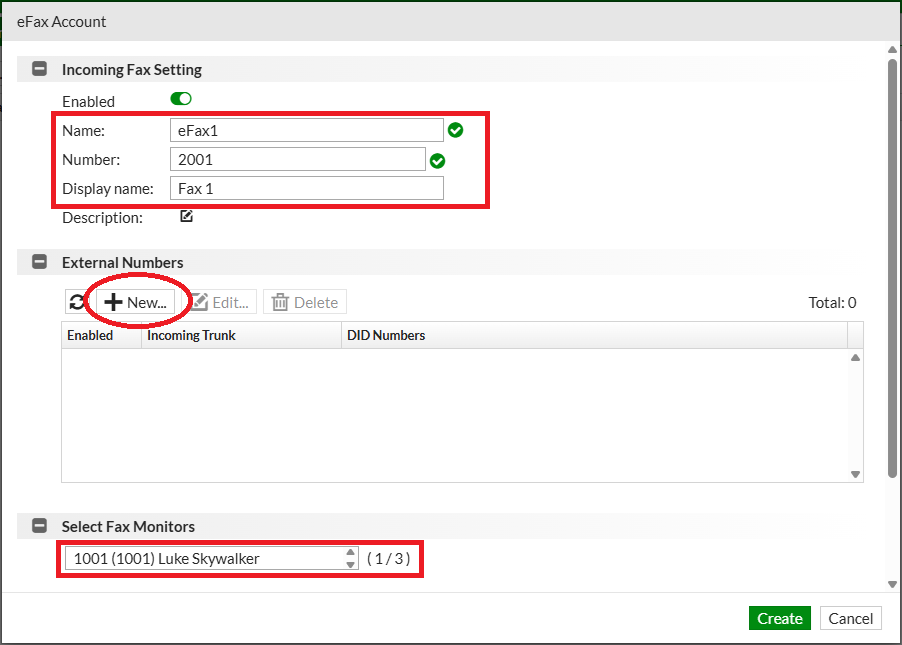
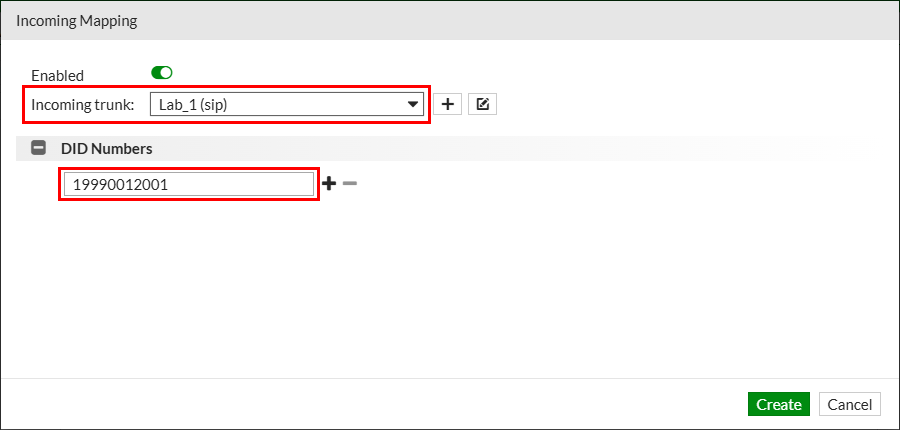
Complete the following fields to create the new eFax account external numbers:
LAB_NN19990NN2001 (replace NN with your assigned two-digit lab number)Click the Create button to create the eFax account incoming mapping. Click the Create button to create the eFax account.
On the FortiVoice web administration page, select Call Feature and Fax on the left-hand menu.
Select the Sending Rules tab to manage eFax sending rules.
Click the New button to create a new eFax sending rule.
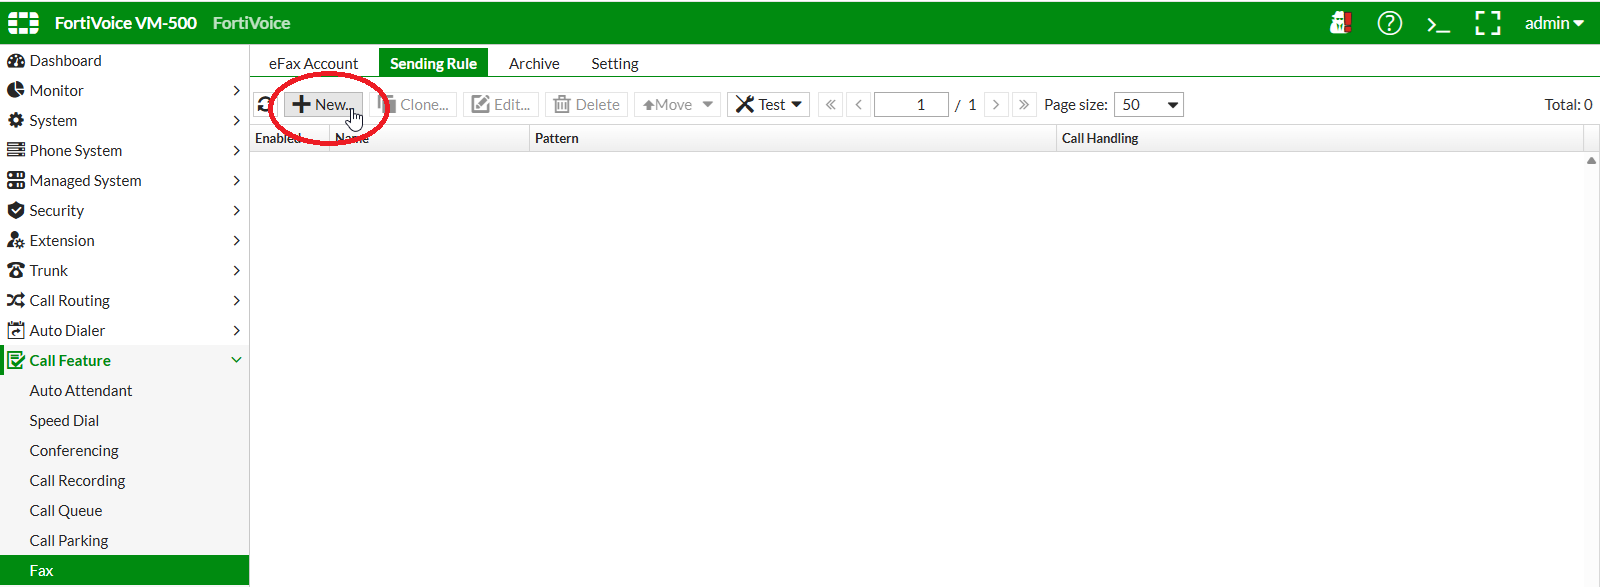
Complete the following fields to create the new eFax sending rule:
eFaxRule1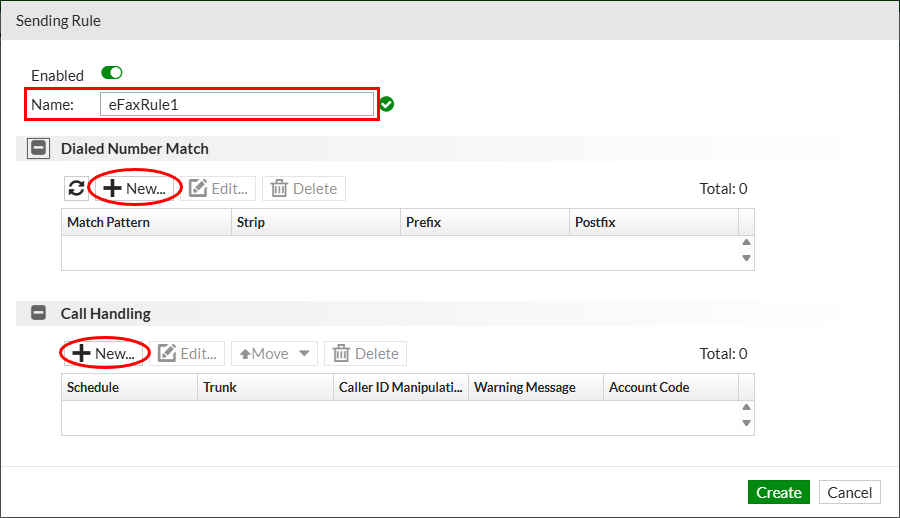
In the Dialed Number Match section, click the New button.
Complete the following fields to create the new eFax sending rule dialed number match:
1NX.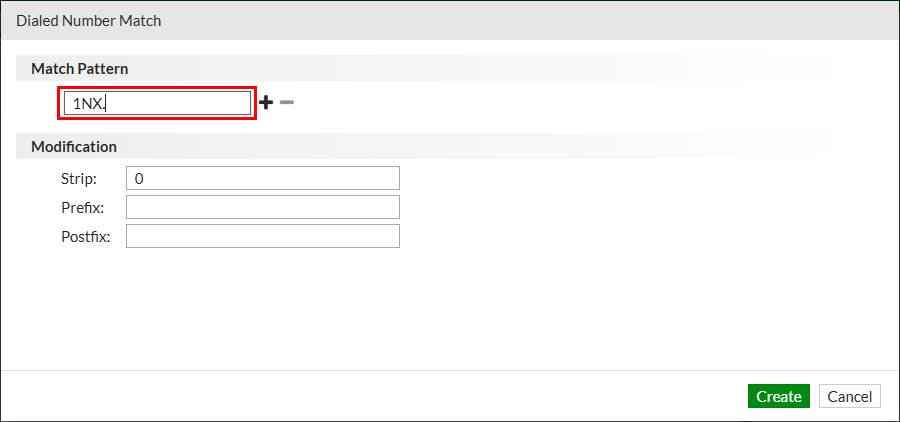
In the match pattern 1NX., N is a dial-pattern symbol and must not be replaced with your lab number.
Click the Create button to create the eFax sending rule dialed number match.
In the Call Handling section, click the New button.
Complete the following fields to create the new eFax sending rule call handling:
LAB_NN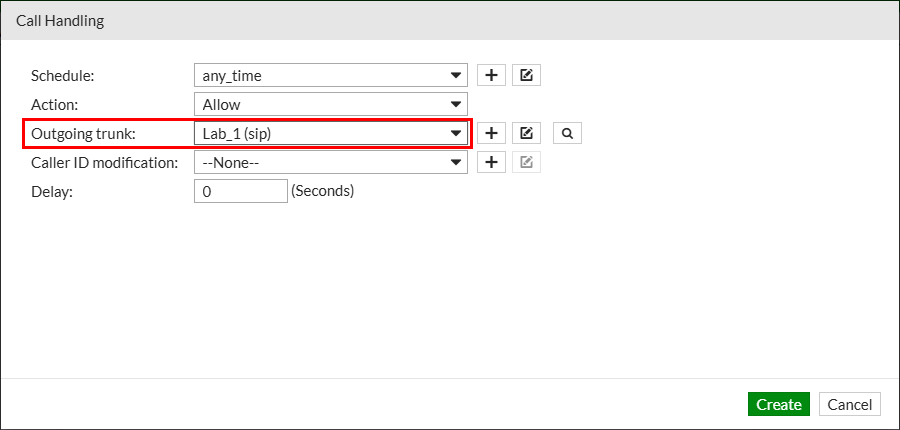
Click the Create button to create the eFax sending rule call handling.
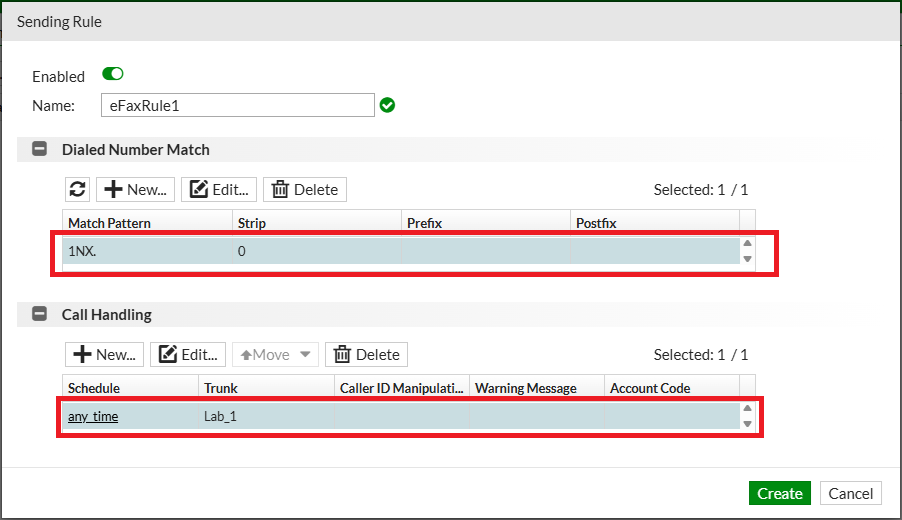
Click the Create button to create the eFax sending rule.
Using Client 1, click the Call button and select the Fax menu. Click the Send Fax button.
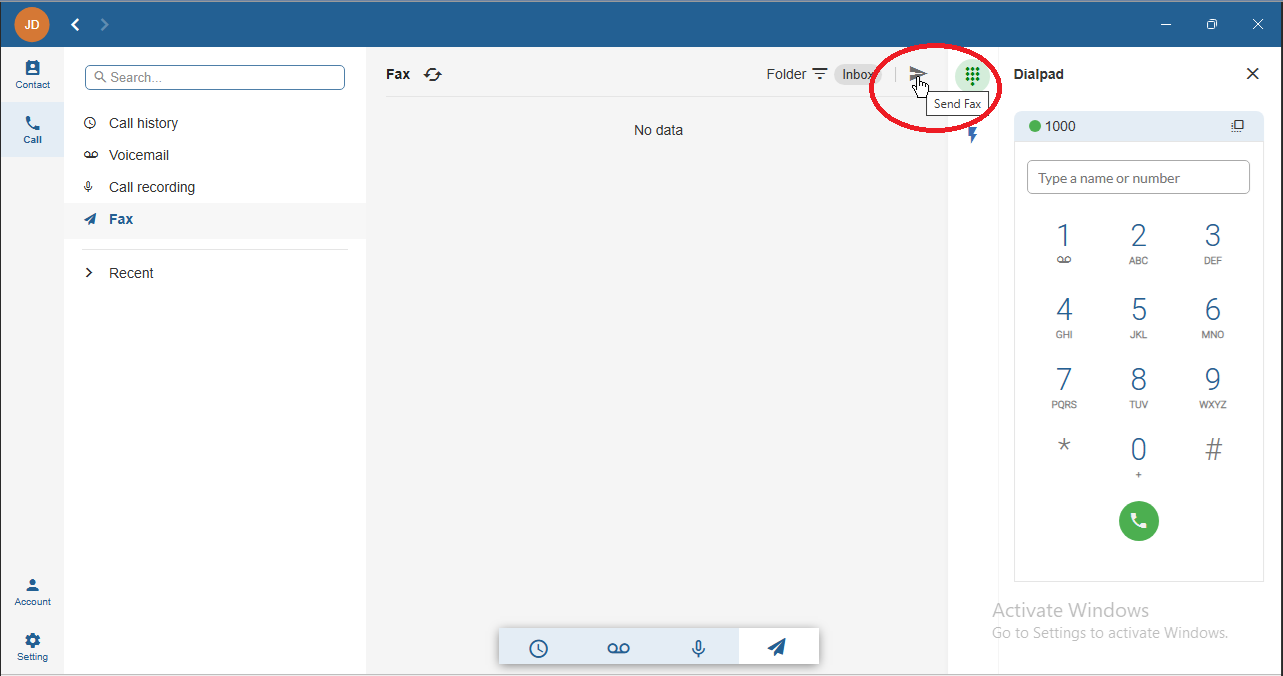
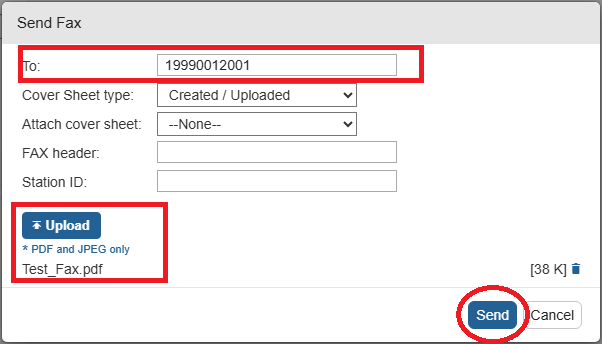
Set the To field to 19990NN2001, replacing NN with your assigned two-digit lab number and click the Upload button.
Select the Test_Fax.pdf file available on the client desktop, then click the Send button.
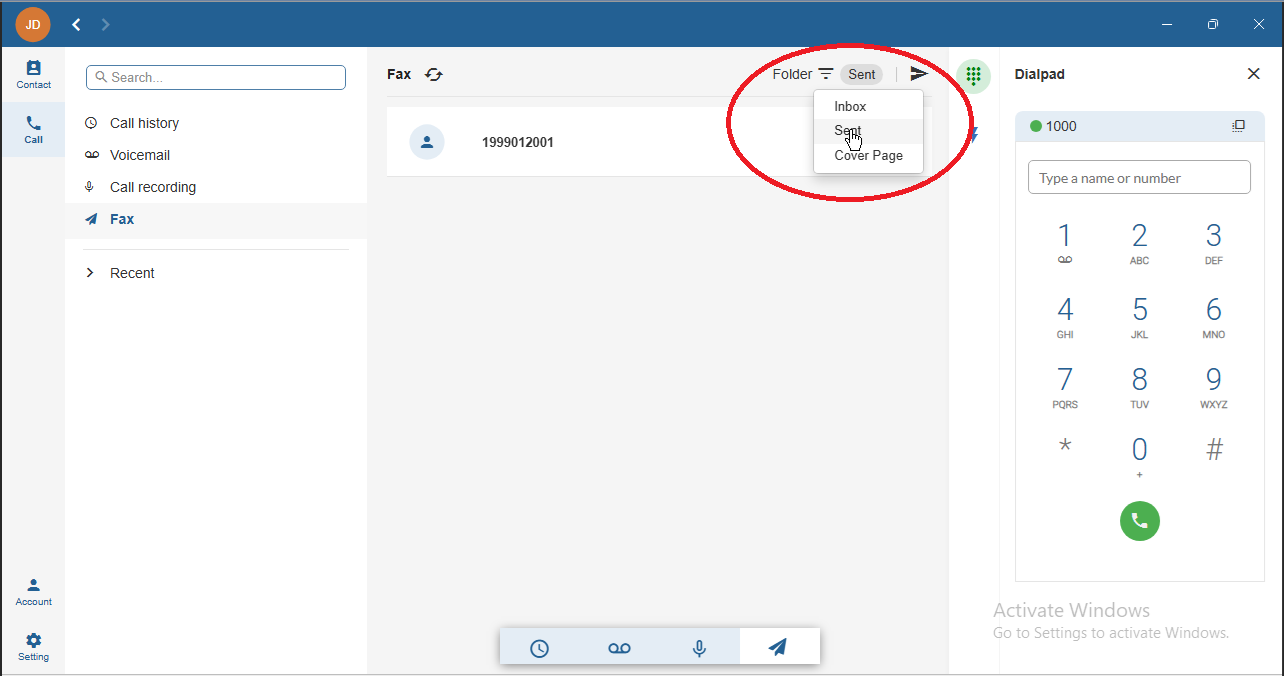
You can check the fax status in the Sent folder.
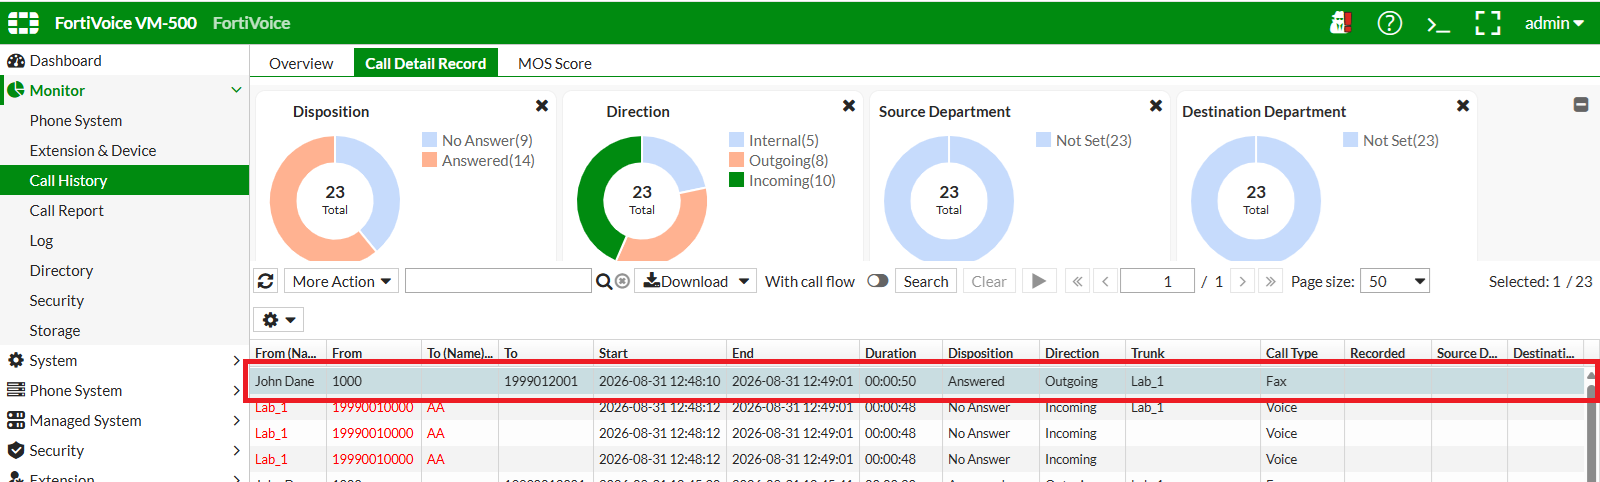
You can also verify the fax call from Monitor > Call History > Call Detail Record on the FortiVoice web administration page.
Using Client 2, click the Call button and select the Fax menu.
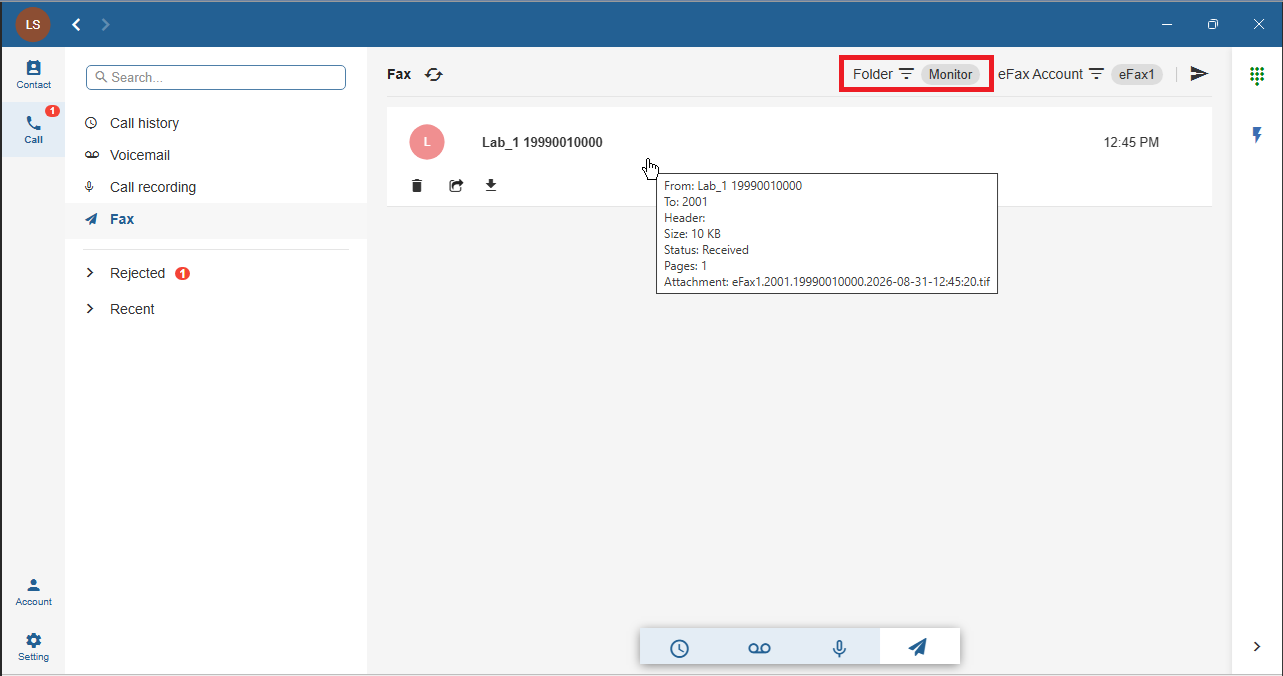
Because extension 1001 is configured as a fax monitor for eFax account 2001, received faxes are available in the Monitor folder.
This can also be accomplished through the user web portal.
FortiVoice emergency calling features can provide additional notifications and monitoring when a 911 call is placed.
Emergency zones can be used to associate extensions with specific locations and define the actions that occur when an emergency call is made. FortiVoice can notify designated personnel, send email notifications, broadcast emergency messages, and allow authorized personnel to monitor emergency calls.
In this section, you will configure an emergency message group and an emergency zone, review emergency call recording options, and place a simulated 911 test call.
After completing this section, you will be able to:
Estimated: 15 minutes
On the FortiVoice web administration page, select Extension and Group on the left-hand menu.
Select the Message Group tab to manage message groups.
Click the New button to create a new message group.

Complete the following fields to create the new message group:
9111911911TextClick the Text… link to manage the message group text.
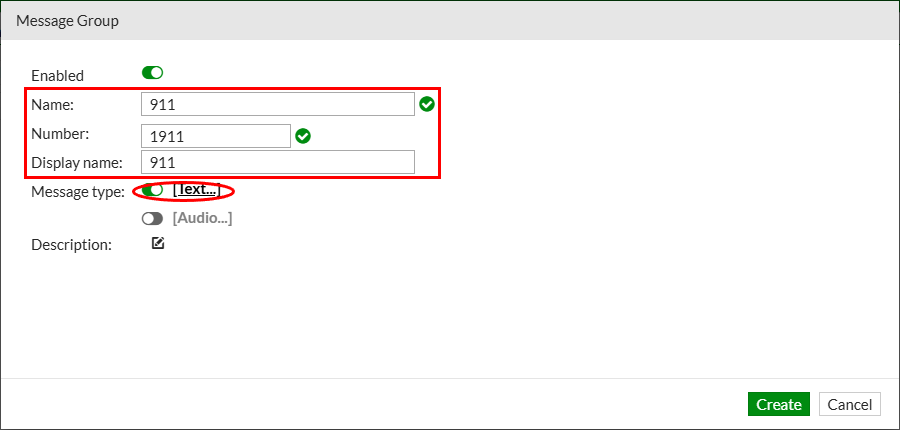
The text message can include variables that FortiVoice populates when the emergency call occurs.
Click the + sign next to the User group field to add users to notify with this message group text.
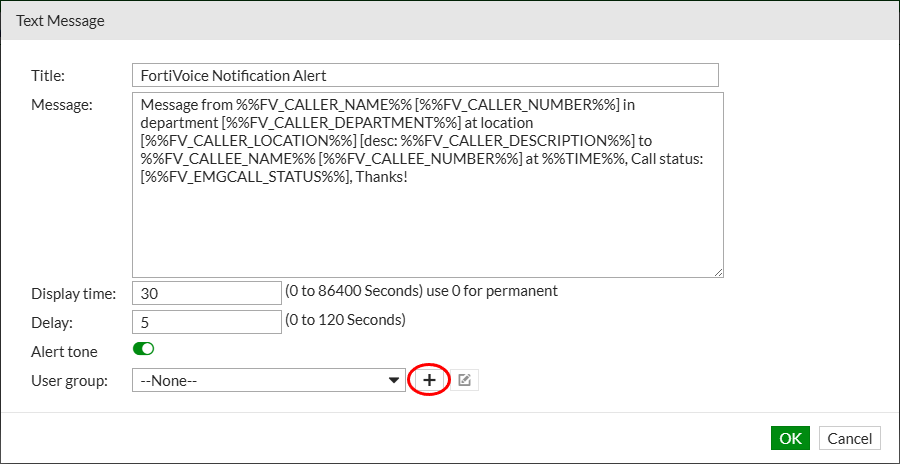
Complete the following fields to create the new user group for the message group text:
911Extension 1001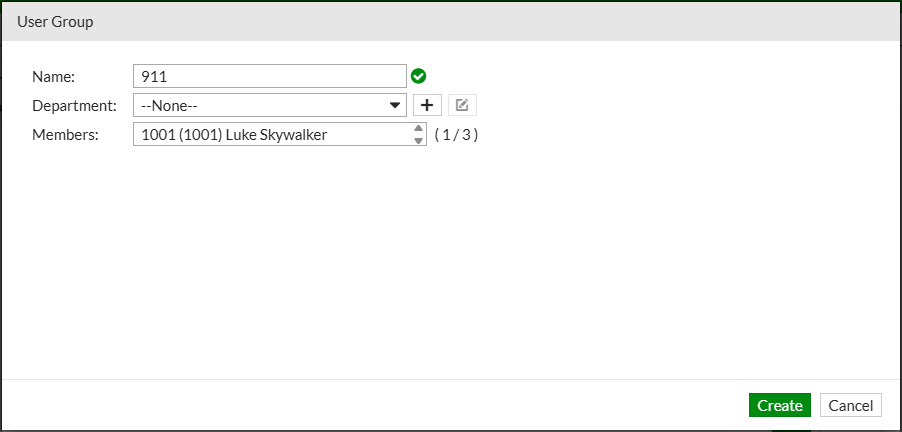
Click the Create button to create the user group for the message group text.
Click the OK button to close the message group text configuration.
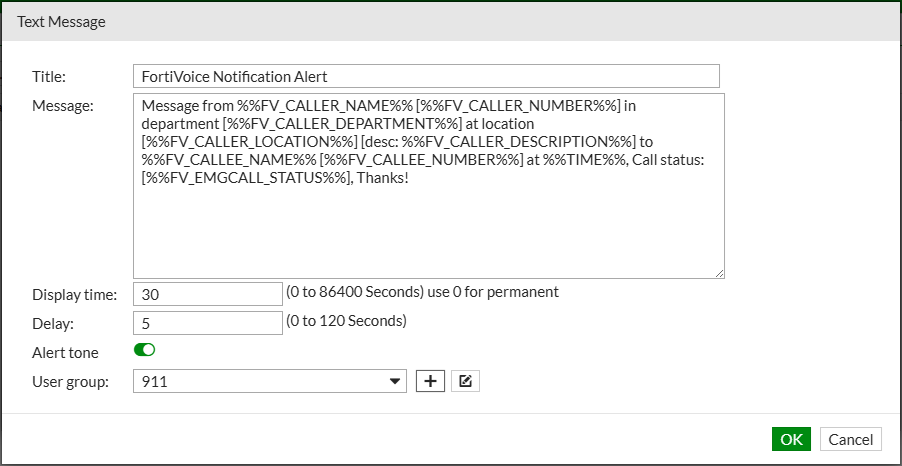
Click the OK button to create the message group.
On the FortiVoice web administration page, select Phone System and Profile on the left-hand menu.
Select the Emergency Zone tab to manage emergency zone profiles.
Click the New button to create a new emergency zone profile.
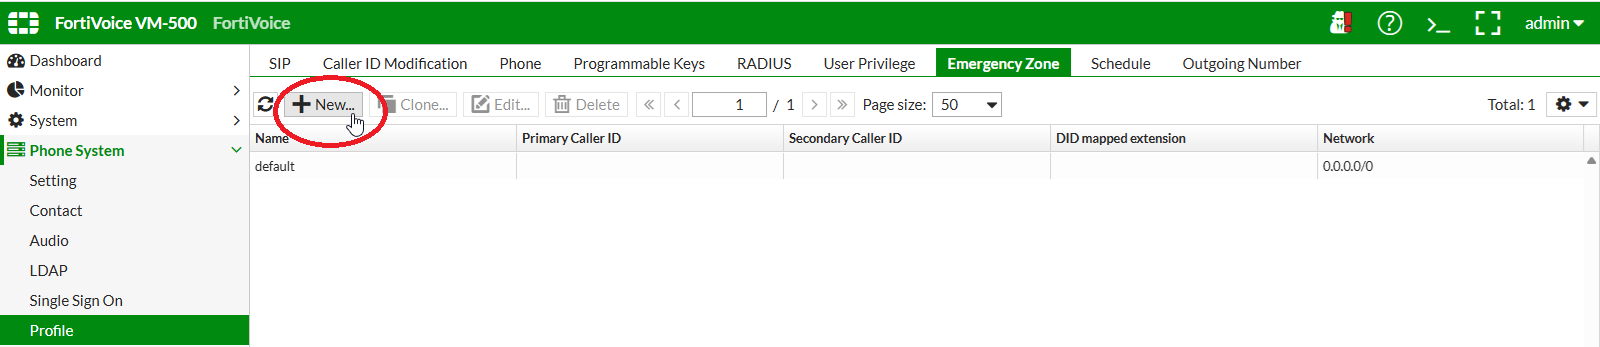
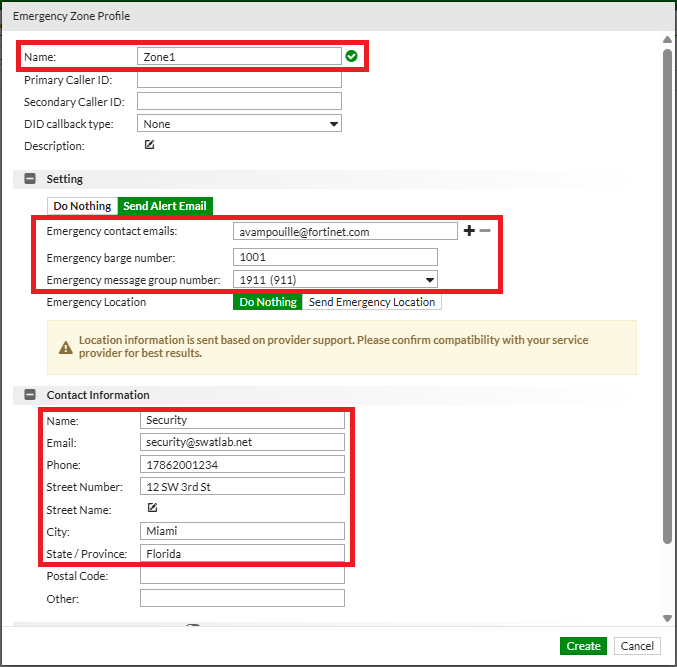
Complete the following fields to create the new emergency zone profile:
Zone1YOUR EMAIL ADDRESS10011911Securitysecurity@swatlab.net1786200123412 SW 3rd StMiamiFloridaClick the Create button at the bottom of the page to create the new emergency zone profile.
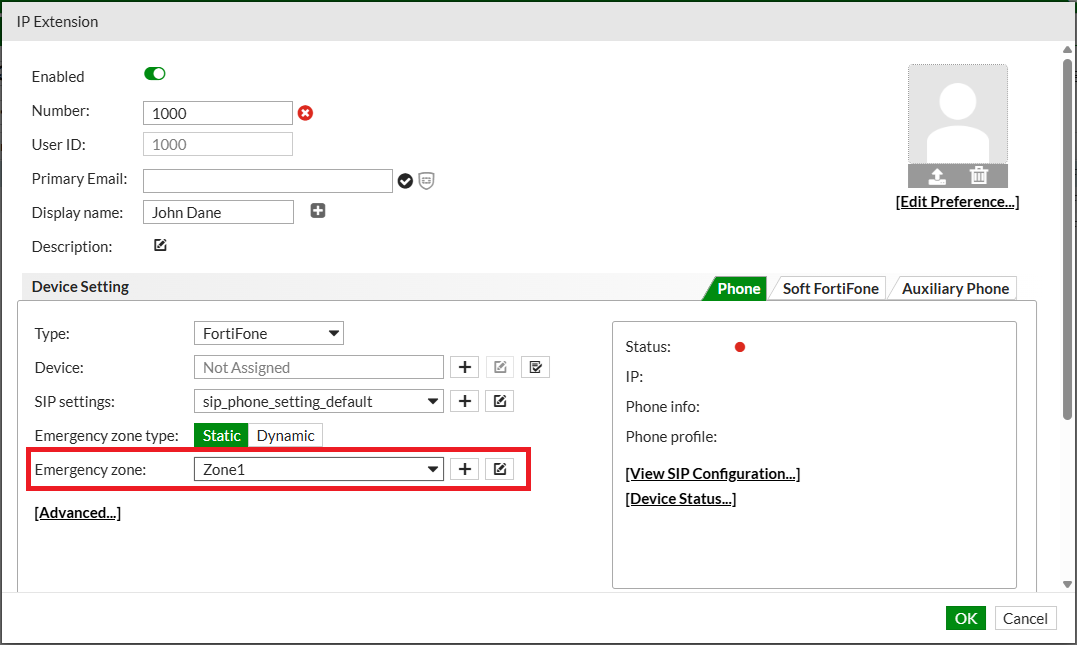
On the FortiVoice web administration page, select Extension and Extension on the left-hand menu.
Select the IP Extension tab to manage IP extensions.
Select extension 1000 and click the Edit button.

Set Emergency zone to Zone1.
Click the OK button to update the extension.
On the FortiVoice web administration page, select Call Features and Call Recording on the left-hand menu.
Select the Policy tab to manage system call recording policies.
Click the New button to create a new system call recording policy.
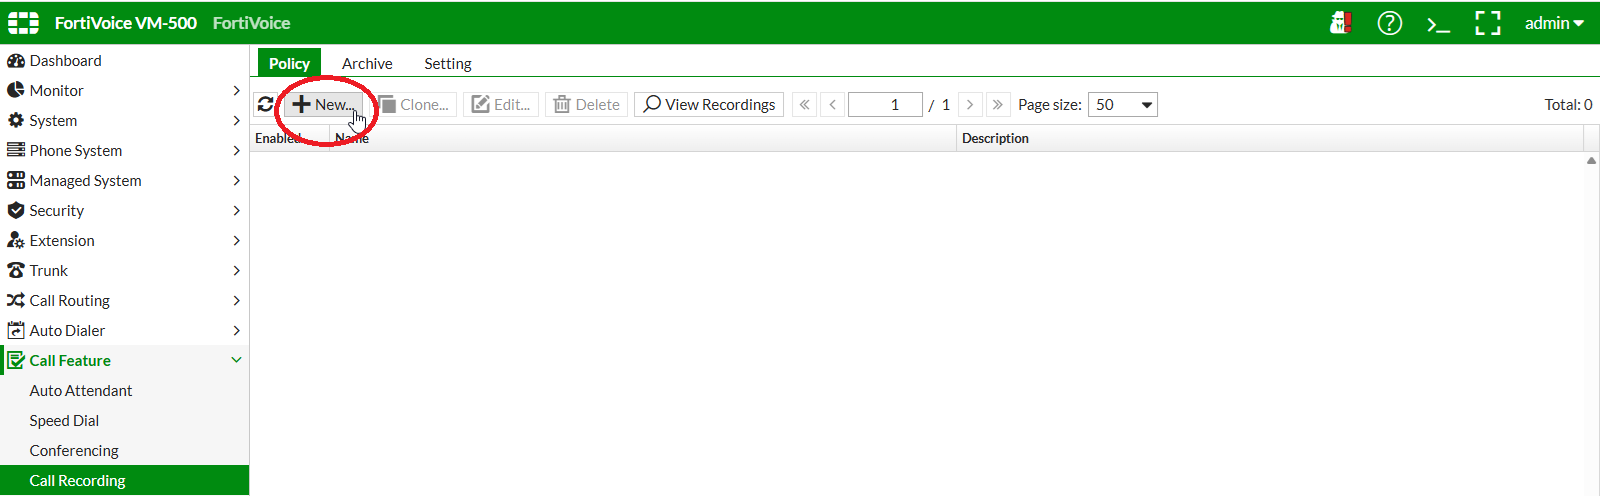
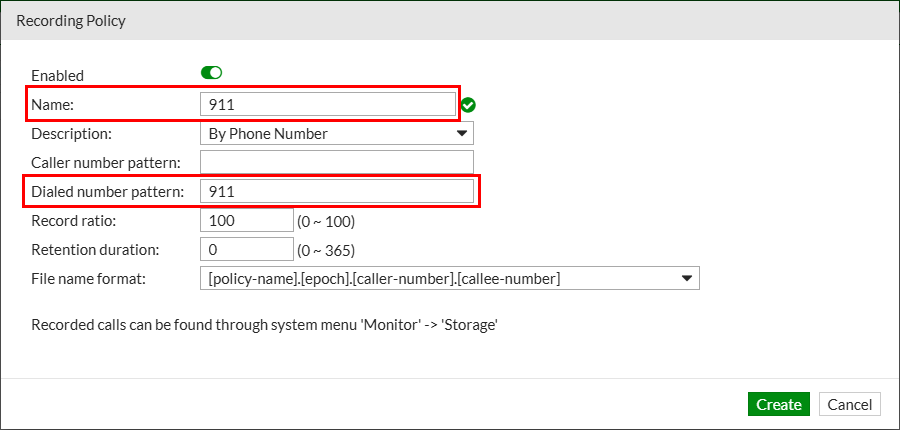
Complete the following fields to create the new system call recording policy:
911By Phone Number911100Click the Create button at the bottom of the page to create the new system call recording policy.
In this simulated E911 exercise, dialing 911 from extension 1000 routes the call to extension 1002, which was configured earlier to act as the simulated Public Safety Answering Point (PSAP). After the PSAP answers, extension 1001 should join the call through emergency barge-in and receive the configured text notification. FortiVoice also sends an email to the emergency contact address configured in the emergency zone.
Using Client 1, dial 911.
Verify that extension 1002 on Client 3 rings, and then answer the call.
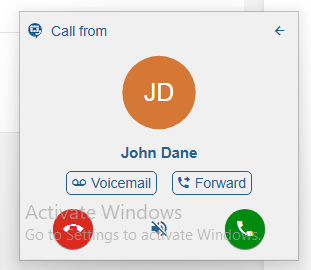
On Client 2, verify that the text notification is received and that extension 1001 joins the emergency call.
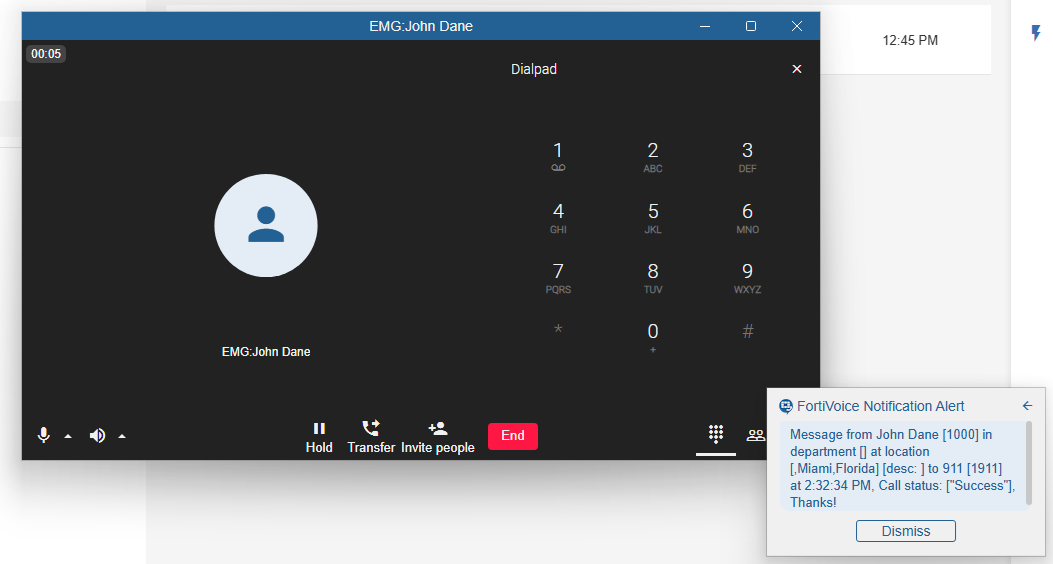
On the FortiVoice web administration page, select Monitor and Storage on the left-hand menu.
Select the Recorded Call tab to access call recordings.
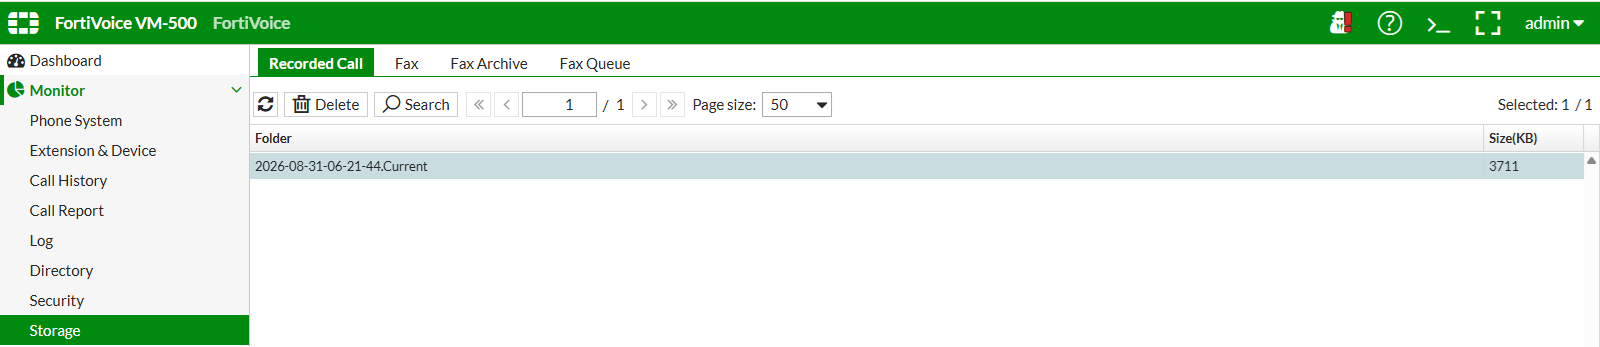
Double-click the most recent item in the table.
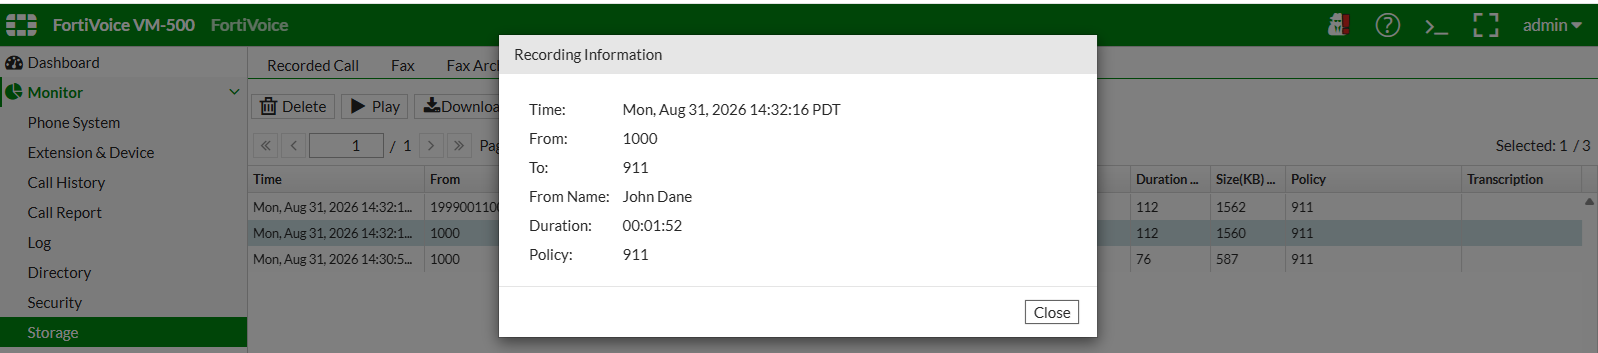
The list of 911 call records is displayed.
Select a recording to view more detailed information.
If you entered your email address as the emergency contact email in the emergency zone, verify that you received the notification email.